A Little Time Out

A Pamper Party

In amongst the hectic lives we live it is important to take a little time out every now and then to relax and pamper ourselves.  After a fairly stressful start to the year I decided that for my birthday that was exactly what I was going to do.

I wanted to be able share the experience with a few of my good friends.  I also wanted the experience to be similar to that of going to an actual day spa, but without having to leave the comfort of my own home.  I didn’t think this would work if we had to do the treatments ourselves, which meant finding a company that would do these for us.    So I went looking, and found Beauty Patrol.  Their staff are fully trained and the ladies that came to us had a lot of experience and did great work.  Beauty Patrol offer a great selection of pamper party treatment menus and at a very reasonable price, I might add.  All that was left to organise was a relaxing environment and some tasty food.

Pamper Party Image 1

Pamper Party Food & Favours

The Menu:

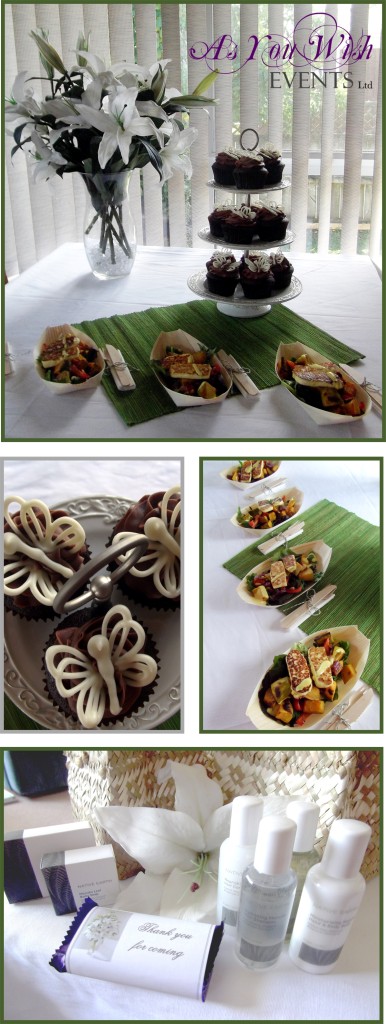
For the food I decided that a couple of fresh and healthy options would be ideal.  So we served a roast vegetable salad with Haloumi Cheese and Honey Mustard Dressing, as well as some fresh summer fruits.  And of course no pampering is complete without a little indulgence so I included some triple chocolate cupcakes.

The Favours:

I love party favours, they are a simple way of saying how much you love and appreciate your guests.  I also think for an occasion such as this it adds just that little extra to the atmosphere of luxury.  So in keeping with the natural and neutral theme, I purchased some flax ketes from the $ value store and some beauty sets off Trade Me to go in them.  I also added a chocolate bar that I wrapped with my thank you note, that matched the rest of my stationery.

Pamper Party 2

The Environment

 The Environment:

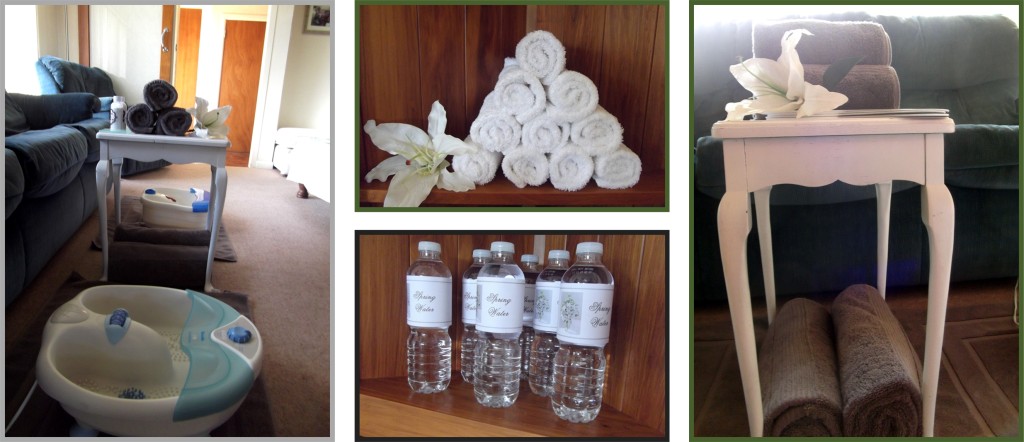
Usually when I write about parties I talk about the decorations, because they play a large role in setting the atmosphere.  However in this case setting the atmosphere was more about clearing things away, rather than setting things up.  I moved out all the unnecessary items that usually clutter our living room.  This instantly made the room more relaxing.  Then apart from a few flowers and a scented candle, everything else I put out was there to be used by my guests.  I made sure we had plenty of towels, water bottles, magazines, a couple of foot spas, and a few additional pamper products like lotions and face masks.

Summing Up:

Overall, it was everything I had hoped and planned for.   One pampered afternoon with friends.

If you have any questions or comments please feel free to share them with us in the space below.  If you’d like us to organise a pamper party for you then please contact us via email for more information.

Vendor Credits:
  • Party Printables: As You Wish Events Ltd
  • Décor & Styling: As You Wish Events Ltd
  • Catering: As You Wish Events Ltd
  • Beauty Therapists: Beauty Patrol


Some Super Ideas for Celebrating Easter

Easter is sneaking up fast on us again.  This is another of my most favourite holidays, so I’ve been out looking for some exciting ideas for our family’s celebrations.

Flower Arrangments in Eggshells

Such a simple yet sweet idea to bring a touch of Easter into your home.

As Seen On: Martha Stewart.com


Easter Table Setting

I love this table setting by Boxwood Clippings. It has a rustic elegance about it with the little nest, paper doily and coffee filters. Brilliant!

As Seen On: Boxwood Clippings


Daffodil Candy Cups

Not only is this a great craft idea to do with the family, its also a great option for those who have allergies that stop them from eating chocolate.

As Seen On:  Martha Stewart.com

The Easter Story

What a beautiful way to keep the true story of Easter central to the holiday. Aimee from ‘It’s Overflowing’, offers the template for this as a free printable on her website. I absolutely love it!

As Seen On: It’s Overflowing


Egg Votive

Another fantastic idea from Martha Stewart.com

As Seen On: Martha Stewart.com

Hot Cross Buns

I just can’t imagine having Easter without Hot Cross Buns. Why not try making your own, maybe hunt out the old family recipe or give this one a try.

As Seen On: Spoonful

Chocolate Easter Egg Nests

A fun gift idea or maybe an activity for the family.
Mmmm, I would like to try stirring one into a nice mug of hot chocolate.

As Seen On: Life and Kitchen

If you have any Easter craft ideas, favourite Easter recipes or Easter decorations that you’d like to share, we’d love to hear from you.  Just share your ideas in the comments below or send us an email.  Happy Easter everyone!

The Construction Party


The Construction Party Header

Back in February I had the privilege of designing a Construction themed birthday party for a young man who was turning six years old.  This was such a great theme to do as there was no shortage of ideas.

Party Highlights:
  • Once again I was really pleased with how the printables turned out.  Out of these the Toolbox Favour box and the little flags have to be my favourites.
  • I loved planning and making the food to match the theme.
  • I was so pleased to find yellow plastic construction party hats at a $ value store and the tool shaped erasers at Manna Christian Store in Henderson – they fitted the theme perfectly.
  • The ‘Build your own Gingerbread House’ activity was a hit, entertaining guests both young and old.
  • And probably the best part for me was the Birthday Boy’s unmistakable excitement and awe for how it all came together.

 Construction Party Blog - The Decor

Party Décor:

The weather was brilliant for this outdoor party.  As the guests arrived they were directed to the backyard by signs made especially for the occasion.  One of the first things they would have seen on reaching the backyard was the big birthday banner, from the Construction party printable collection.  We created the dining space by using the gazebo and a couple of giant road cones paired with ‘Caution’ tape.  We also used the ‘Caution’ tape to wrap around the backs of the chairs and the backdrop for the food table.  The guest table had two small road cone centrepieces and a hessian table runner, along with place settings consisting of a placemat, plate, serviette, themed drink bottle and favour box.

Party Favours:

Each guest received a construction party hat along with a Toolbox, favour box.  These were a little tricky to put together but looked great in the end.  Each favour box contained a tool shaped eraser, pencil and a ‘Builder’s Notebook’.  The covers for the notebooks were from the printable collection which we wrapped around some little notebooks we found at a $ value store.

Construction Party Blog - The Entertainment

The Entertainment:

There was no shortage of things to do at this party.  The main activity was to ‘Build your own Gingerbread House’.  Each guest was given their own ‘kit set’ containing everything they would need for building their house.  After giving a quick demonstration and appointing a couple of the dads as the foremen for the job site, we left them to it.  As the party progressed the guests played ‘Pin the Bucket on the Digger’ – simply a theme appropriate version of ‘Pin the tail on the Donkey’; played with the build a picture set and listened to our storyteller read one of the popular ‘Little Yellow Digger’ books.

Construction Party Blog - The Food

The Party Food:

This was an exciting menu to put together.  We had:

  • Chocolate Fudge cupcakes – displayed with wrappers and toppers from the Construction Party printable collection.
  • Hard hat cake pops
  • Tool-shaped cookies
  • Mini Boulder Burgers – displayed with little flags from the Construction Party printable collection.
  • Popcorn served in cones from the Construction Party printable collection.
  • Drill bit curly fries
  • Road Works Pudding Cups.

The buffet table was set up using a variety of toolboxes and an old nail box along with a few other pieces we had handy.  We used labels from the Construction Party printable collection to tie everything together.  At the centre of the buffet table was the amazing ‘Digger’ birthday cake made by a family friend.

Summing Up:

Overall this was a fabulous party to put together.  The most challenging part was dealing with the heat from the sun – but once we had everything properly positioned under the gazebo and umbrella we were good to go.  Everyone seemed to enjoy themselves, especially the Birthday Boy.

If you have any questions or comments regarding how we put this theme together or if you would like us to create a party for you then please contact us either via email or through the comments section below.

 Vendor Credits:
  • Party Printables: As You Wish Events Ltd
  • Décor & Styling: As You Wish Events Ltd
  • Catering: As You Wish Events Ltd
  • Photography: Christine Kehinde
  • Cones hired from Hirepool
  • Caution tape purchased at Super Cheap Auto


Counting Down to Valentines Day – Part 1

Every Valentine’s Day celebration needs a yummy sweet treat to accompany it and this idea I found on the Sprinkle Bakes website couldn’t be more perfect.

Chocolate Cupcakes with Flaming Strawberries

Chocolate Cupcakes with Flaming Strawberries

What could be more Valentines Day than Chocolate and Strawberries, but then to add the fiery flare of the flambé truly gives this dessert a unique twist.  I must admit that I’m a bit of a pyromaniac, having grown up in a family that really enjoys fireworks, and a lover of all things that sparkle and shine which is why I think this idea appeals to me so much.

Heather at Sprinkle Bakes has all the fabulous instructions on her blog, all the links in this post will take you there.  I do suggest you practise the technique of flambé beforehand as it can be a bit tricky – Heather has some great tips for this on her blog also.  So have fun, be creative, but still do be careful – it is fire you’re playing with after all.

Fairy Princess Party


Fairy Princess Party

One of my earlier printable designs recently underwent a fairy-makeover for my niece’s 5th birthday party.  The weather was just perfect for the outdoor party which took place in their back yard last weekend.

Party Highlights:
  • The pretty pink and white ‘Fairy Princess’ party printables.
  • The Dress Up stations with ornate pink mirrors.
  • Gran dressing up as the ‘Fairy Grandmother’ who read the guests a beautiful book in the ‘Storytime Tent’.
  • The Fairy Princess Pudding cups and Fruit Wands.
  • And when I asked my niece her favourite thing she said “the presents”.

Fairy Princess Party Pt1

Party Décor:

This time around we started out with our party printables which gave us the colour scheme of pink and white and a splash of purple. Much of the décor was determined by the activities we had planned.  I had some old white carpet runners sitting in my storeroom waiting to be thrown out, but instead I decided to cut them down to mat sizes and draw designs on them.  I then used these to define the areas for eating, dress up and story time.  I wanted to keep the eating area looking clean and bright – which was achieved through the use of white tablecloths and a white satin backdrop. This also created a background on which the party printables could really stand out.  A few other items I had in my storeroom were the two little white tables that I was able to pair with ornate pink mirrors from The Warehouse to create child-sized dressing tables for the Dress Up station.  The ‘Storytime Tent’ was made from a Mosquito Net that I got on special at Briscoes along with all the cushions I could find.

 Party Favours:

As part of the party printable set, we designed a lovely little handbag box.  In each box was a mini chocolate bar, a pink balloon, a sparkly hairclip and a lip gloss.

Fairy Princess Party Pt2The Entertainment:

Instead of games we opted for three activities.  We had the ‘Make Your Own Wand’ craft; the Dress Up Station and Story time.  As the guests arrived they were able to join in with making their own wand and once they were done they were free to play with the dress ups or wherever else there imagination took them.  Towards the end of lunch we sung happy birthday and the beautiful cake was cut.  At the same time Gran came out dressed up as the ‘Fairy-Grandmother’ to read all the guests the story of ‘The Rose Princess and the Special Gift’.  This was then followed by the opening of the presents.

Fairy Princess Party Pt3

The Food:

On the menu we had:

  • Castle Club Sandwiches – these were served in little lunch boxes placed at each guest’s place setting.
  • Crinkle Cut Fries
  • Popcorn
  • Chicken Bites – served in little cupcake cases purchased at Countdown.
  • White Chocolate Cake Pops
  • Vanilla Cupcakes – displayed with wrappers and toppers from the Fairy Princess printable collection
  • Fairy Princess Pudding Cups
  • Fruit Wands
  • And a mini candy buffet with 3 types of theme coloured lollies.

The buffet was set up using a collection of glassware, white platters and a box that I covered in stripy paper.  The fabulous centrepiece on the buffet was the amazing doll cake made by Sweet Bites Cakes – a decadent chocolate mudcake – yummy!

Summing Up:

It was really fun to transform my sister’s backyard into a fairy princess’ garden.  Everyone seemed to enjoy themselves having plenty of activities do and yummy treats to eat.

If you have any questions or comments regarding how we put this theme together or if you would like us to create a party for you then please contact us either via email or through the comments section below.

Vendor Credits:
  • Party Printables: As You Wish Events Ltd
  • Décor & Styling: As You Wish Events Ltd
  • Catering: As You Wish Events Ltd
  • Photography: Adam Ferris
  • Cake: Sweet Bites Cakes


A Brownie S’mores Trifle – WOW!

I recently discovered on Momendeavours.com a recipe for exciting new take on the trifle.  A Brownie S’mores Trifle – it looked and sounded so amazing I just had to try it.  Christmas day seemed like a great opportunity.  My Mum-in-law (we were with the in-laws for Christmas) was happy for us to try out something new, because in previous years there always seemed to be heaps of the traditional trifle leftover and it usually ended up going to waste.

Brownie-Smores-Trifle-516x1024

Oh so yummy!

 As seen on Momendeavors.com

The full recipe in available on Momendavors.com with great instructions and photos – but as it is an American based site these are my ‘available in New Zealand’ substitutions:

Brownie S’mores Trifle Ingre­di­ents:

  • 1 box brownie mix (or your favourite from scratch recipe) – Personally, I’d go with a ‘from scratch recipe’ but the box mix works as well.
  • 1 large box or 2 small of instant choco­late pud­ding (approx. 4 cups) – This is basically 2 of the standard sachets that are available in Kiwi supermarkets. 
  • 1 sleeve of gra­ham crack­ers, bro­ken (about 9 crackers) –  I believe that the closest match we have is the Wheaten Digestive Biscuits.
  • 1 tub of whipped topping – I used freshly whipped cream.  A 300ml bottle seemed to be enough.
  • 1 small jar of Marsh­mal­low Crème – I couldn’t find this in the supermarkets at the time, so we made our own using a recipe from Chow.com (click here for the recipe), however I have since seen it in the spreads section at Pak ‘n’ Save.  Just as a side note, if you do decide to make your own Marsh­mal­low Crème using this recipe in NZ we call corn syrup, glucose syrup.
  • 1 C mini marshmallows – These are readily available in most Kiwi supermarkets.
  • optional: 1 Hershey’s Bar – Occasionally you’ll find these in the stores, otherwise chocolate buttons work too.

We greatly enjoyed our trifle on Christmas day this year and there were no leftovers that went to waste.  Thanks Momendeavors for this great recipe.  I hope to make it again soon.


Sundae Buffet

12 Days of Christmas Ideas – Day 12

Well here we are – Day 12 of ’12 Days of Christmas Ideas’.  So many ideas to choose from yet somehow I managed to whittle it down to 12 of my favourites.  Today’s idea is not only a favourite of mine, but a favourite with everyone whenever I set one up.  It is the Sundae Buffet.  Plus with today’s idea we are offering a free download of Christmas tags and buffet labels.

Sundae Buffet for Christmas Day

I have done Sundae Buffets for a few years now and whether its for children or adults they always prove to be popular.  Being that Christmas Day can often be a hot one here in New Zealand I thought it would be great to create one that is very Christmassy and will go well along side Christmas Dinner.  A simple solution to dessert – they are fairly easy to set up and most of the prep-work can be done well in advance.  Not only that they look incredible!

For this Sundae Buffet I have used dishes that I have collected over the years (mostly from my grandmothers when they cleaned out their china cabinets), but you can use anything to hold your toppings.  It doesn’t need to be a great expense. I’ve seen people use paper bags and terracotta pots.  I suggest you look around your home and see what you have available.  If you decide you do need to buy some dishes try the second hand shops, they often will have a variety of suitable dishes.

Sundae Buffet Topping Ideas

It’s so easy to get carried away with the number of toppings you add to a Sundae Buffet.  Keep in mind that a little can go a long way. I always like to start with either Vanilla or French Vanilla Ice cream, that way it keeps the toppings as the main feature and flavour.  I then work at having a selection of toppings from the following categories: Sprinkles; Sauces; Fruit (Fresh or Frozen) and Sweet Treats.  Depending on the occasion I might add a few extras – for example being that this Sundae Buffet was a Christmas theme, I added the little Gingerbread Men.

For the sprinkles I started with the chocolate drops, then chopped up some shortbread biscuits and walnuts.  I also decided I just had to have some Christmas coloured candies and 100s and 1000s.  I found an online candy store (based in NZ) called Crazy Candies.  Their candies are sorted by colour which meant I could easily find what I wanted. I ended up buying one pack of their red chocolate gems and one pack of their green chocolate gems.  I was very impressed with their service and how quickly they delivered.  To get the mix of 100s and 1000s that I wanted I ended up buying one packet of each colour and mixing them myself.  I got mine from an awesome little cake decorating shop in New Lynn, Auckland called Miss Bon Bon.  If you do plan to visit, try and go on a Friday as it is cupcake day and they are just divine.  You can place orders with them over the phone if you live further afield. Alternatively Pretty Baker have a good online store that also supply these.

For the sweet treats you can have anything you fancy.  I like to keep them bite size since it’s it really just about having a taste and you don’t want them to take up the entire sundae cup.  For this Christmas theme I went for mini Christmas mince tarts, Christmas cake and mini chocolate éclairs.  For the Sauces I always feel that 3 is a good number – in this case I choose Maple Syrup,  Homemade Mixed Berry Sauce and Homemade Chocolate Sauce.  Lastly I added in the fresh Strawberries.

Sundae Buffet Topping 2

Once you have your toppings all sorted it’s just a matter of setting it up, putting out the sundae dishes ( I suggest using small ones – people can always come back for seconds) and adding the buffet labels.  You can either make your own our download our editable designs.

Download Christmas 2013 Tags & Buffet Labels

So that brings us to the end of our ’12 Days of Christmas Ideas’.  We’d love to hear your feedback about any of the ideas and if you decide to try out any for yourself we’d love to hear how you got on.

Merry Christmas, may your countdown to Christmas 2013 be creative, low-stress and most of all enjoyable.

The Cookie Swap Party

12 Days of Christmas Ideas – Day 10

Home baking is a lovely treat to offer family and friends when they pop in for a visit over the Christmas period.  It is also a great and inexpensive gift idea.  Having a variety available for both instances can be a lot of work which is why (as promised on Day 2 – Planning Tips for Christmas) I would like to share with you the second of the two party ideas that will help you prepare for Christmas. It’s the Cookie Swap Party.

The Cookie Swap Party is somewhat of a new concept to us here in New Zealand, but I think it is a fantastic idea for getting friends together to achieve a common goal.  Here’s how it works.

1. The Planning

Invite a few of your friends to participate.  I think 5 – 8 people is a nice number.  Each person bakes one dozen of cookies per person attending, plus 1 extra dozen for tasting during the party.  So if you have 5 people coming, each person would need to bake 6 dozen cookies.  That may seem a little scary at first but if you choose a recipe that yields a large quantity to start with and has a short baking time then all you need to do is double the recipe once and within an hour or so you should have all the cookies you need.  Another planning tip is when your guests confirm their participation, ask them what type of cookie they plan to bring.  This way you can be sure to have a good variety on the day.

2. The Cookies

A couple of points to consider when choosing your cookie recipe:

  • Make sure that they are a cookie that will handle being transported – you don’t want the cookies crumbling to pieces before they reach their intended recipients.
  • If the recipe calls for the cookie to be kept in the fridge then it is not a good recipe to choose – you don’t want them to spoil before they reach their intended recipients.
  • You might also like to find out if any of your friends would like a gluten and dairy free option in which case I found the most amazing recipe for Coconut Flour Snickerdoodles. Yum, Yum!

The Cookies - gingerbread

When everyone arrives for the party layout the cookies for swapping on the table.  Label the cookies so everyone knows what they are getting.  If there are gluten and dairy free options make sure everyone knows which ones these are.  Before the swapping begins remind everyone that they can take one dozen of each type of cookie, including one dozen of their own.  If people are gift wrapping their cookies then they probably won’t want to take all their cookies at once, so offer paper and pens for people to keep track of what they take.


3. The Tasting

Set up the cookies for tasting in a space separate from the swapping cookies.  Be the polite hostess and offer your guests a beverage when the arrive, but also set up a little refill station so they can help themselves later if they would like another one – this way you can concentrate on wrapping your cookies and enjoying their company.

The Tasting

Tasting the cookies is my favourite part.  It’s great that the refreshments for the party are provided without any extra effort, but I think it is even better that everyone then knows exactly what it is they are wrapping as gifts or taking home.  It’s also a great opportunity to swap recipes if something really takes your fancy.


4. The Wrapping

The last thing you’ll need to set up is a wrapping station.  Gather together a range of wrapping supplies.  You can choose whether you supply these yourself or if you ask your friends to contribute.  Things you could include are ribbons; favour boxes; disposable plates; recycled cans, boxes and jars that could be decorated and Christmas paper for making boxes or gifts bags.  Cellophane and lunch wrap paper are also handy to have. One idea a friend of mine suggested was to buy little glass dishes from the second hand shop and wrap the cookies up in these.  You’ll also need things like scissors, glue stick, rulers, sticky tape etc. along with anything else you might want in order to achieve your desired results.The Wrapping

Once everything is set all that is left to do is start swapping, wrapping, eating and chatting.

The photos in this post were taken at a Cookie Swap Party I had with my friends over the weekend.  It was a lot of fun, catching up, eating cookies and being creative.  I wish you just as much fun, should you try this idea with your friends.

Shot Glass Appetisers

12 Days of Christmas Ideas – Day 9

What is any social gathering without nibbles or appetisers?  For many years it was the good old chips and dip or nuts and raisins.   More recently it seems to be the deep fried mini spring rolls and samosas served with sweet chilli dipping sauce.  Now most guests would probably be happy any of these options, but why not step out of the box and wow your guests with any, or all, of these fresh and tasty shot glass appetiser recipes.

 Veggie Shooters

Veggie Shooters

Ingredients:  Your favourite dip, veggies like carrots, celery and capsicum cut into sticks.

My favourite dip is the Classic Kiwi dip that uses the Nestle Reduced Cream and Maggie Soup – although I like to swap the Onion soup mix for a Tomato or Tomato and Onion soup mix.  Other alternatives you could use are hummus or guacamole.

Put a couple of teaspoons of dip in the bottom of a shot glass and add the veggie sticks.


Satay Chicken Skewers

Satay Chicken Skewers

Ingredients:  400g of chicken breast chopped into pieces approximate 2cm in size. Two bottles of Watties ‘Bit On The Side’ Java Satay Sauce.

Mix the chicken with one bottle of the satay sauce, then leave in the fridge to marinade overnight or for at least a few hours.

Soak the wooden skewers in cold water for at least an hour, then thread at least 3 pieces of chicken onto each one.  It should make approximately 25 skewers.  Cook them on the BBQ, in the frying pan or under the grill.  To serve, place a couple of teaspoons of the remaining satay sauce into each shot glass and serve with a skewer on top.


Lamb Skewers with Tzatziki

Lamb Skewers with Tzatziki

  • This recipe is based on one that I found in the ABC Delicious Cookbook named ‘Let’s Entertain’. 
  • It makes approximately 25 skewers.

Skewer Ingredients: 500g lamb mince; 3 garlic cloves; 1 tsp ground cinnamon; 1 tsp ground cumin; 1/2 tsp paprika; 1/4 tsp of salt; 2 Tbsp greated lemon rind; 1/4 cup of olive oil.

Tzatziki – 1 Lebanese cucumber; 400ml of Greek yoghurt; 4 cloves of garlic; 3 Tbsp of mint chopped; 1 Tbsp of lemon juice


To make the skewers, place all the ingredients in a bowl and mix together well using your hands.  Mould small oval shapes onto each skewer.  Put them into the fridge until you’re ready to cook them.  When you’re ready, cook them on the BBQ, in the frying pan or under the grill.

To make the Tzatziki, halve the cucumbers lengthwise and remove the seeds but leave the skin on. Grate it into a bowl, sprinkle it with salt and set it aside for 15 minutes.  Rinse the cucumber well, place in a clean tea towel and squeeze all the moisture out.  Place it back into the bowl and add the remaining ingredients, mix together well and add salt and pepper to taste. To serve, place a couple of teaspoons of Tzatziki into a shot glass and serve with a lamb skewer on top.


I like many things about this idea.  Firstly they look fabulous and very appetising when put on the serving tray.  There is just something about individual serves that captures people’s interest.  Secondly, each of these recipes is full of flavour and offers a healthier fresher option to their deep fried counterparts.  Lastly, they eliminate those infamous double dippers that we all dread.

Now if you don’t have a supply of shot glasses on hand, then there is no need to fret you can still make this idea work.  Most supermarkets and even the ‘$2’ type stores sell little plastic tasting cups that work just as well and are usually a very reasonable price.  But I would say that any little, food safe containers that you have available could be used.

So enjoy the recipes, and have fun wowing your guests.  And if you have any tried and true ideas for other shot glass appetisers or what to use as little containers we’d love to hear from you in the comments section below.

Chocolate Christmas Tree Centrepiece

12 Days of Christmas Ideas – Day 7

I like table centrepieces.  They look pretty and are a simple way to decorate for a special occasion.  In fact whenever I am styling an event, one of the first things we consider are the table centrepieces.  They draw in the guest’s attention and help to set the atmosphere for the occasion, and I believe this true whether you have 20 tables at a wedding or just the one for Christmas day dinner.

A friend mentioned today’s Christmas idea to me a few years back, but it has only been in the last few months that I decided to give it a try.  And here it is, ’The Chocolate Christmas Tree Centrepiece’.   It took me couple of tries to get this to work, but once I had the right materials it came together very quickly.

Chocolate Tree 1

The Chocolate Christmas Tree Centrepiece

How I did this was to start with a cone.  You could make one out of card or stiff paper but I just bought a polystyrene one from the craft section at The Warehouse.  I then covered the cone with baking paper, using two flat head sewing pins to hold it in place.  Then I sat it on a small ramekin so that it wouldn’t get stuck to the plate when I put the chocolate on it.  I melted the dark chocolate buttons in the microwave and allowed it to cool just enough so that I could handle it once it was in the piping bag.  Using a small round tip icing nozzle, I drizzled the chocolate all over the cone.  Once it set hard I removed the cone and gently peeled away the baking paper.  The easiest way I found to do this was by pushing a bamboo skewer into the polystyrene, then as I pulled it out I gave it a slight twist and it brought the cone out with it.

From there all that was left to do was to display the chocolate tree.  I chose to use a cake stand with some artificial greenery and Christmas tree baubles – but you could use anything you like.

If you decide to give this idea a go, I would love to see your finished product.  Either email me or leave a comment below.


My tips for working with Chocolate:

  • Your tree is less likely to collapse when you remove the cone if the chocolate has set hard.  Some chocolates seem to set harder like dark chocolate or cooking chocolate, but it is also important to consider the temperature of the room – the cooler the better.
  • When melting chocolate in the microwave, cook for short periods of time only and always at 50% power.  Stir well between each cooking time and be patient.  If you rush the process you’re likely to ruin the chocolate.