Delightful Decoupage Décor

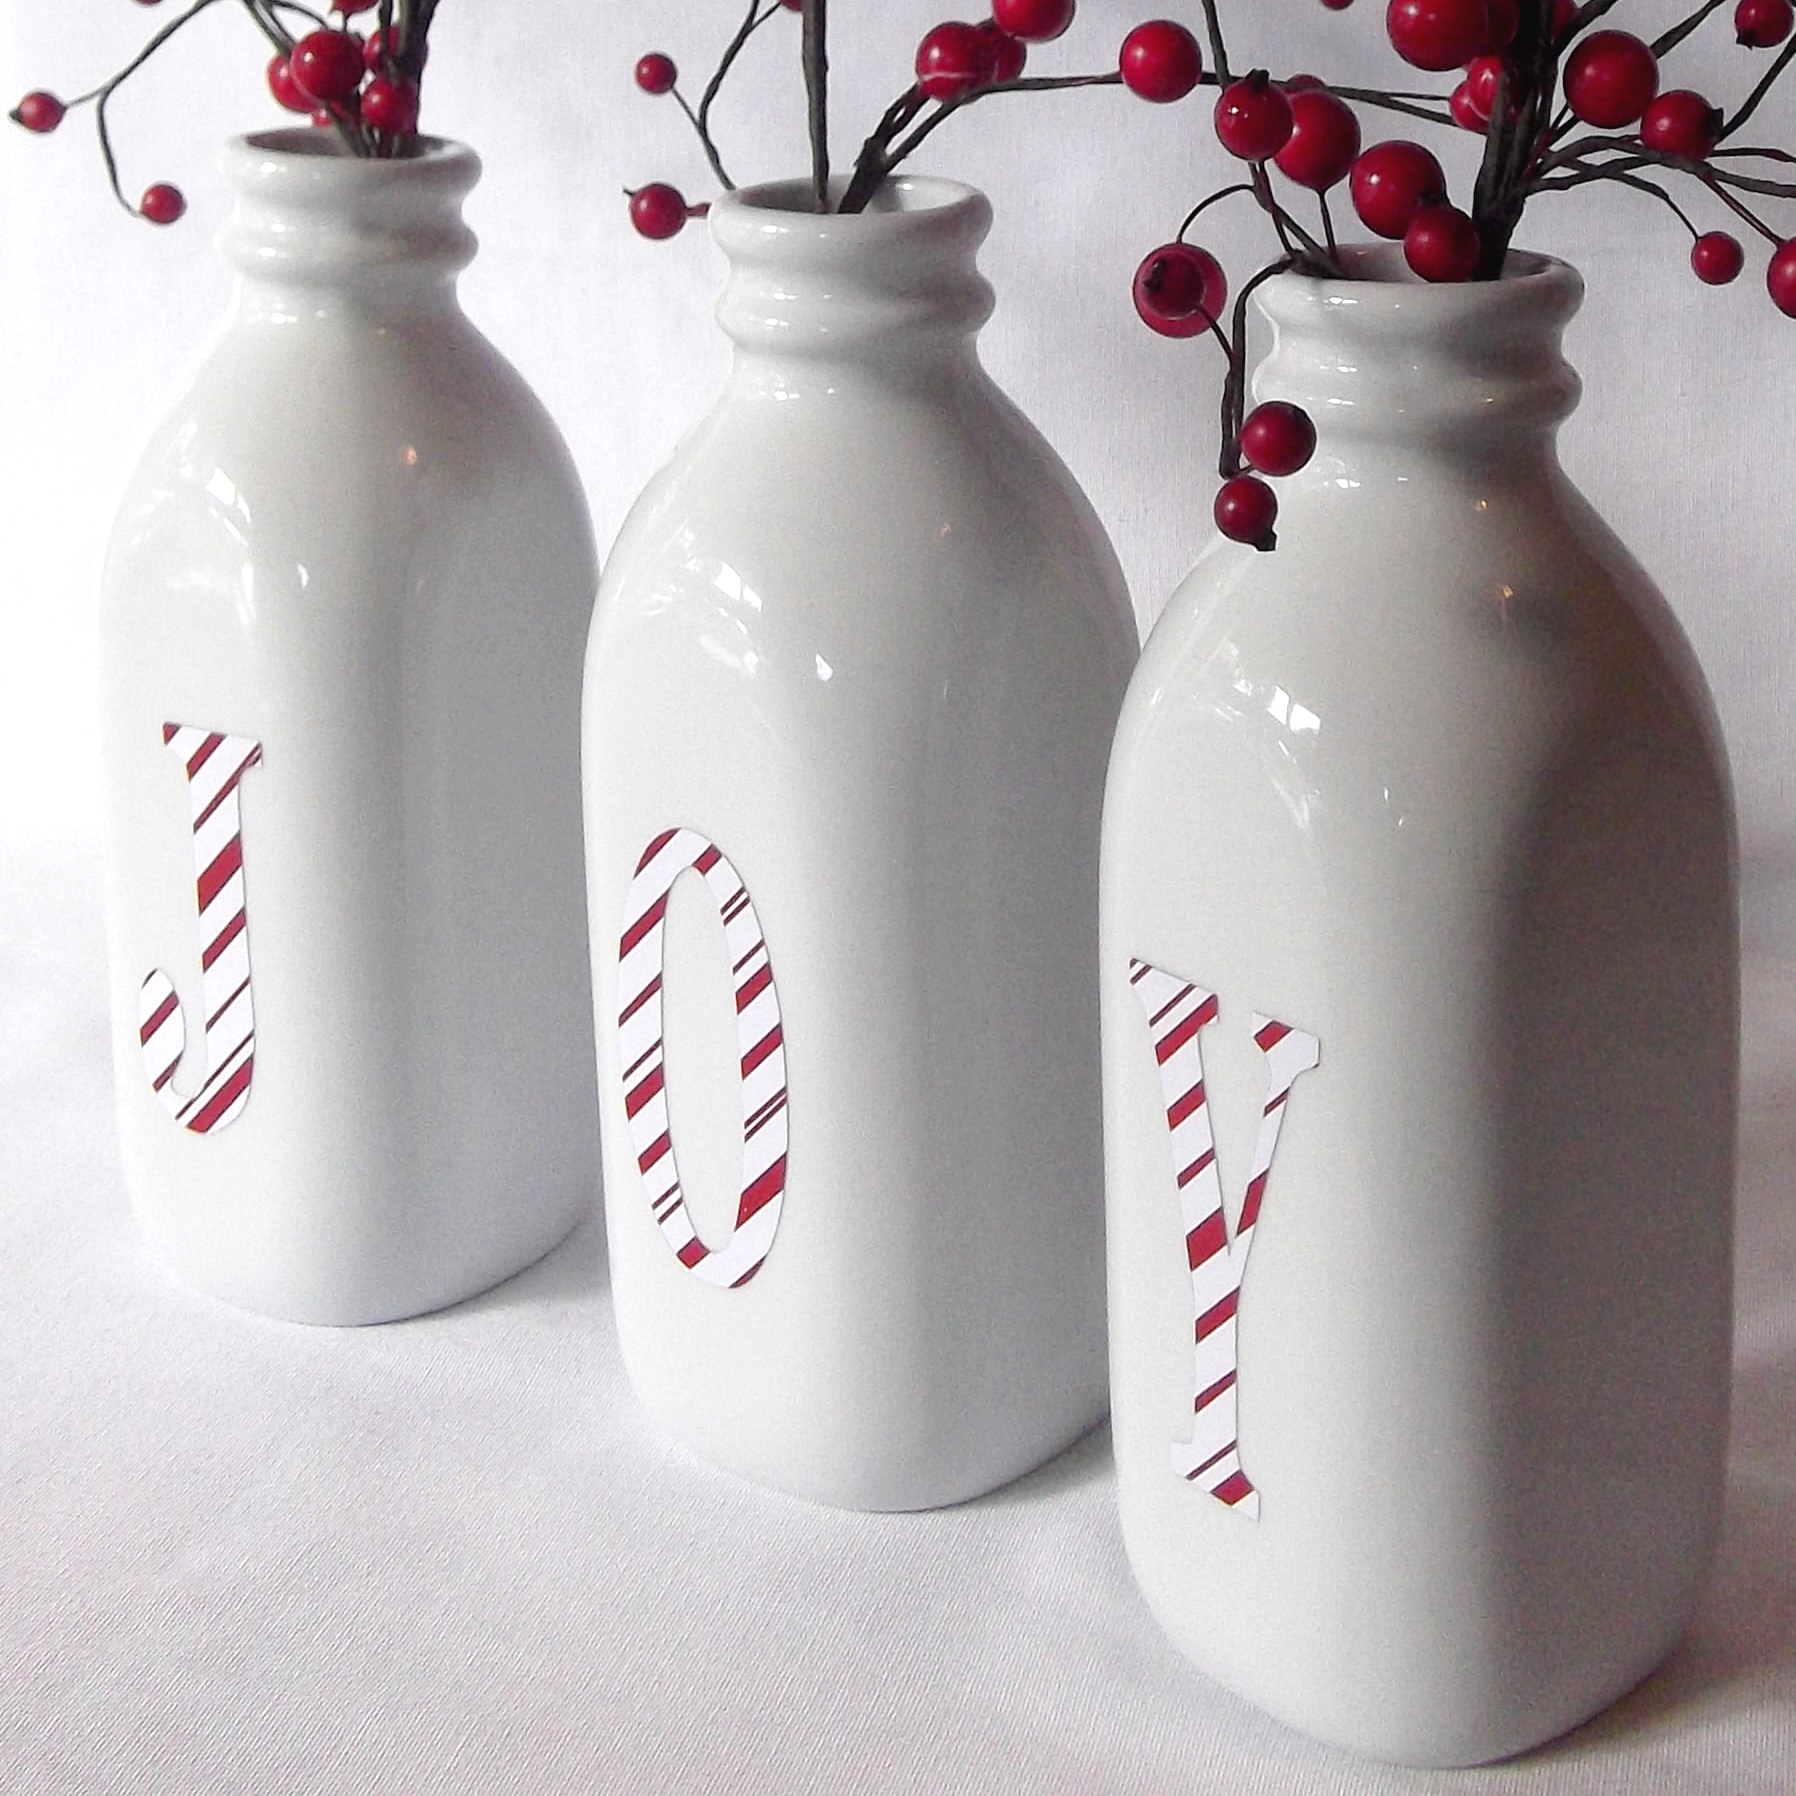
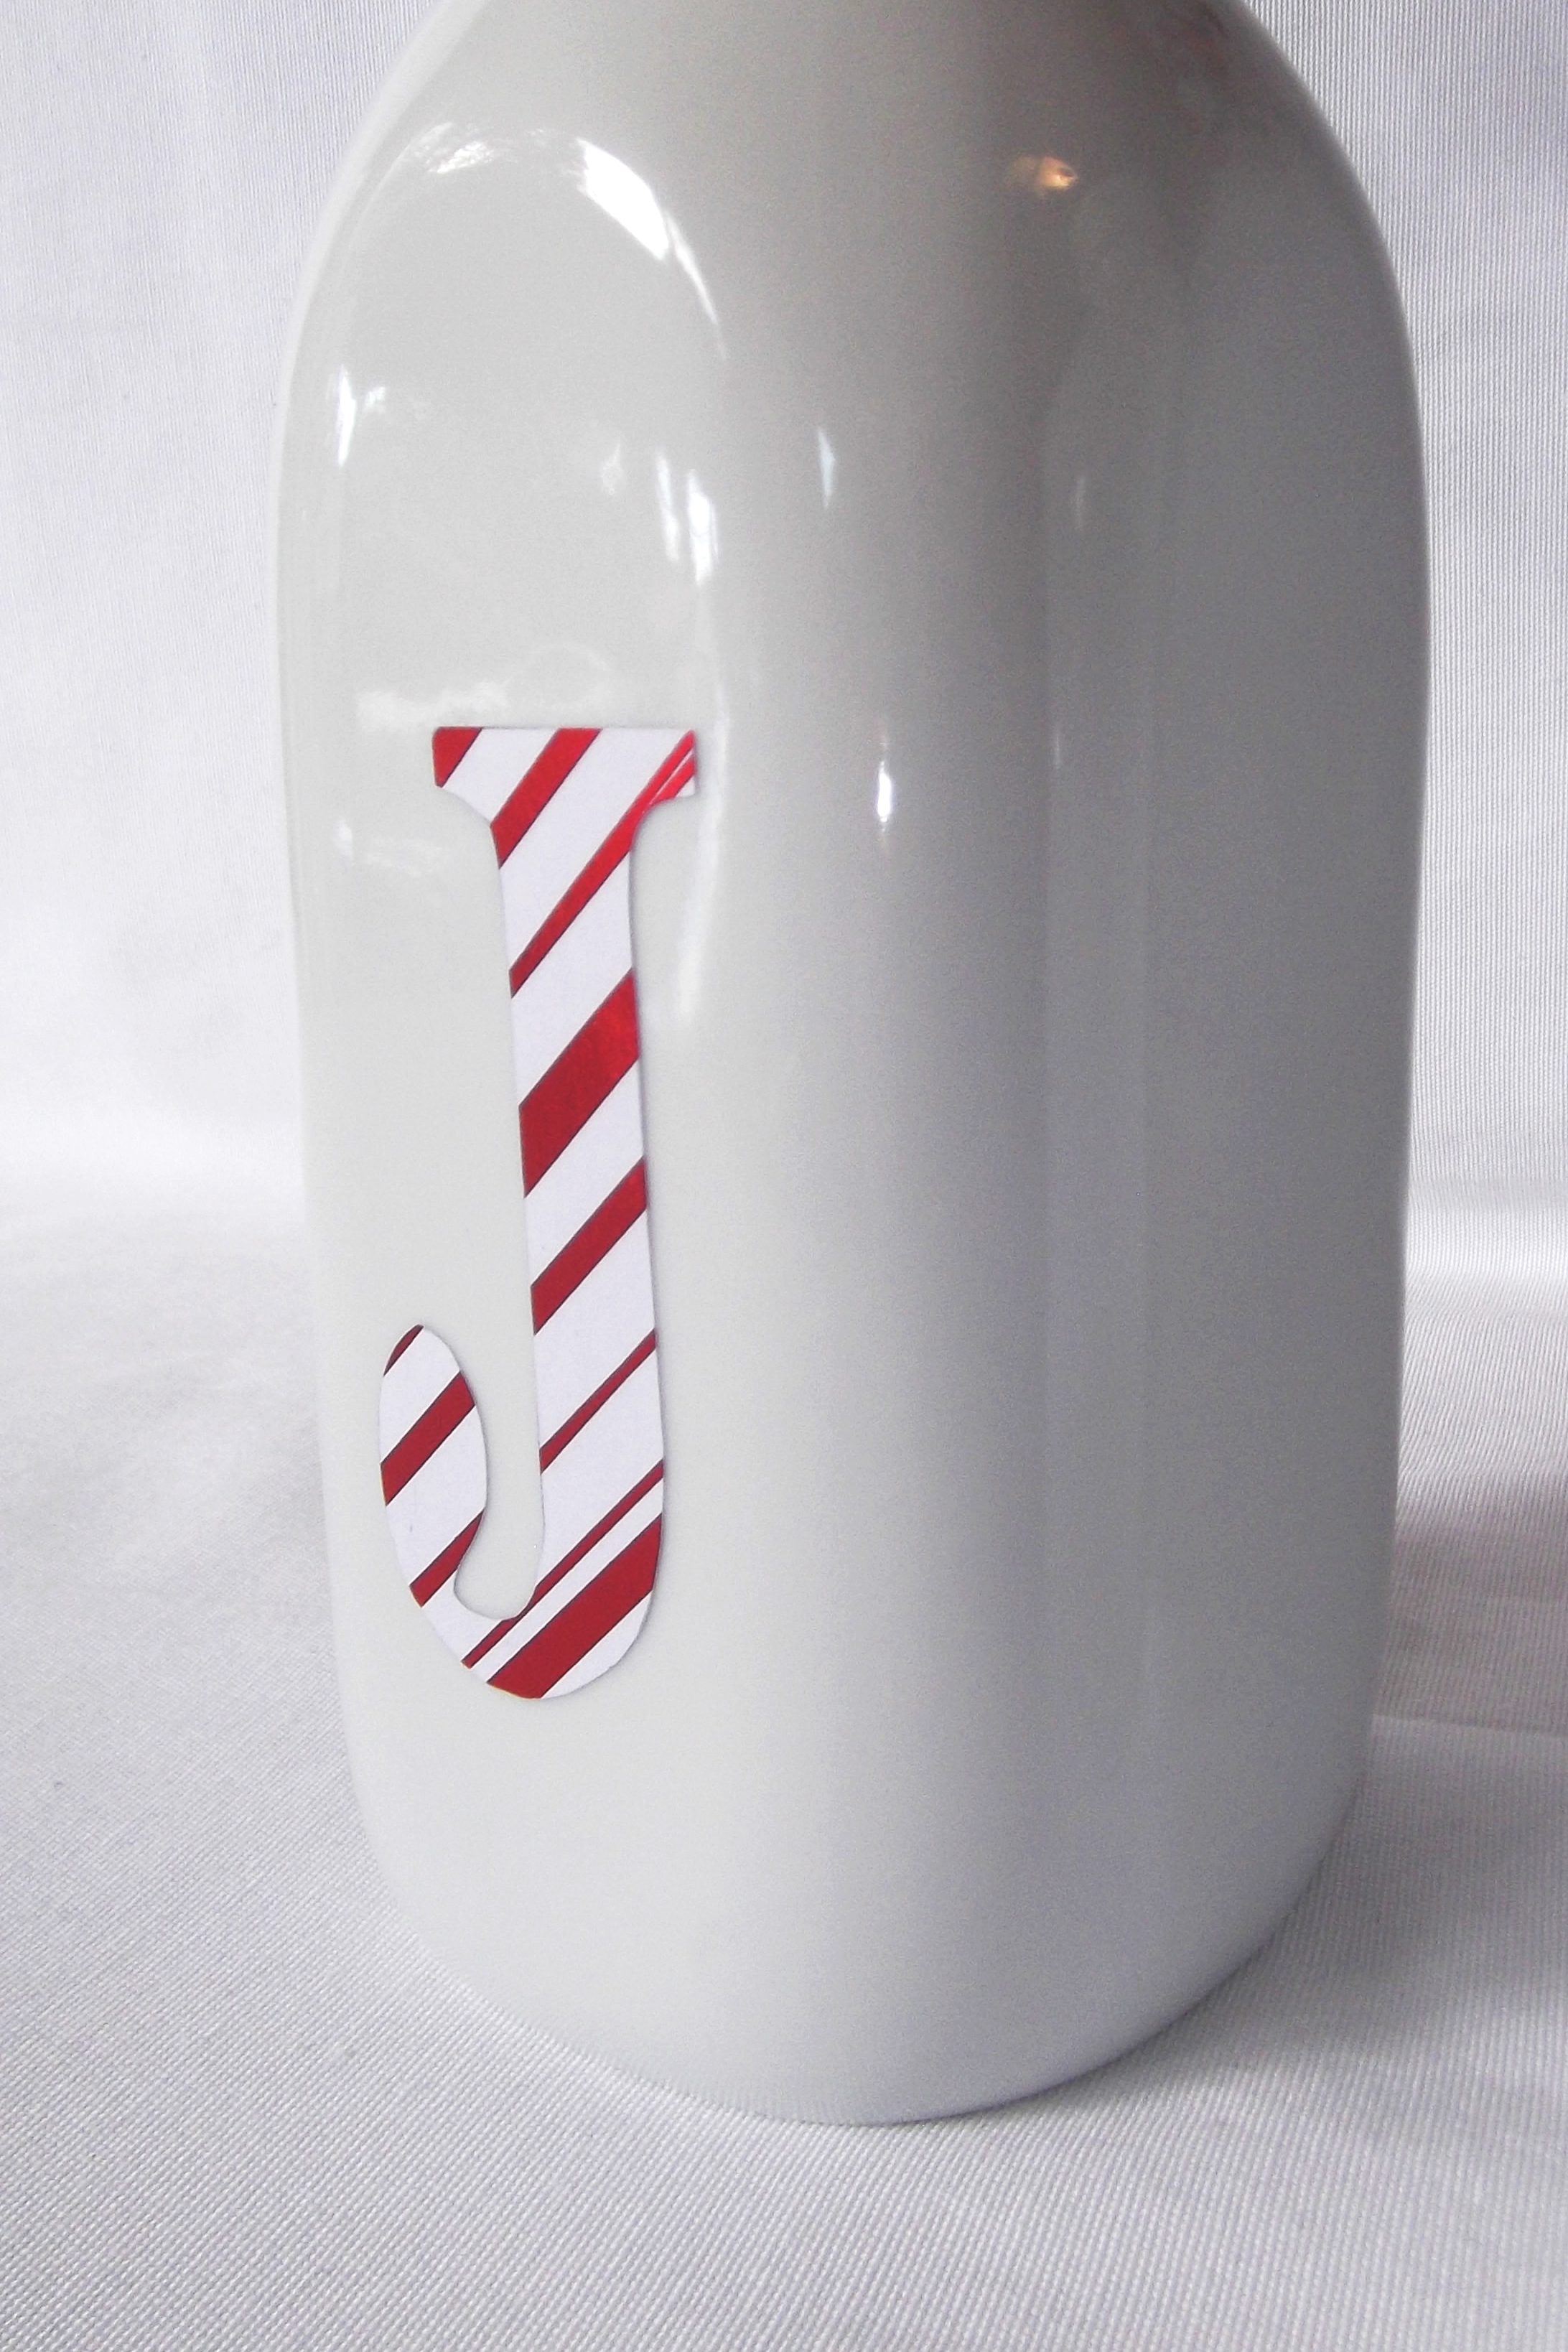
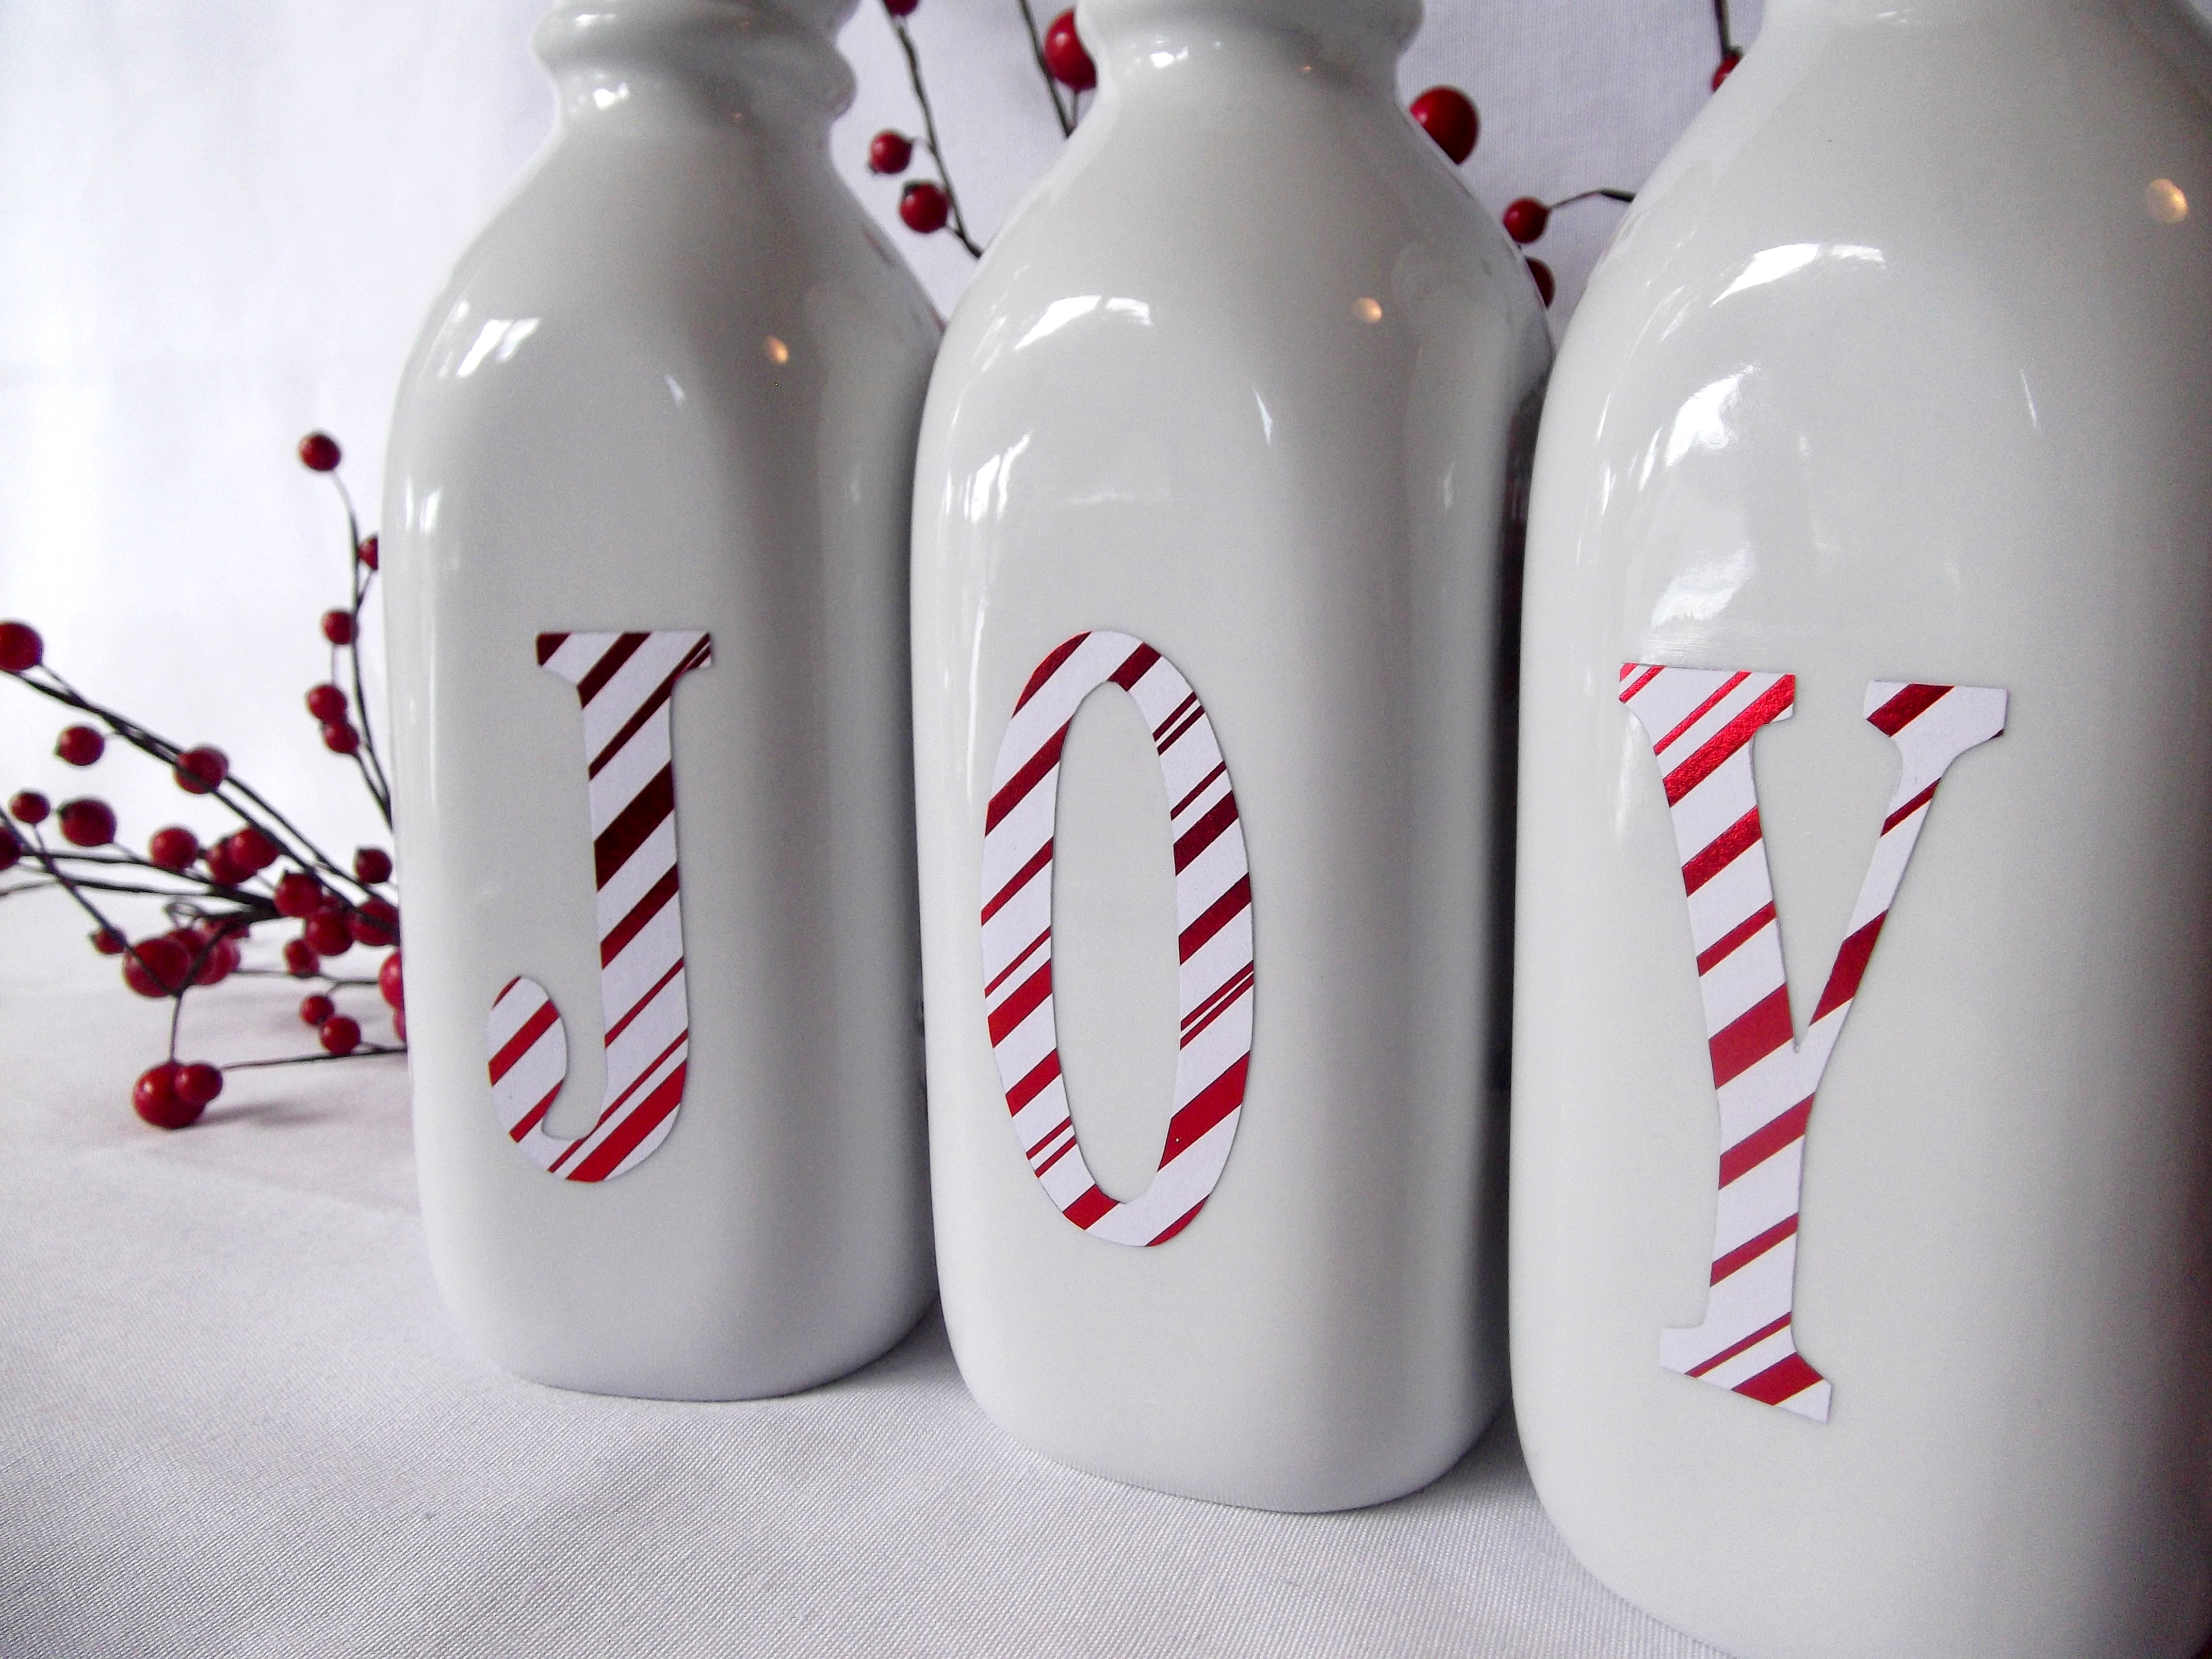
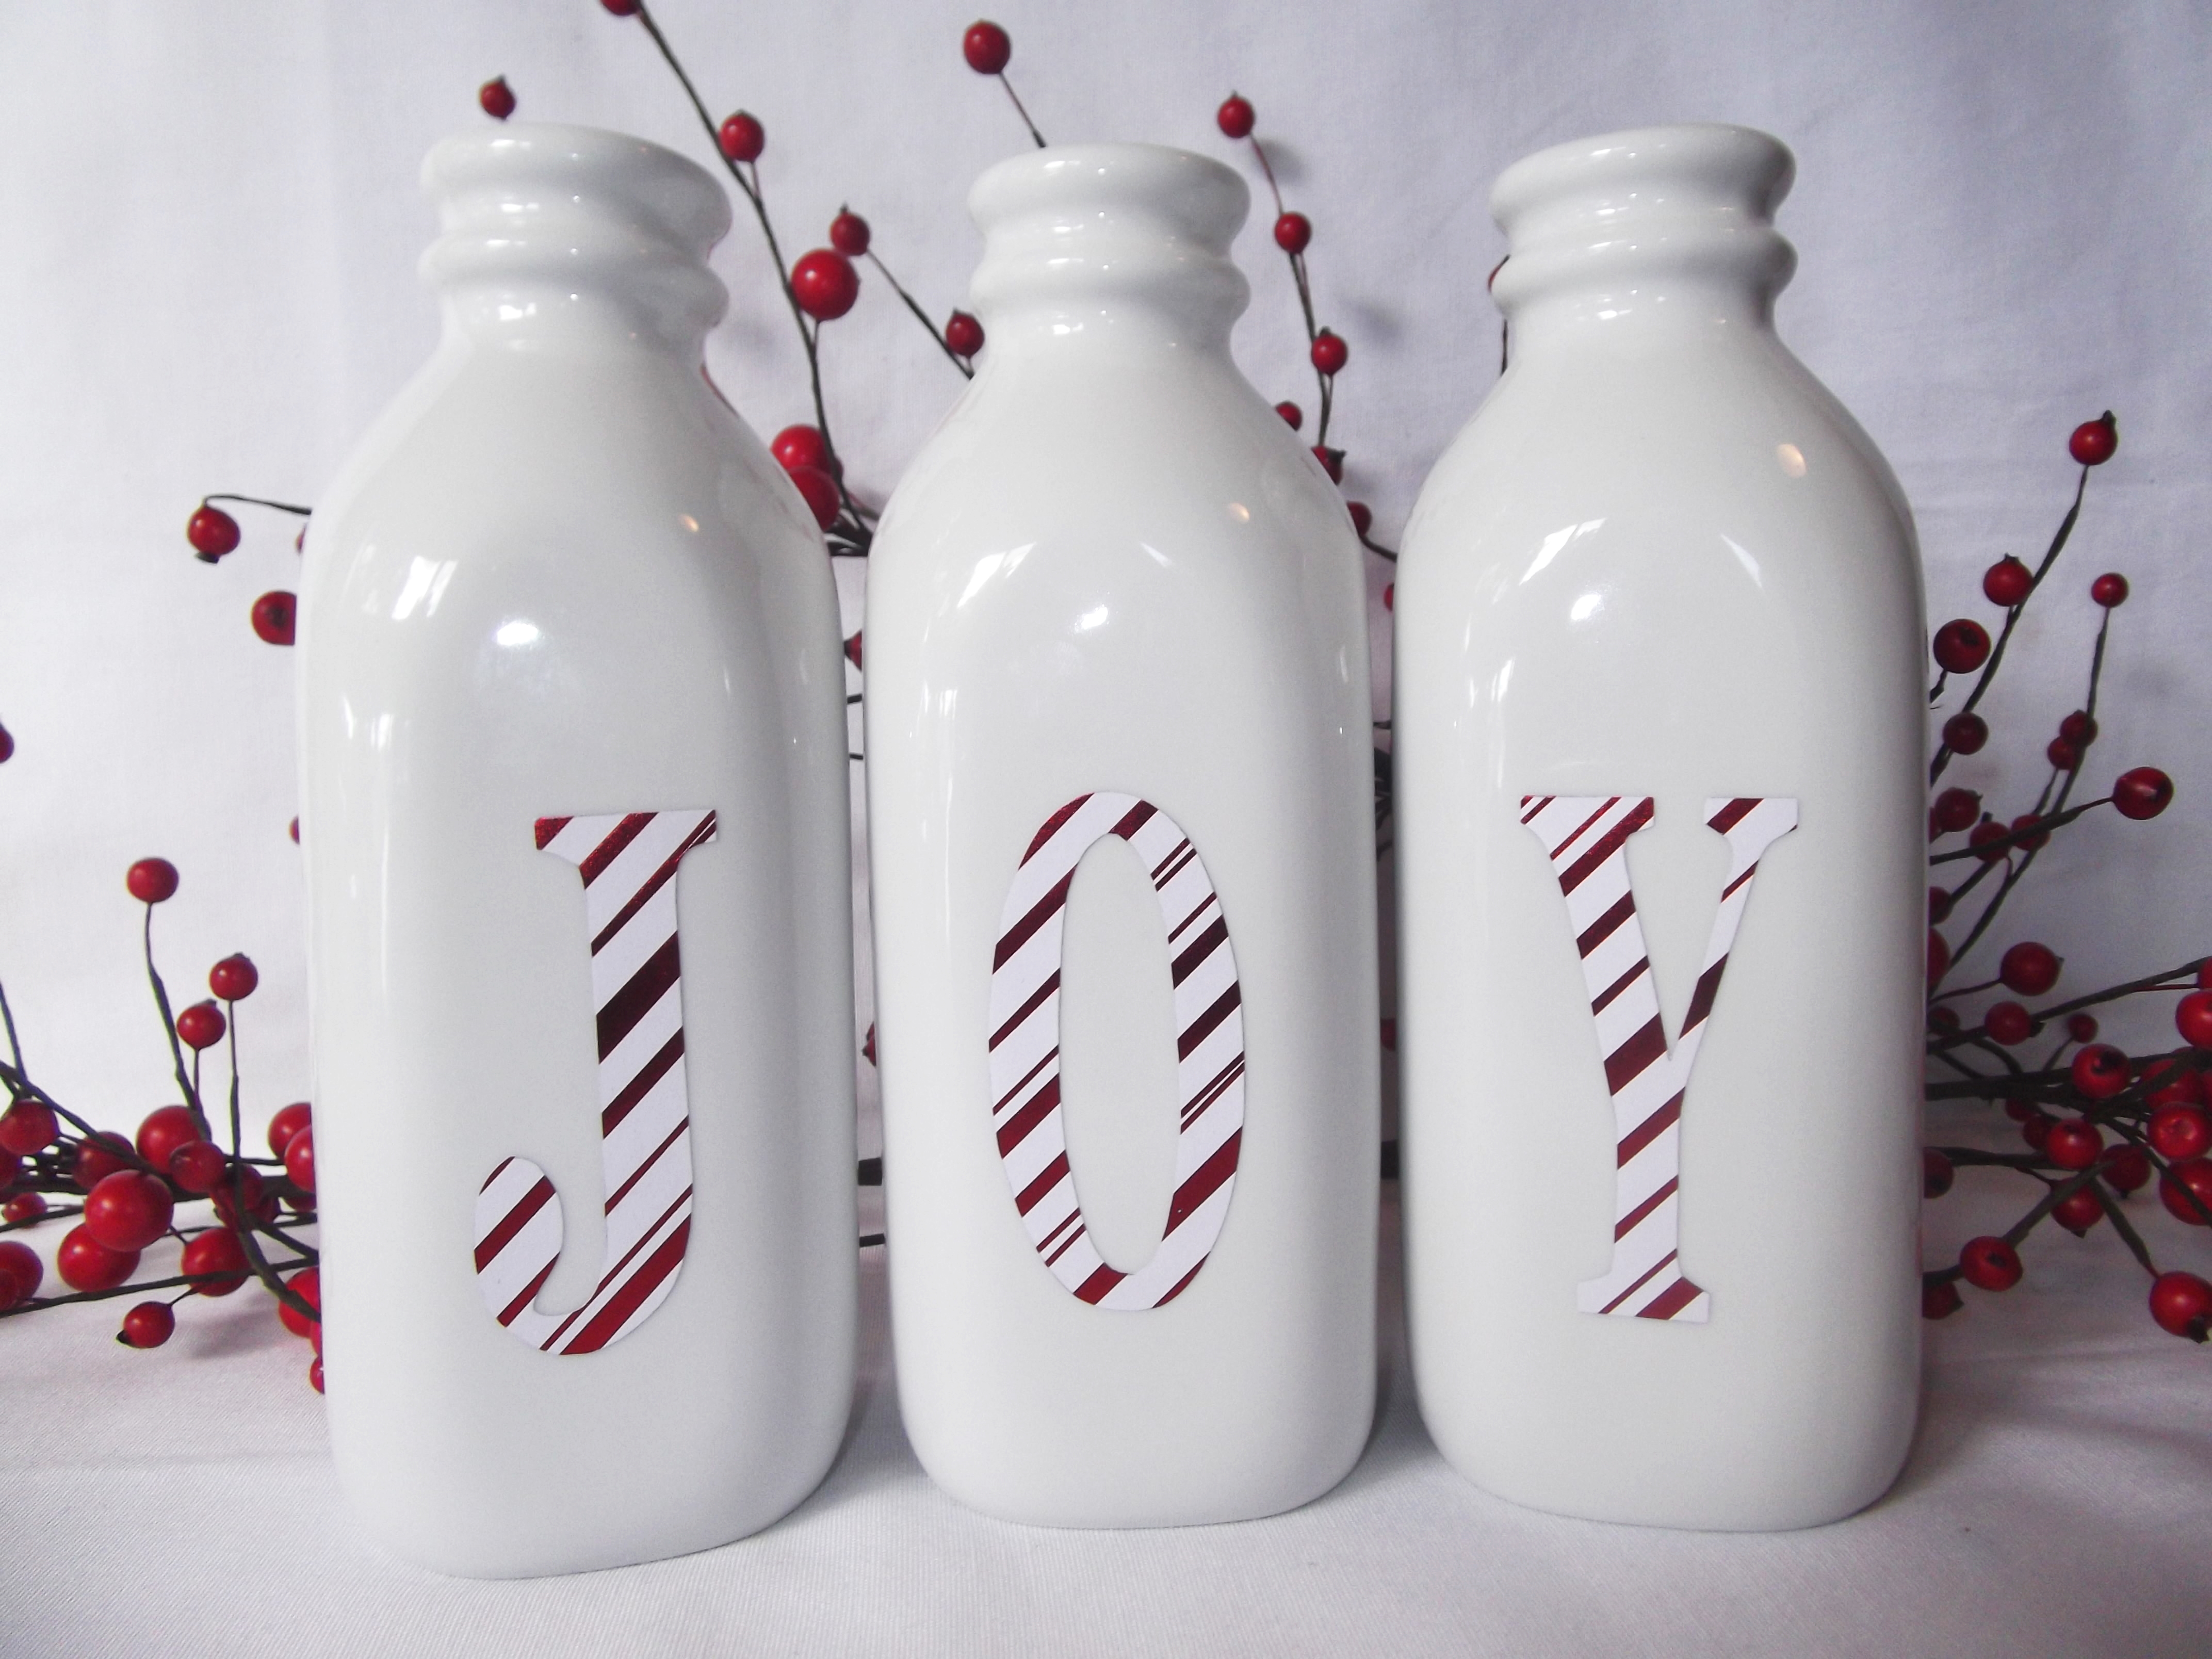
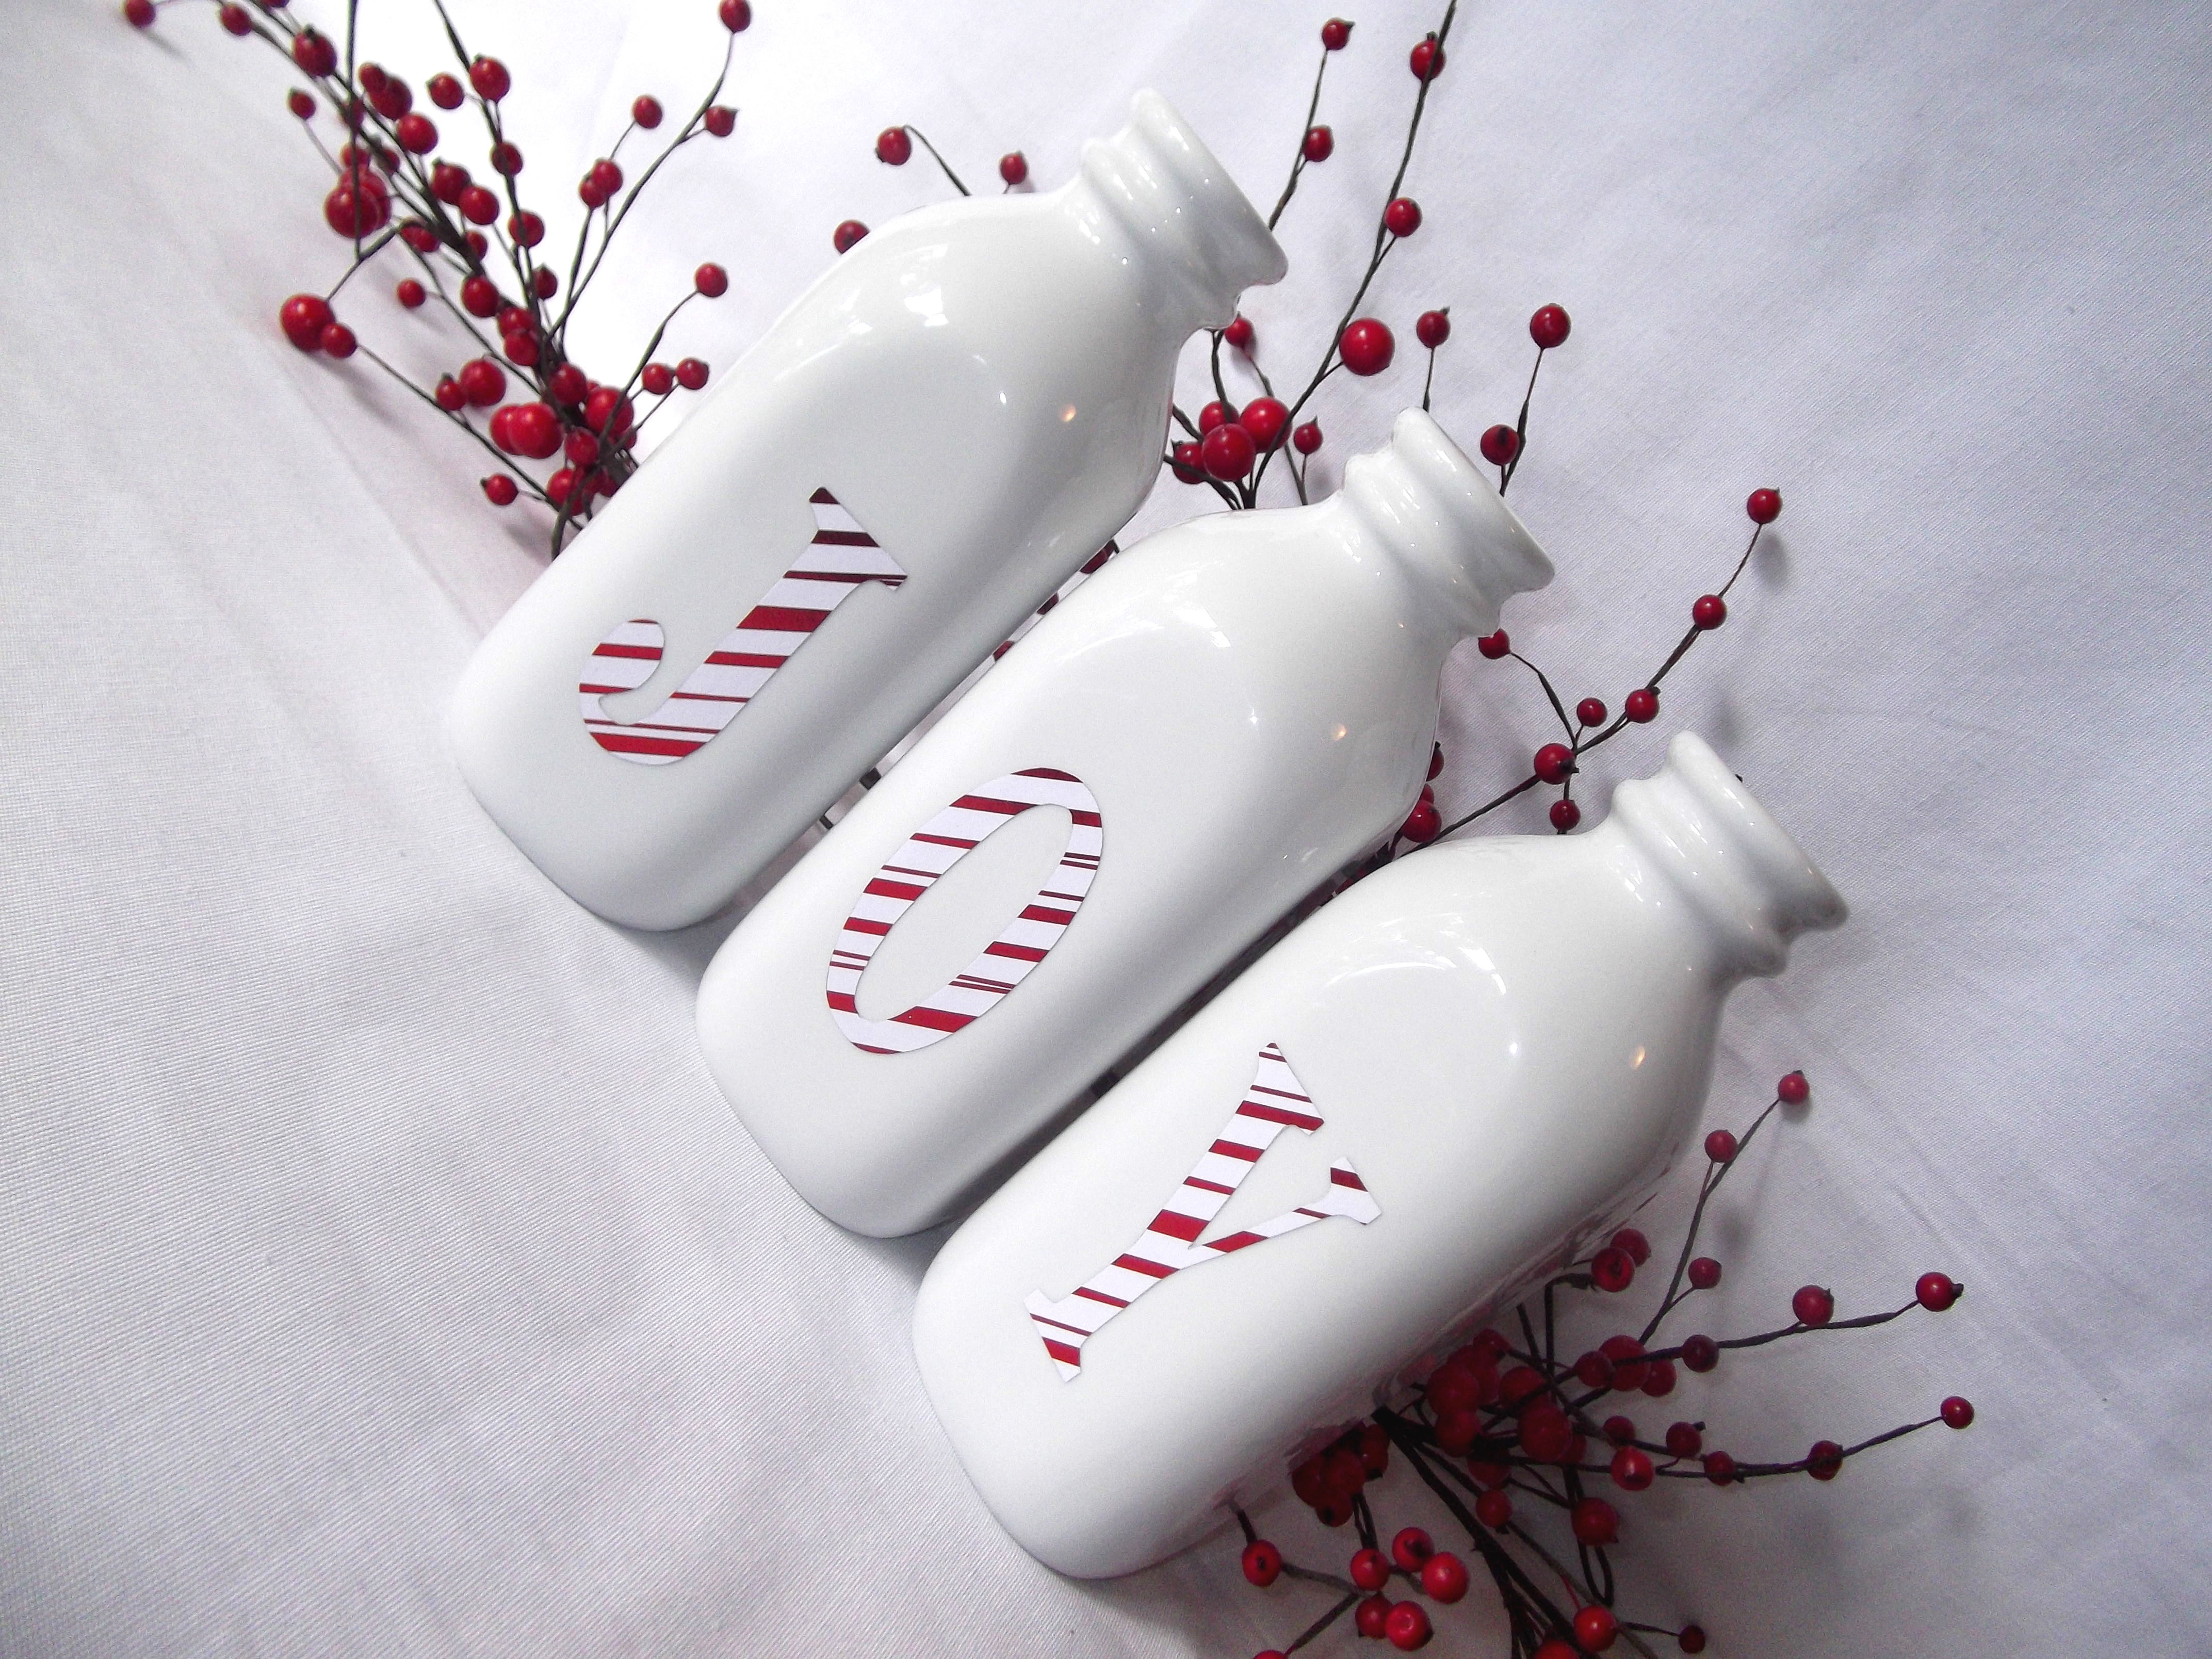
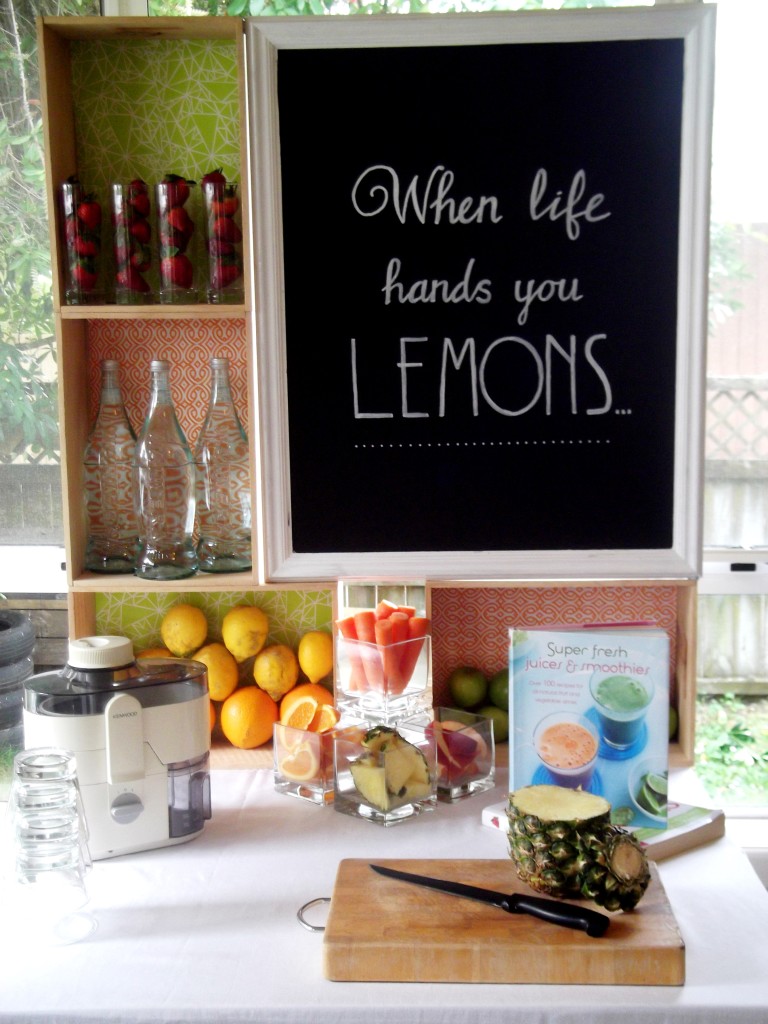
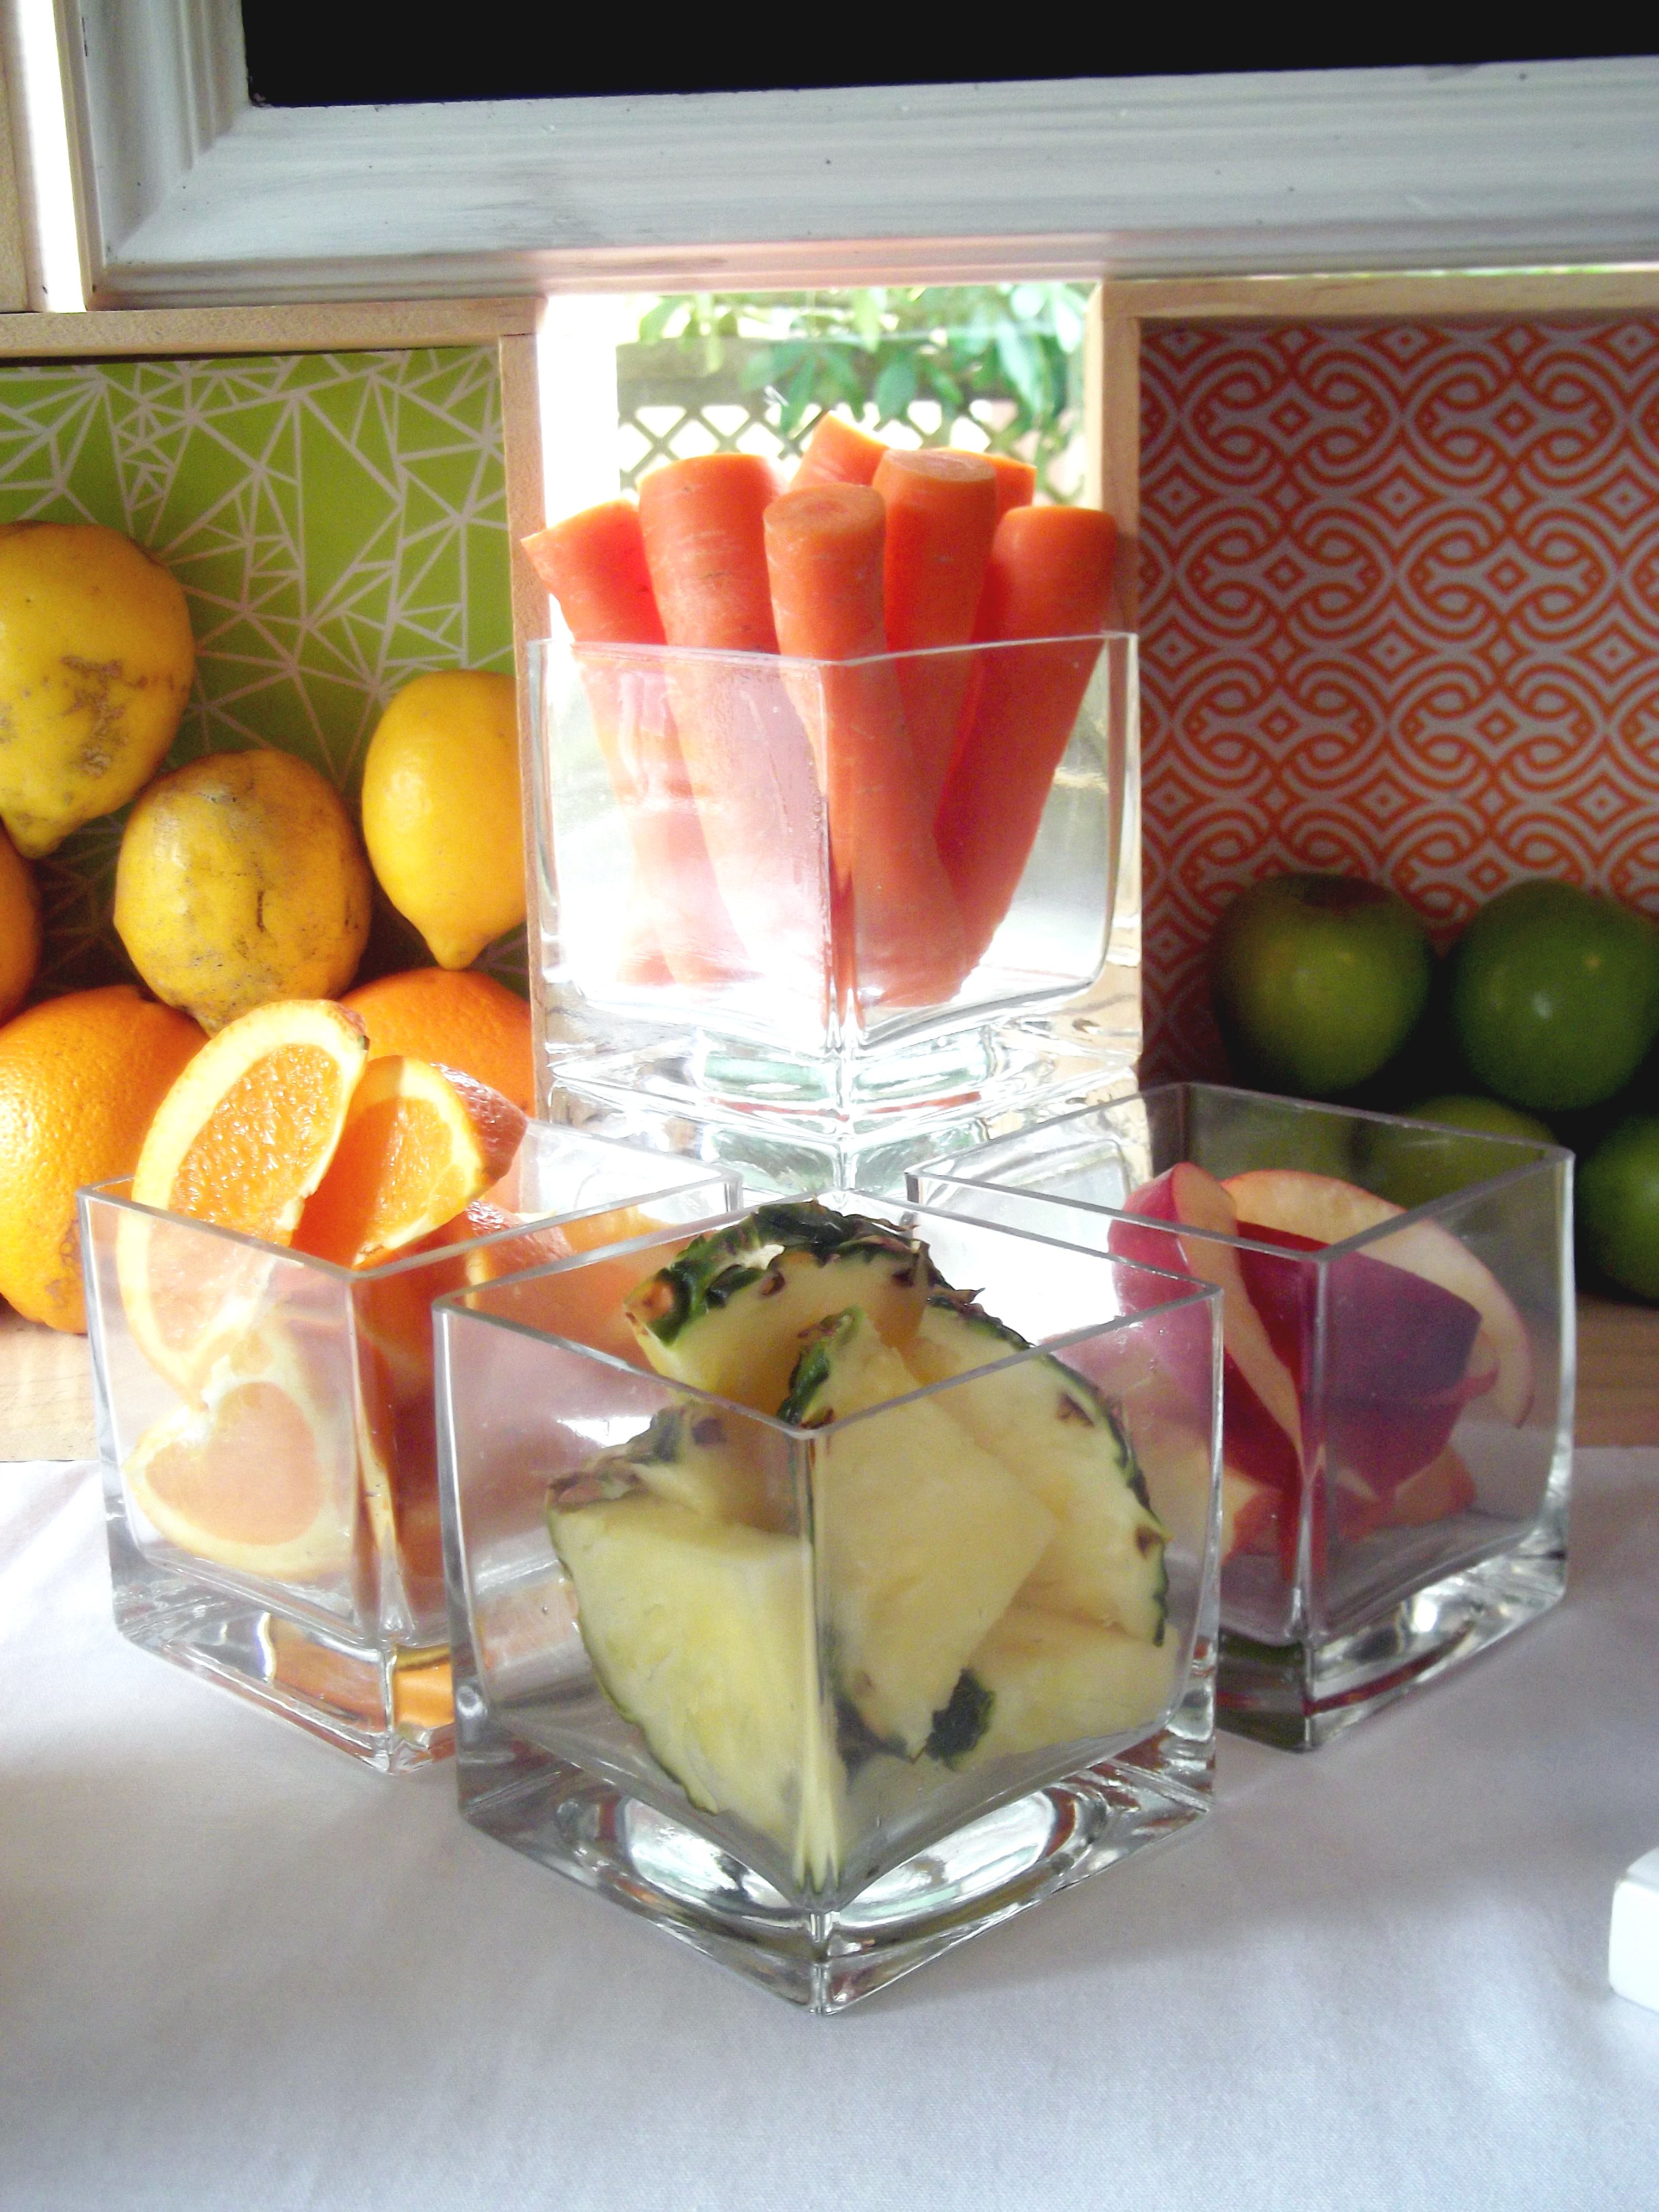
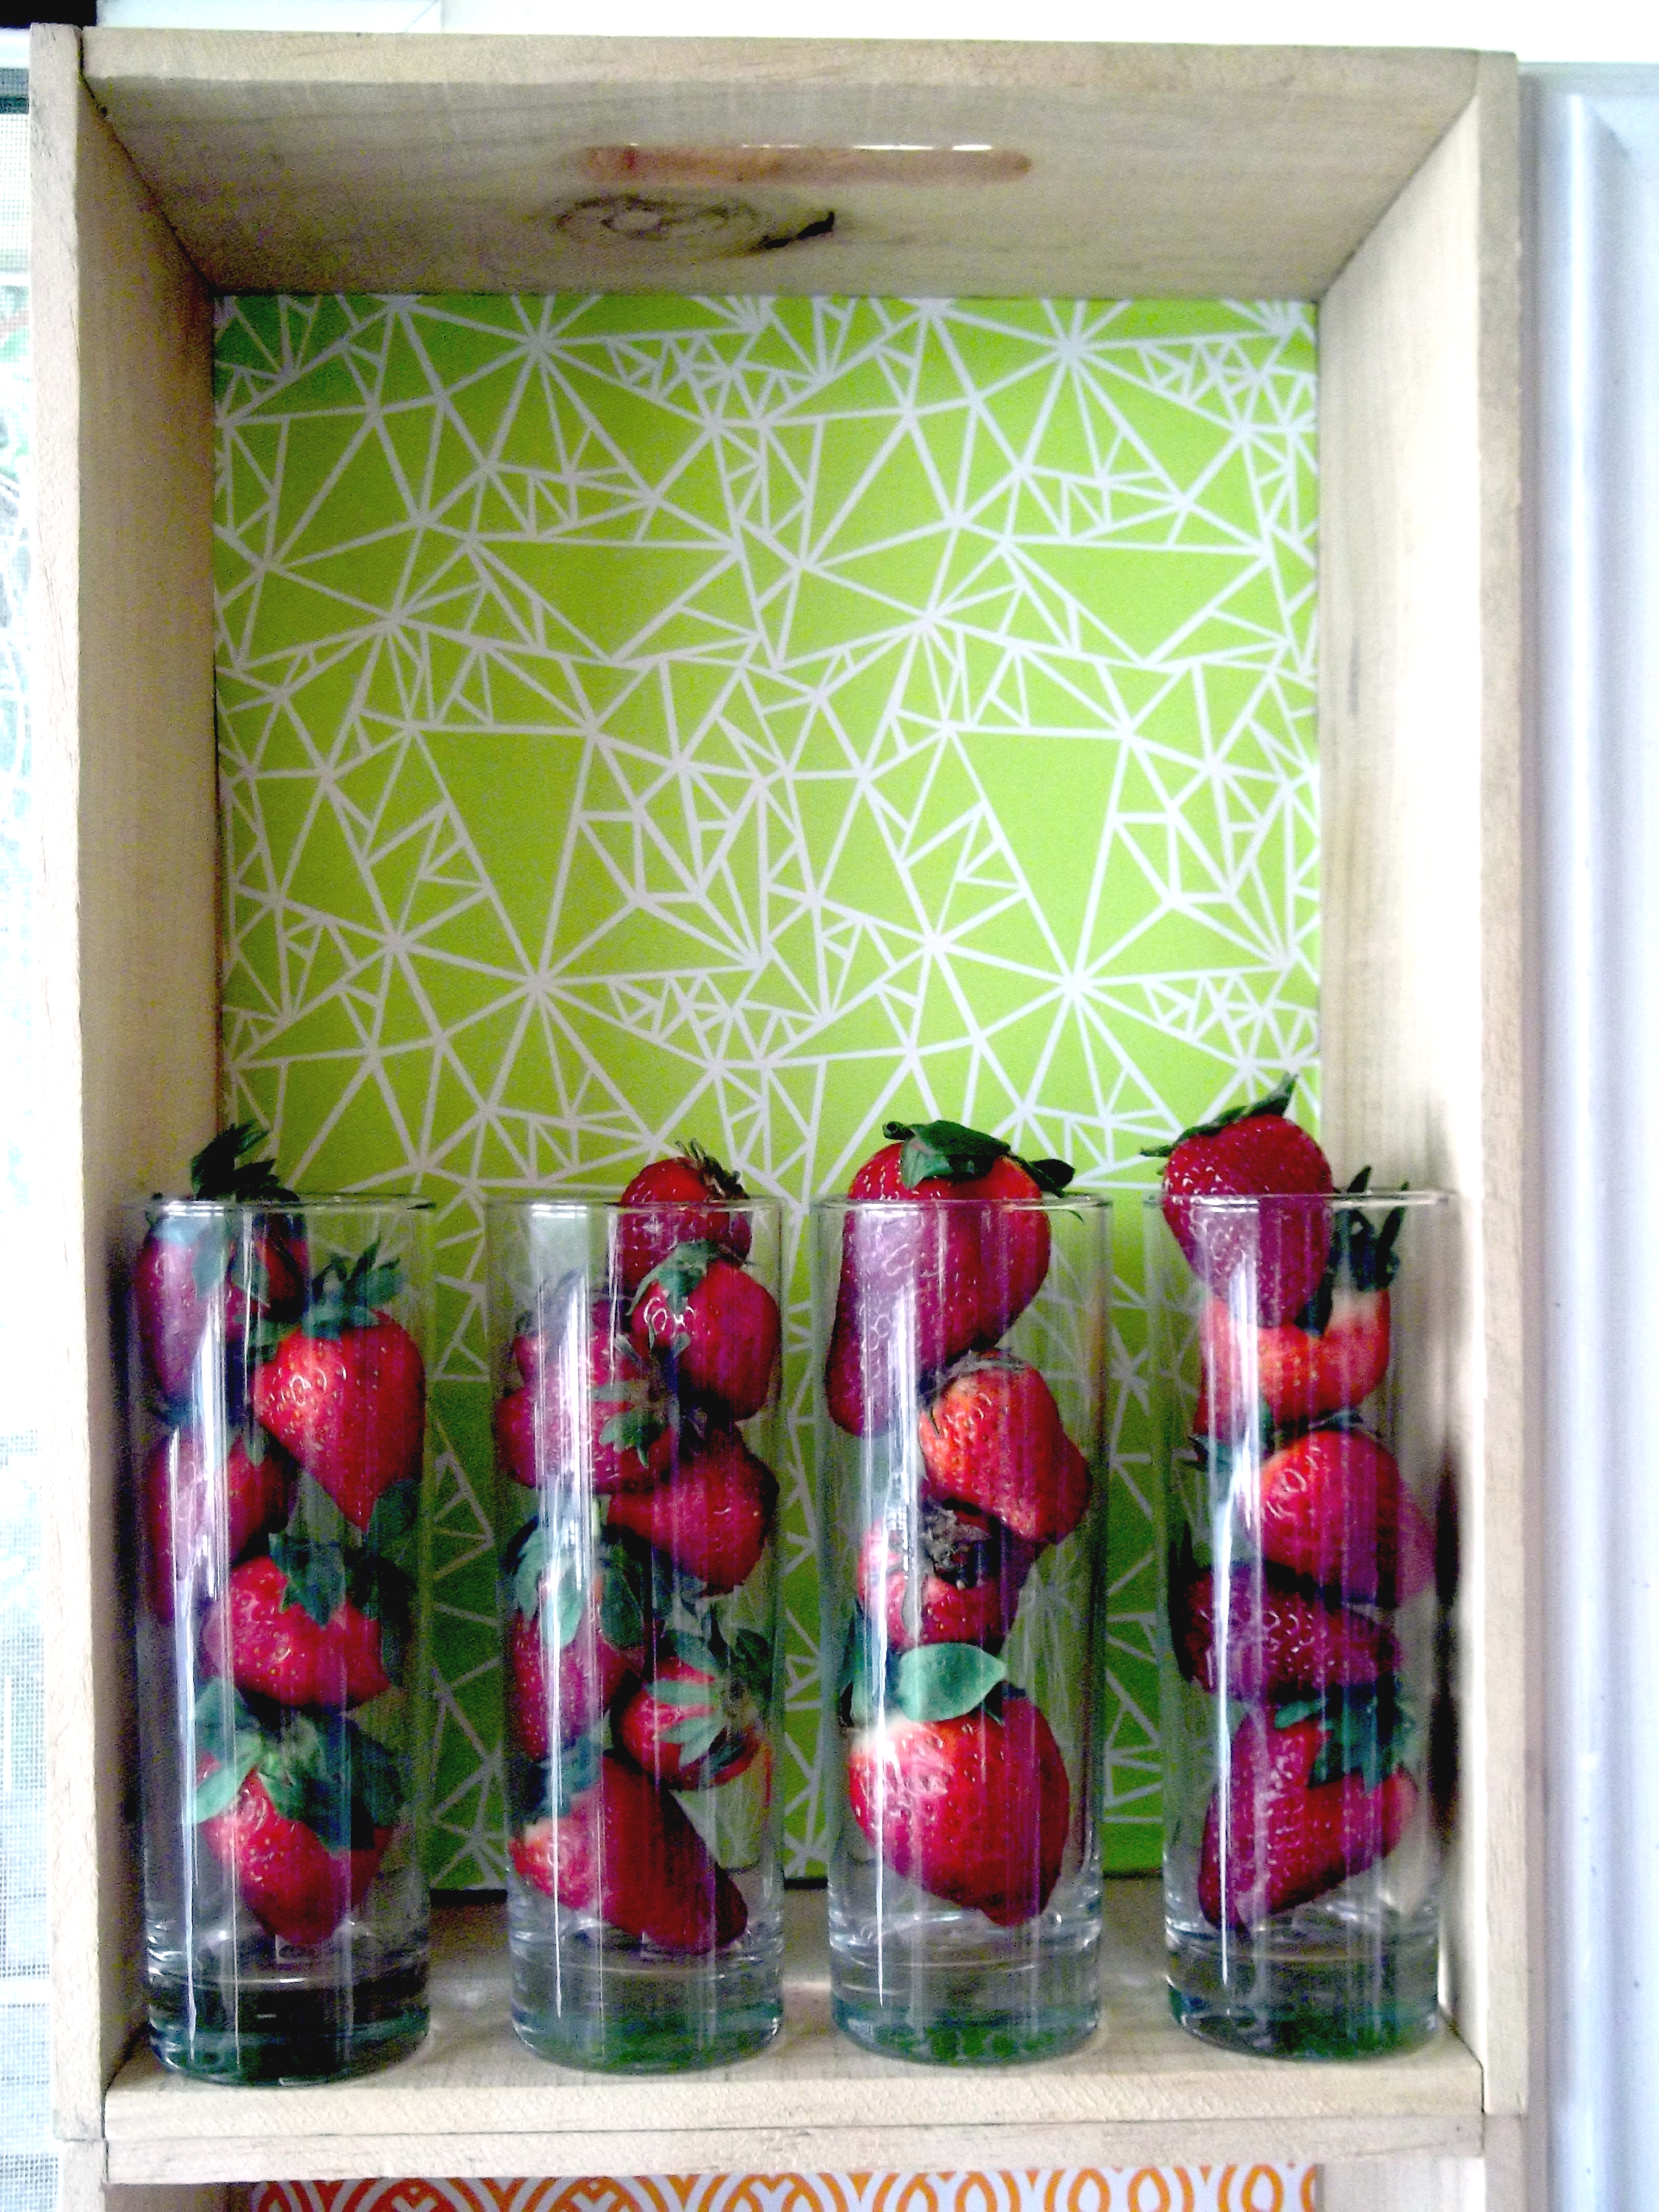
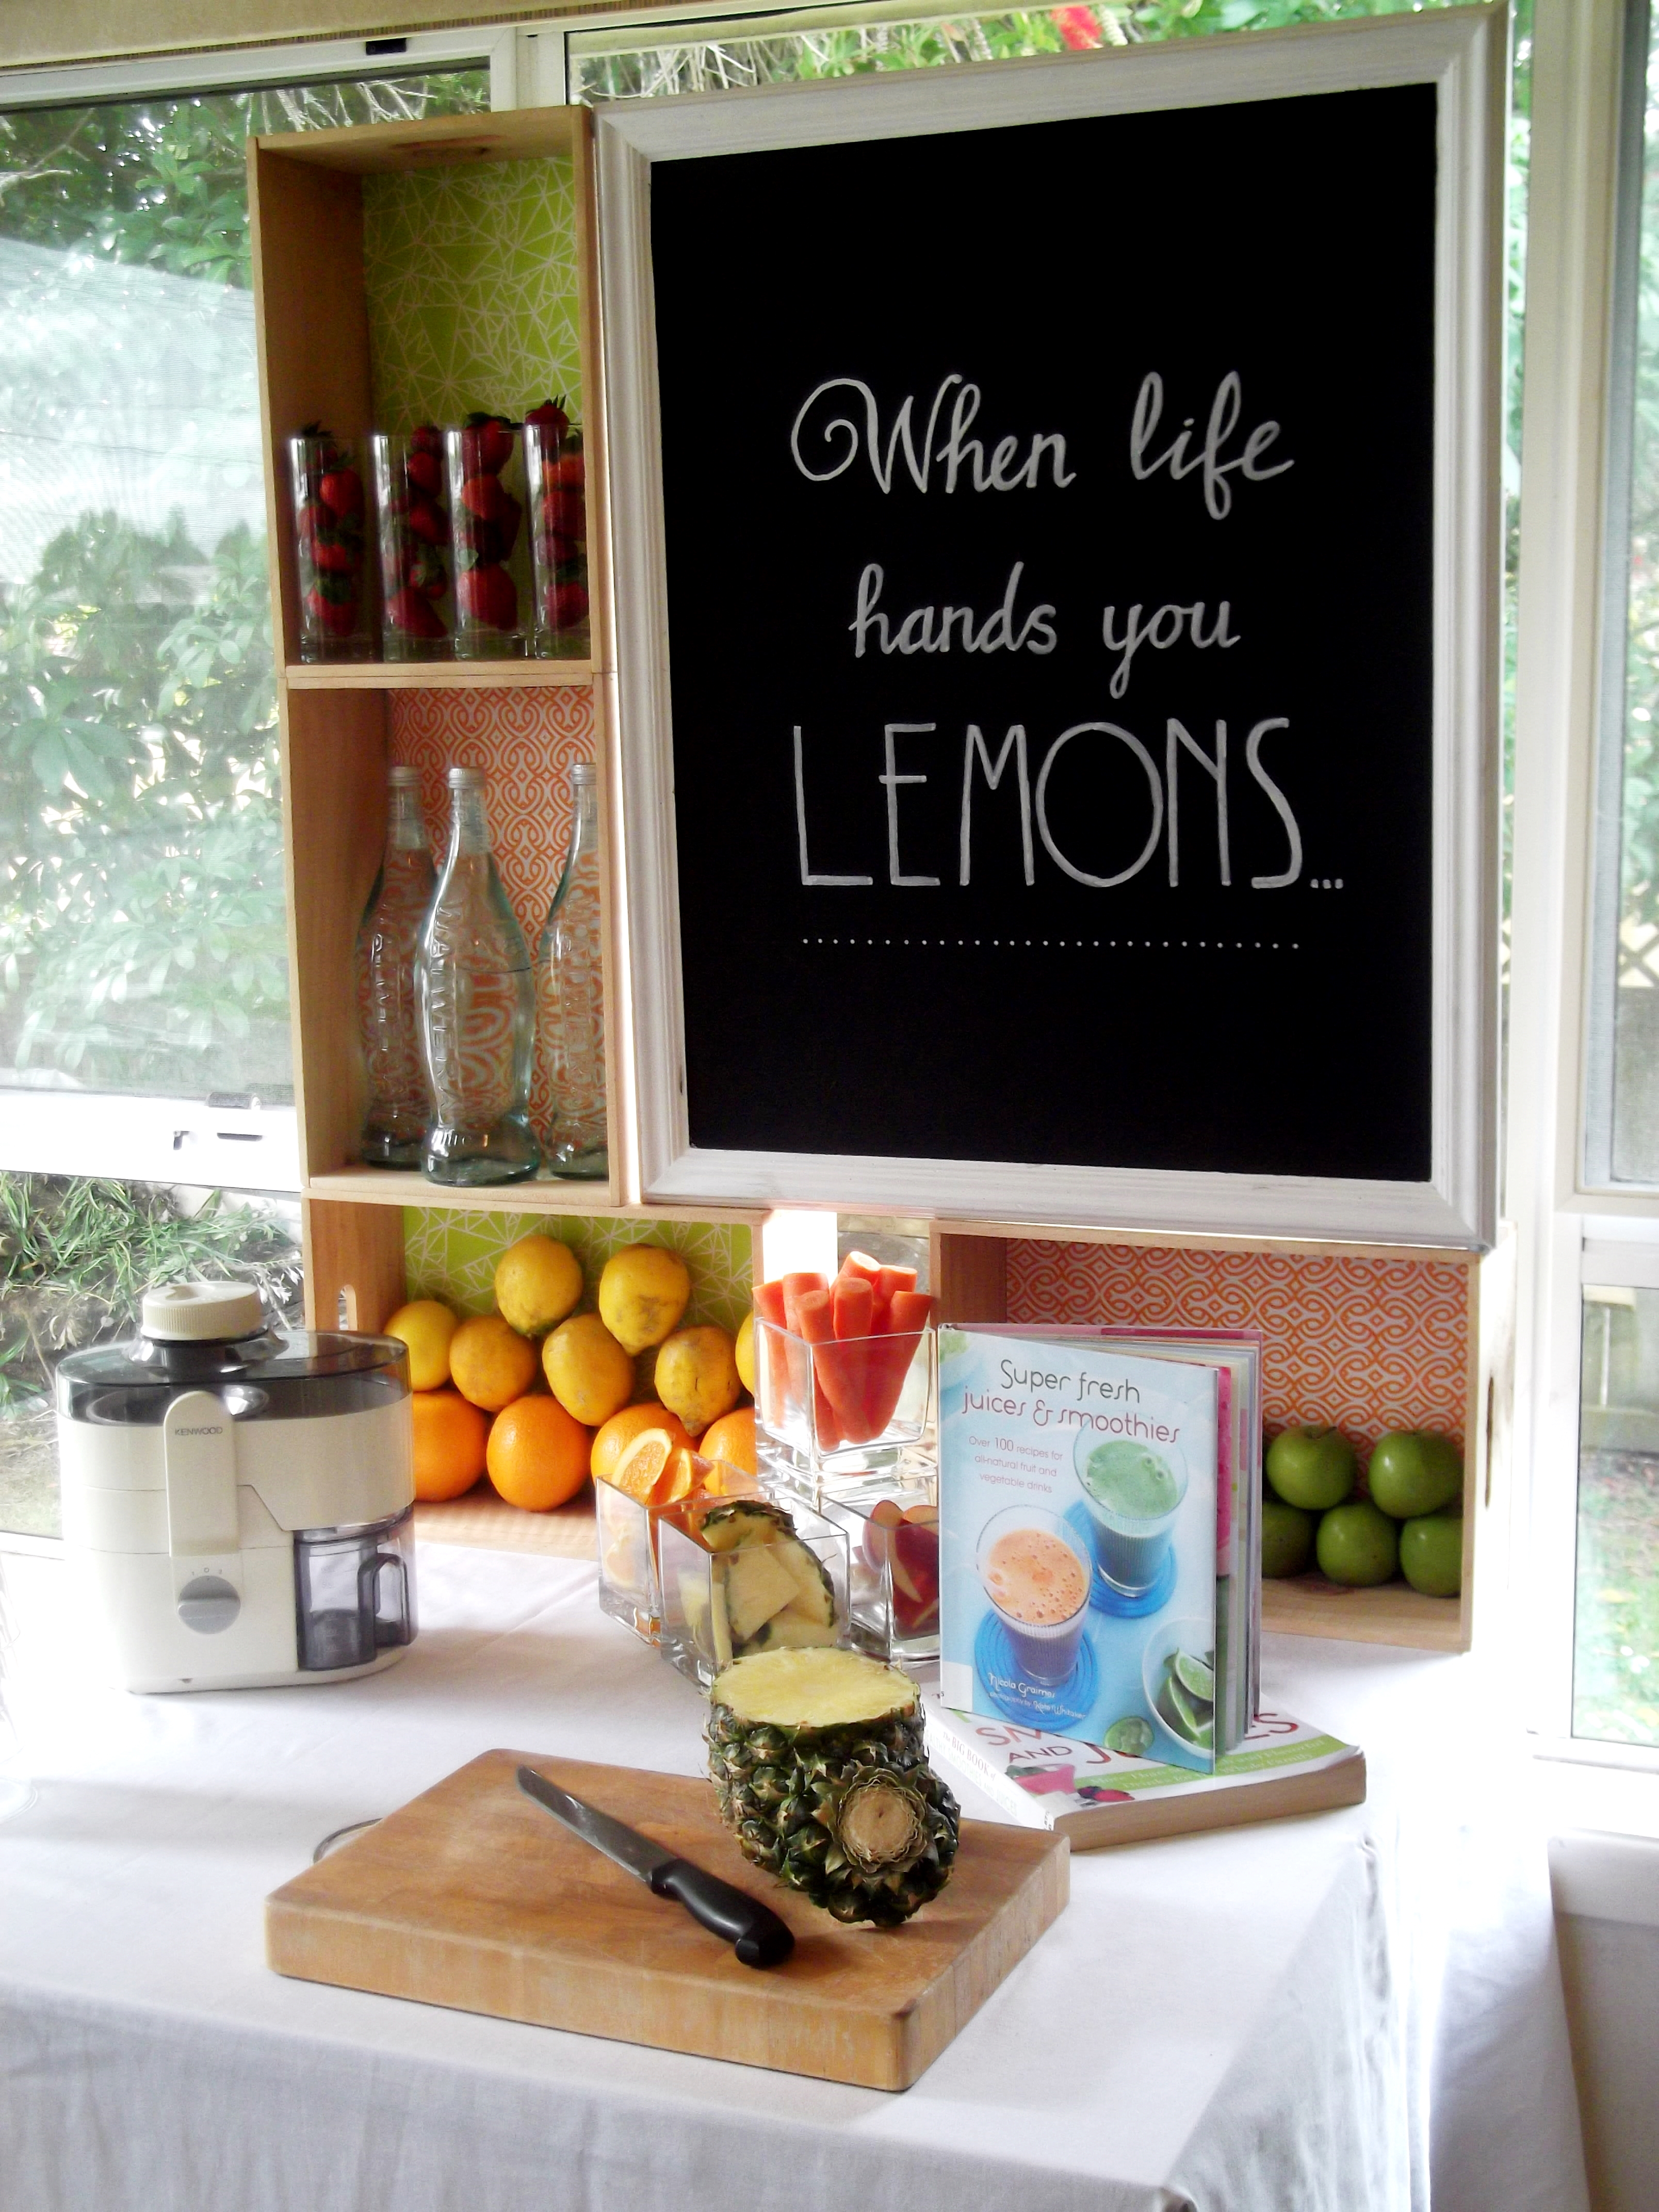
12 Days of Christmas 2015 – Day 5
Delightful Decoupage Decor

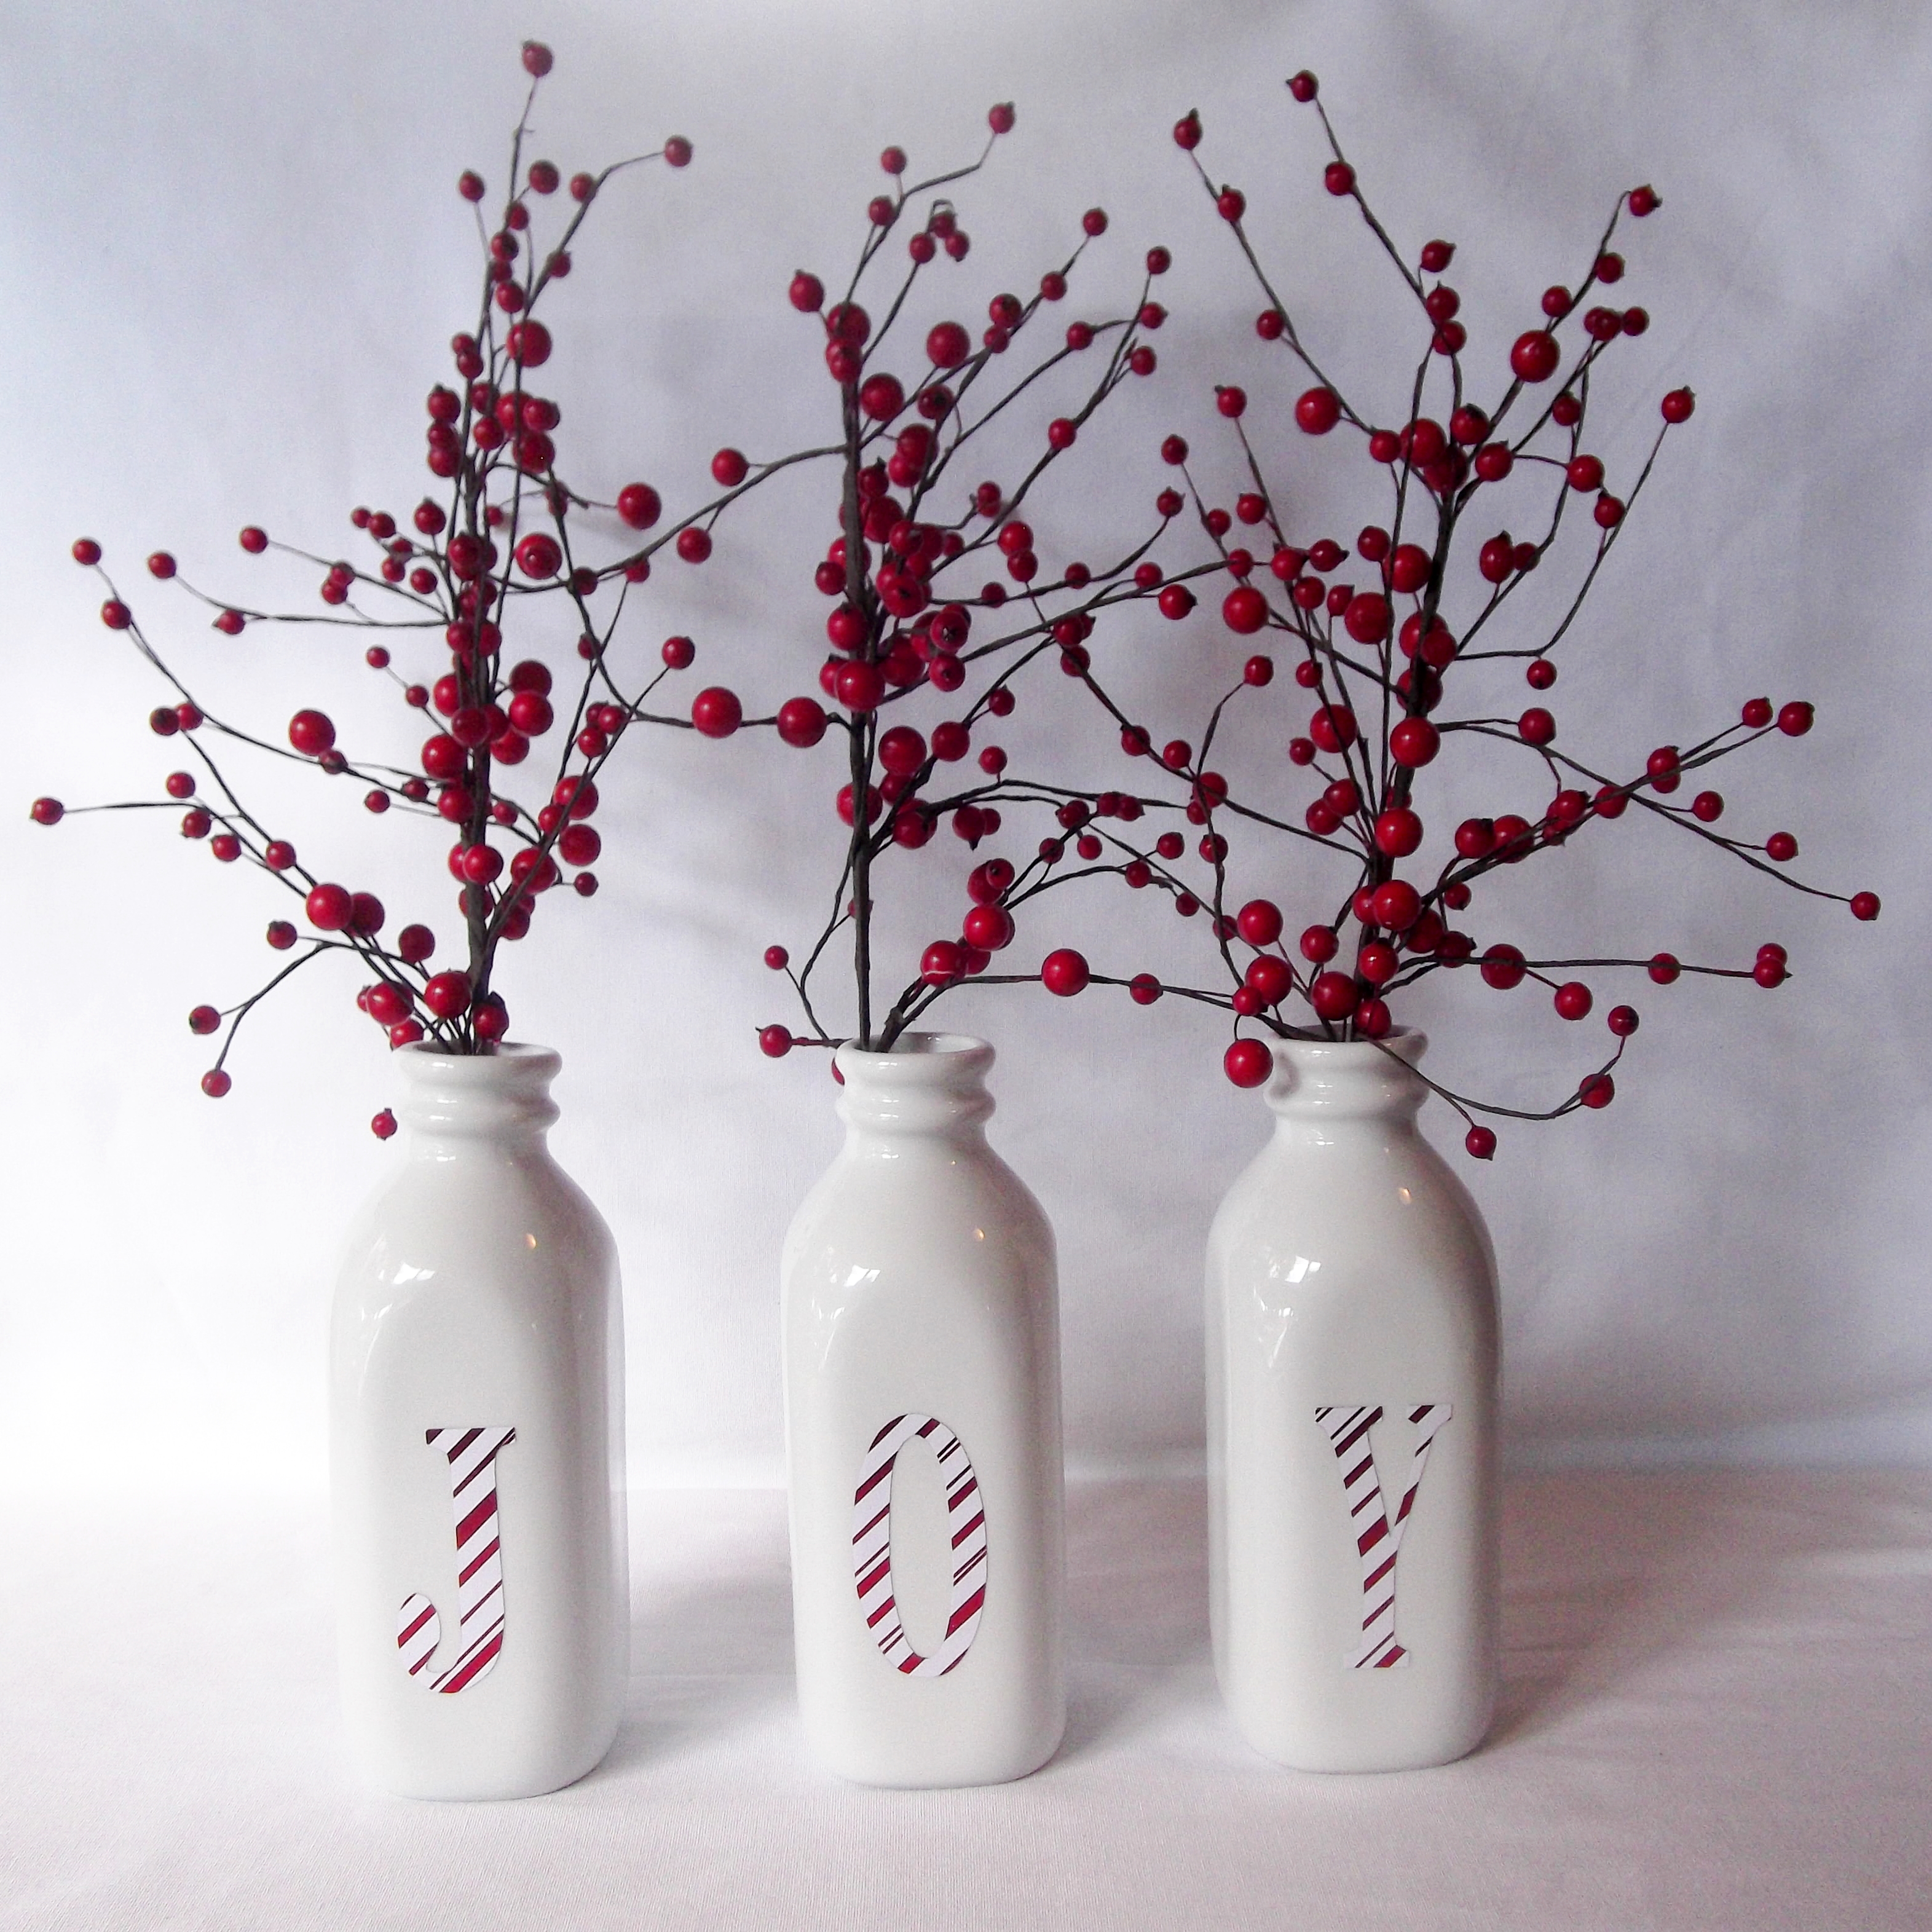
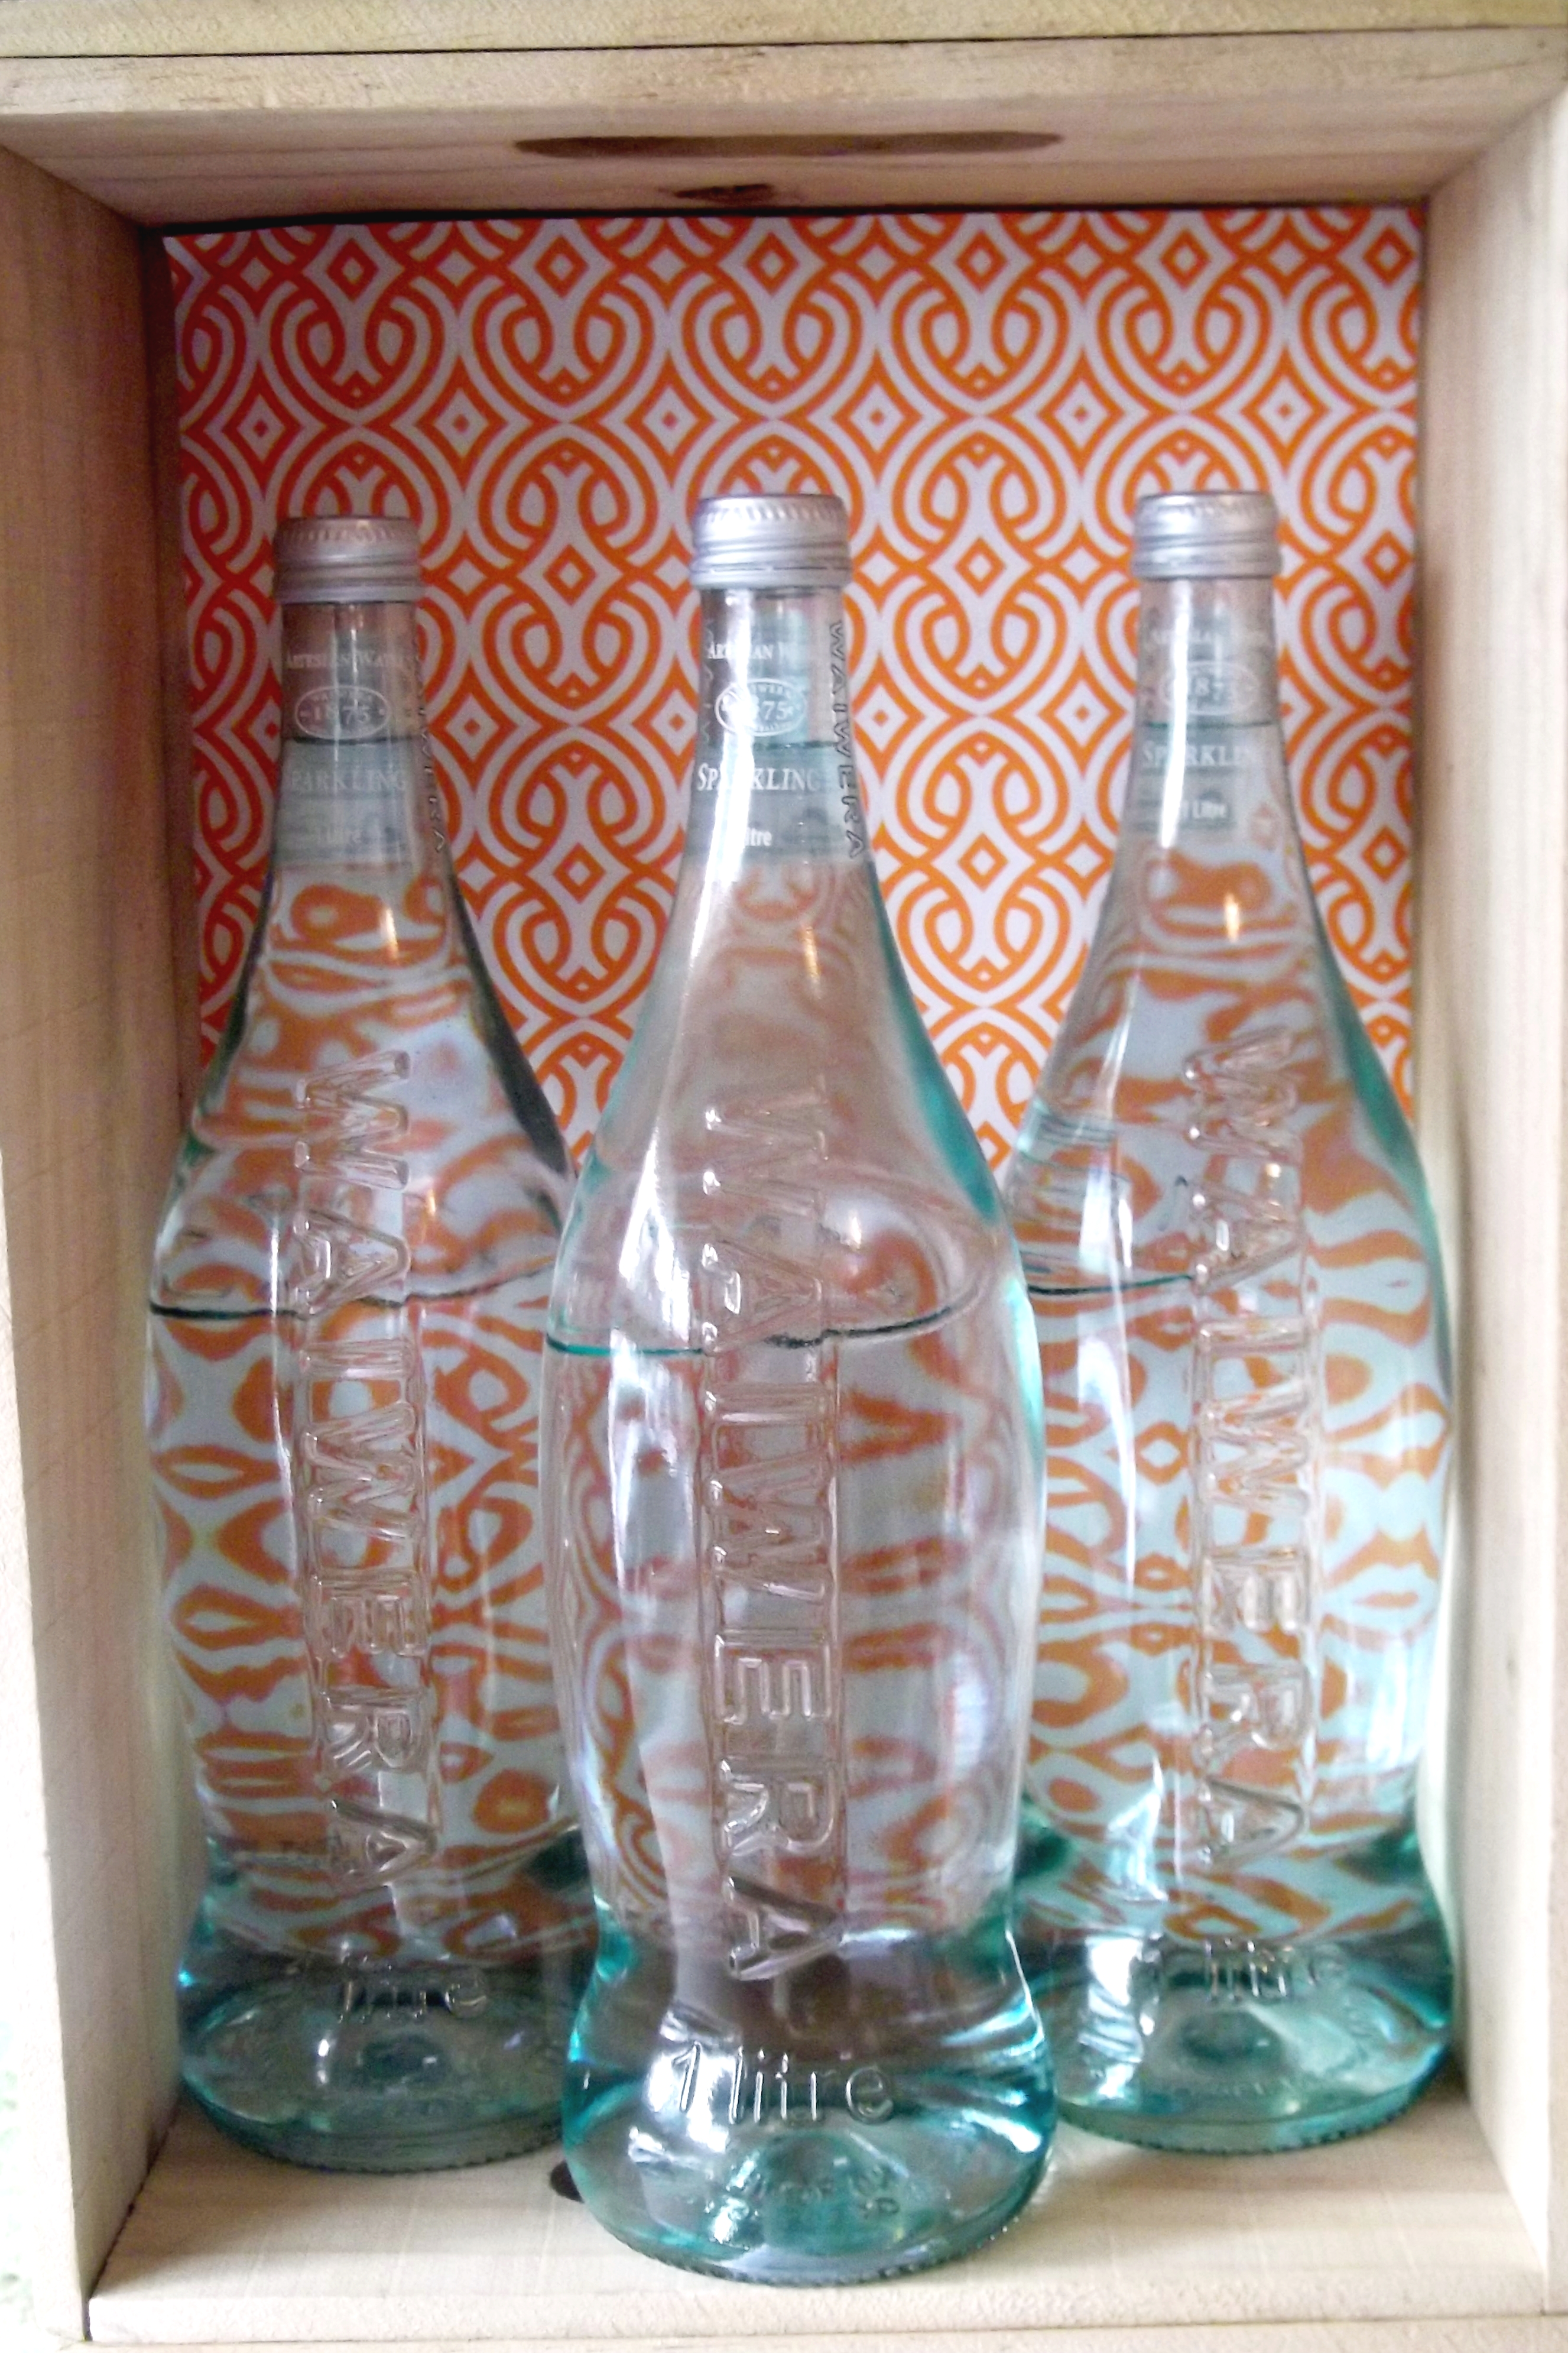
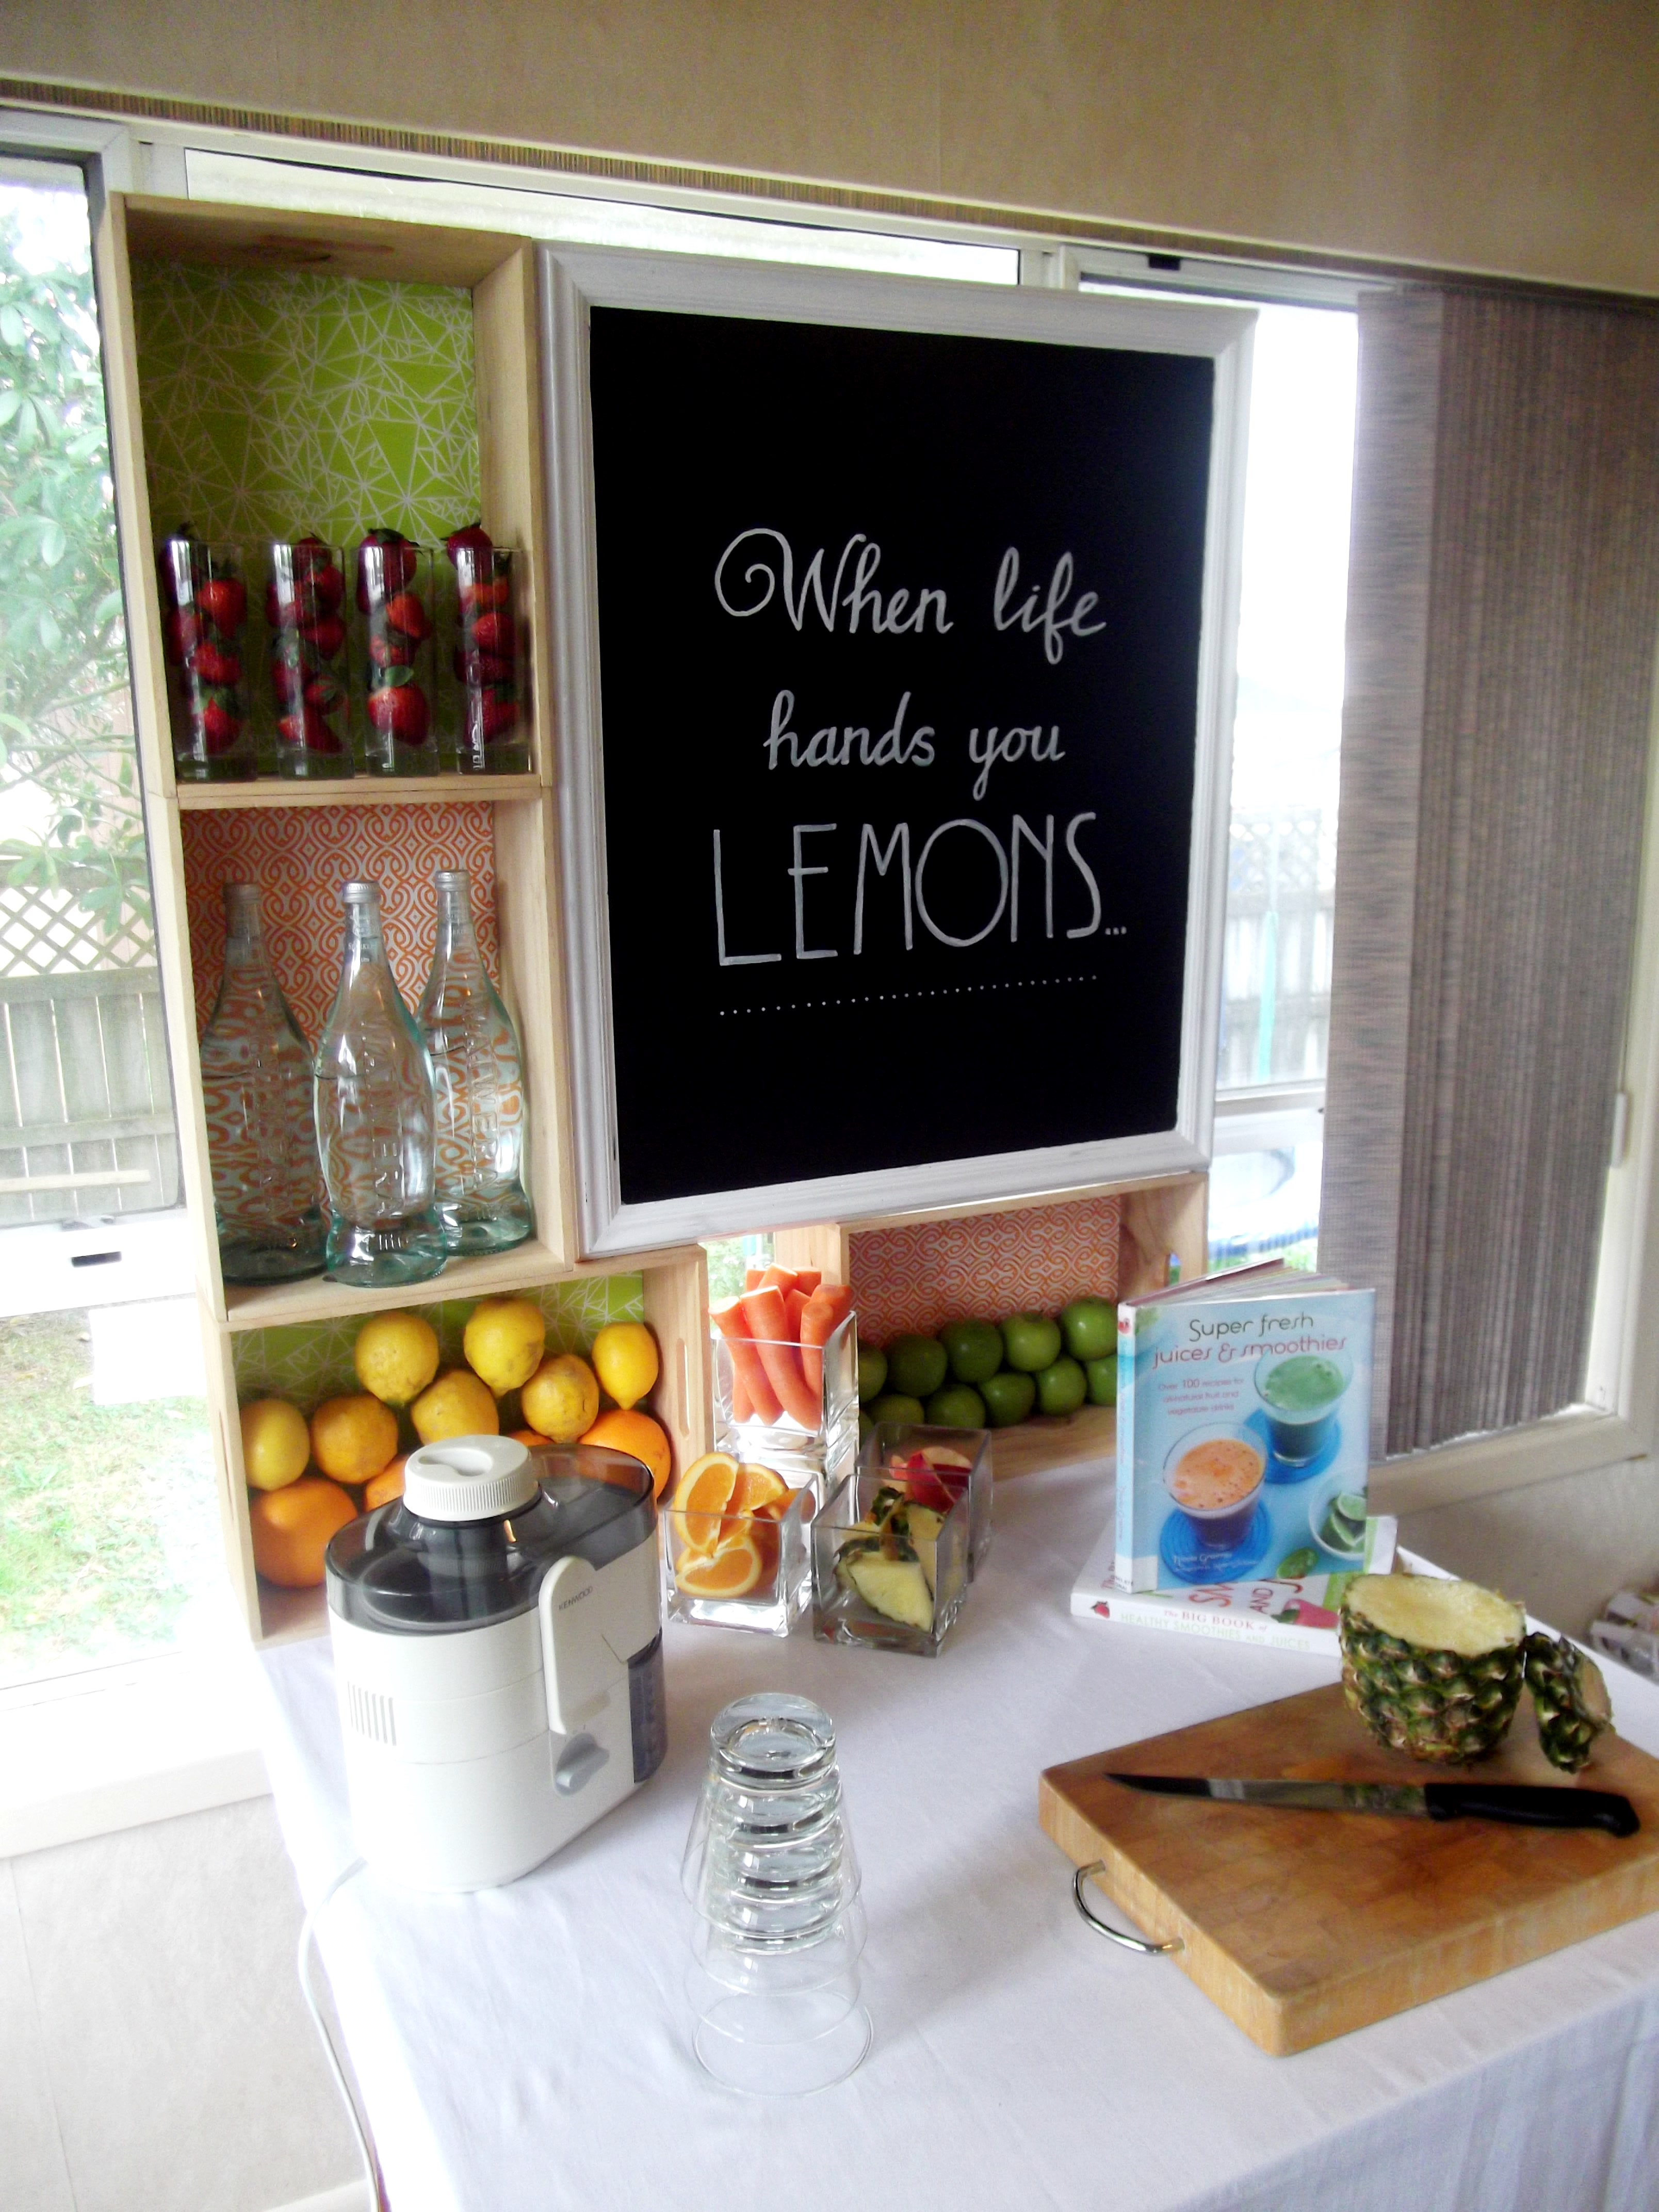
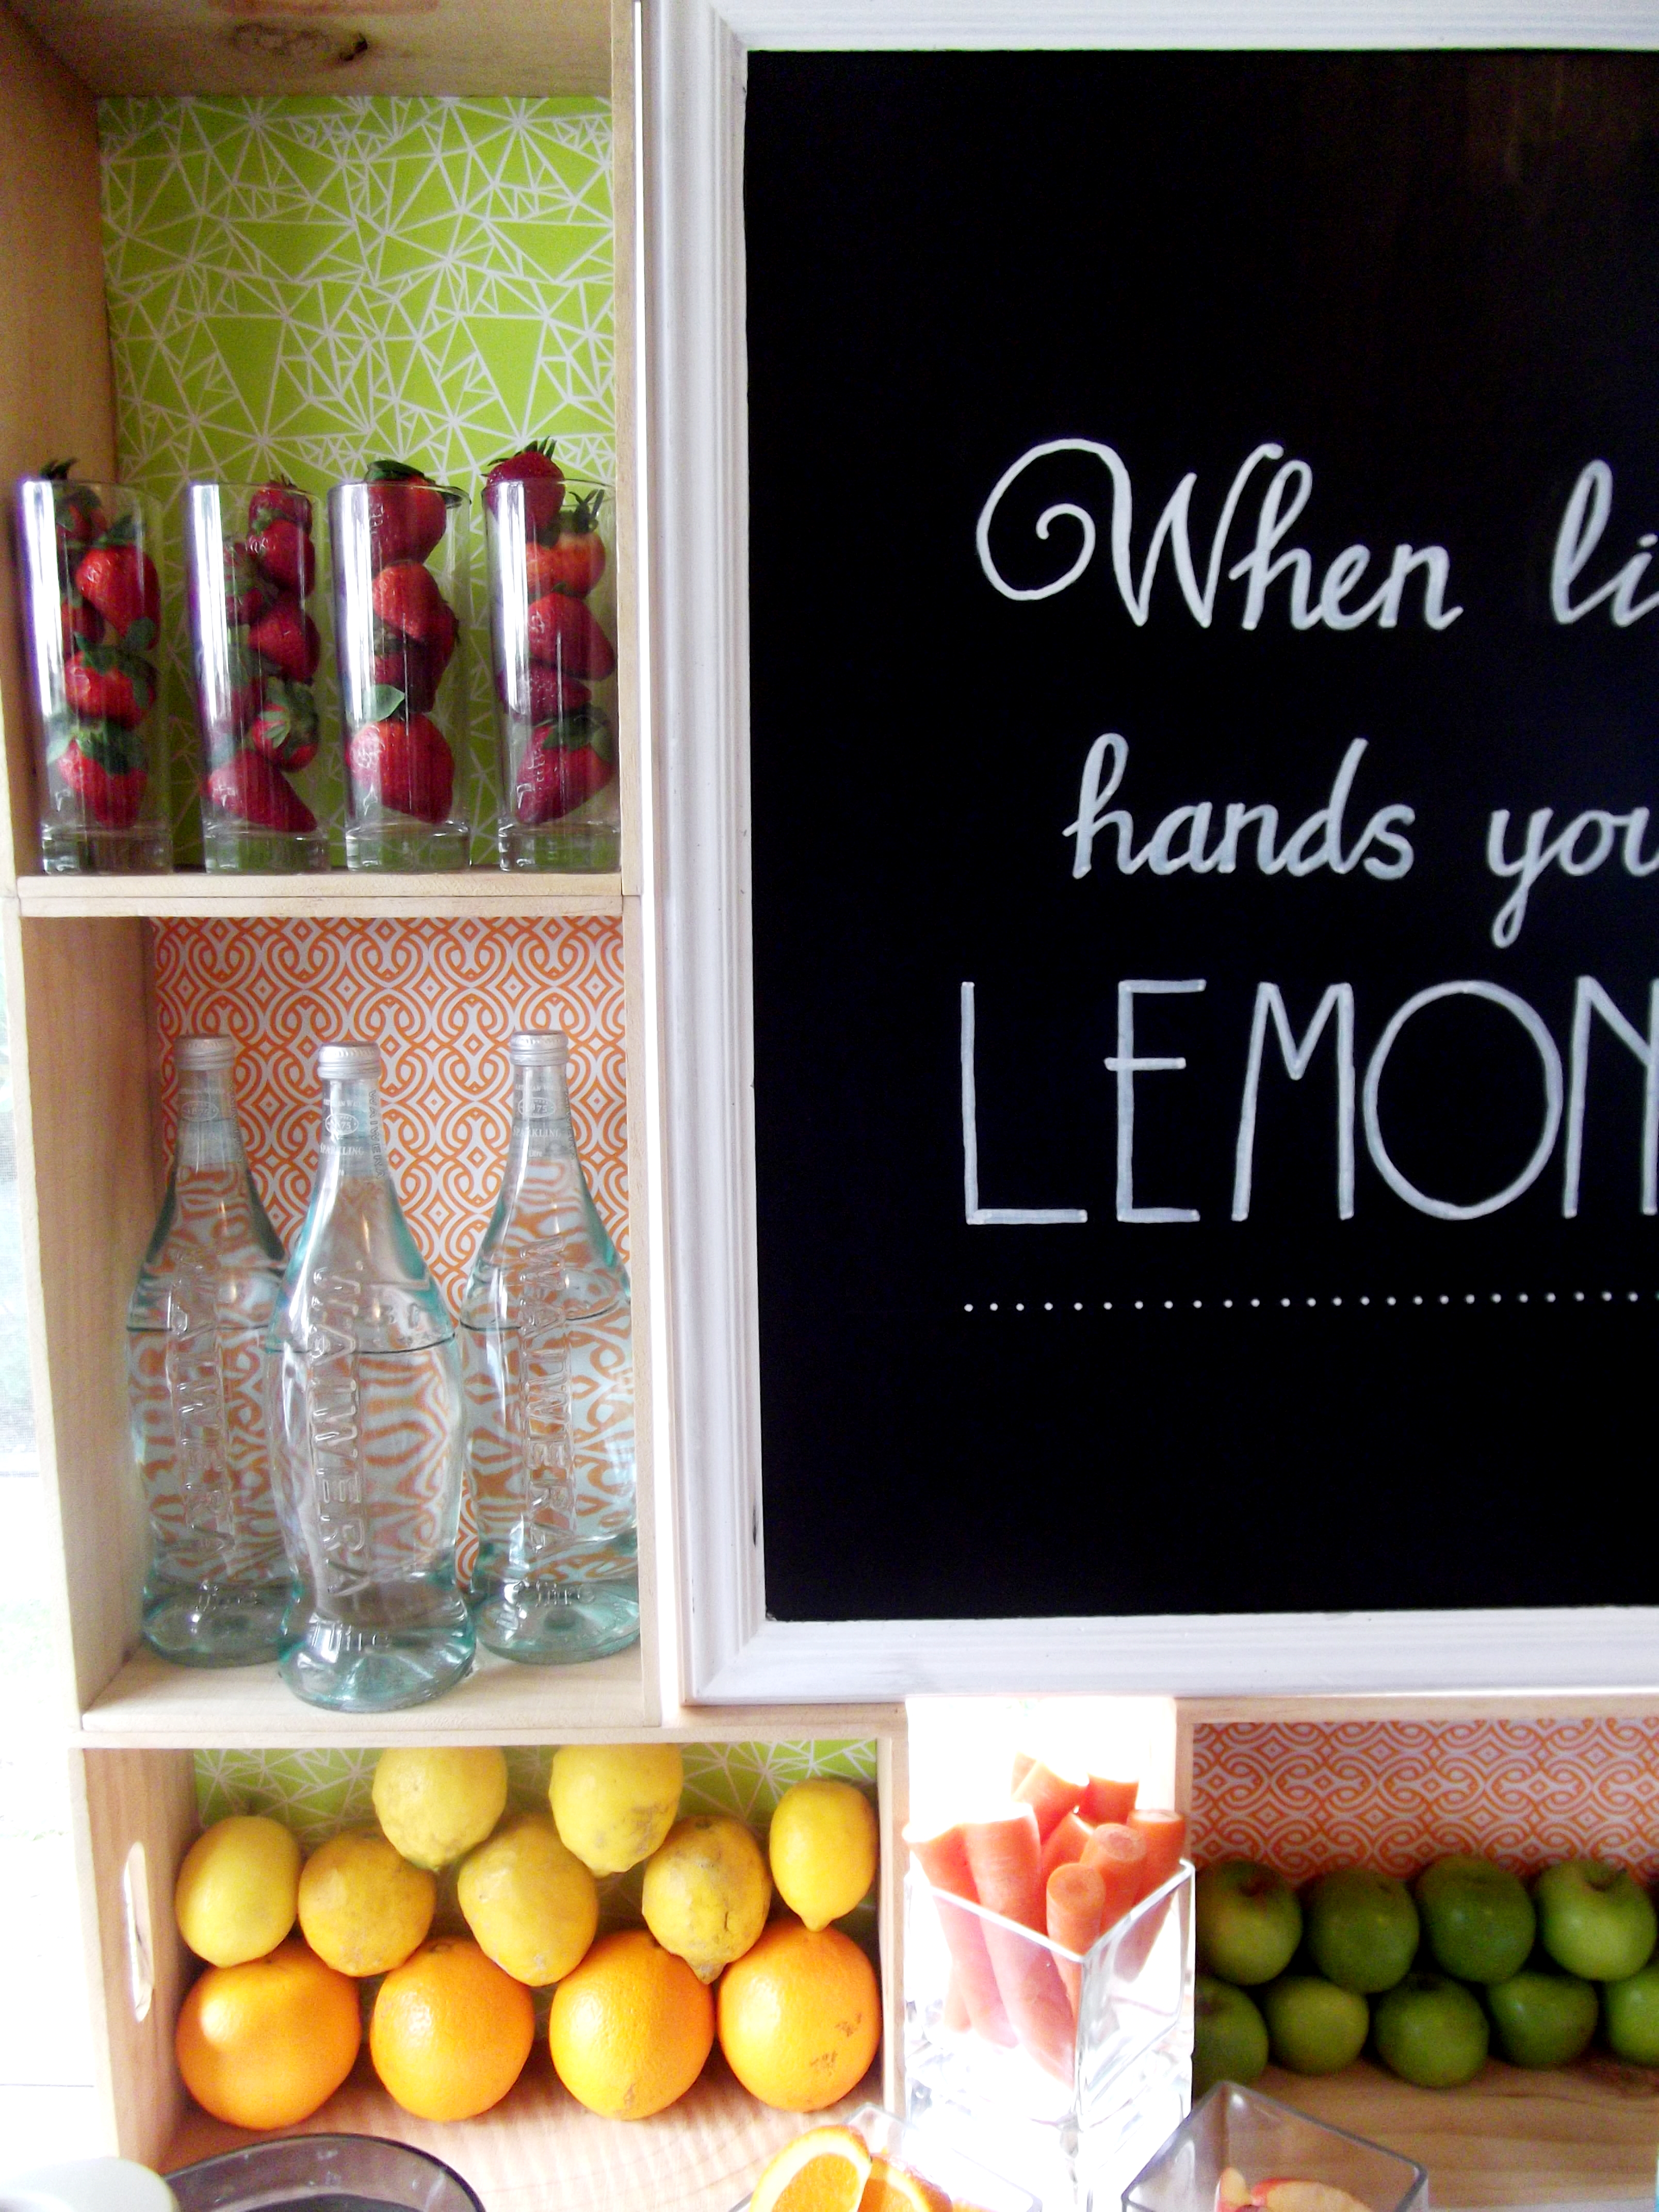
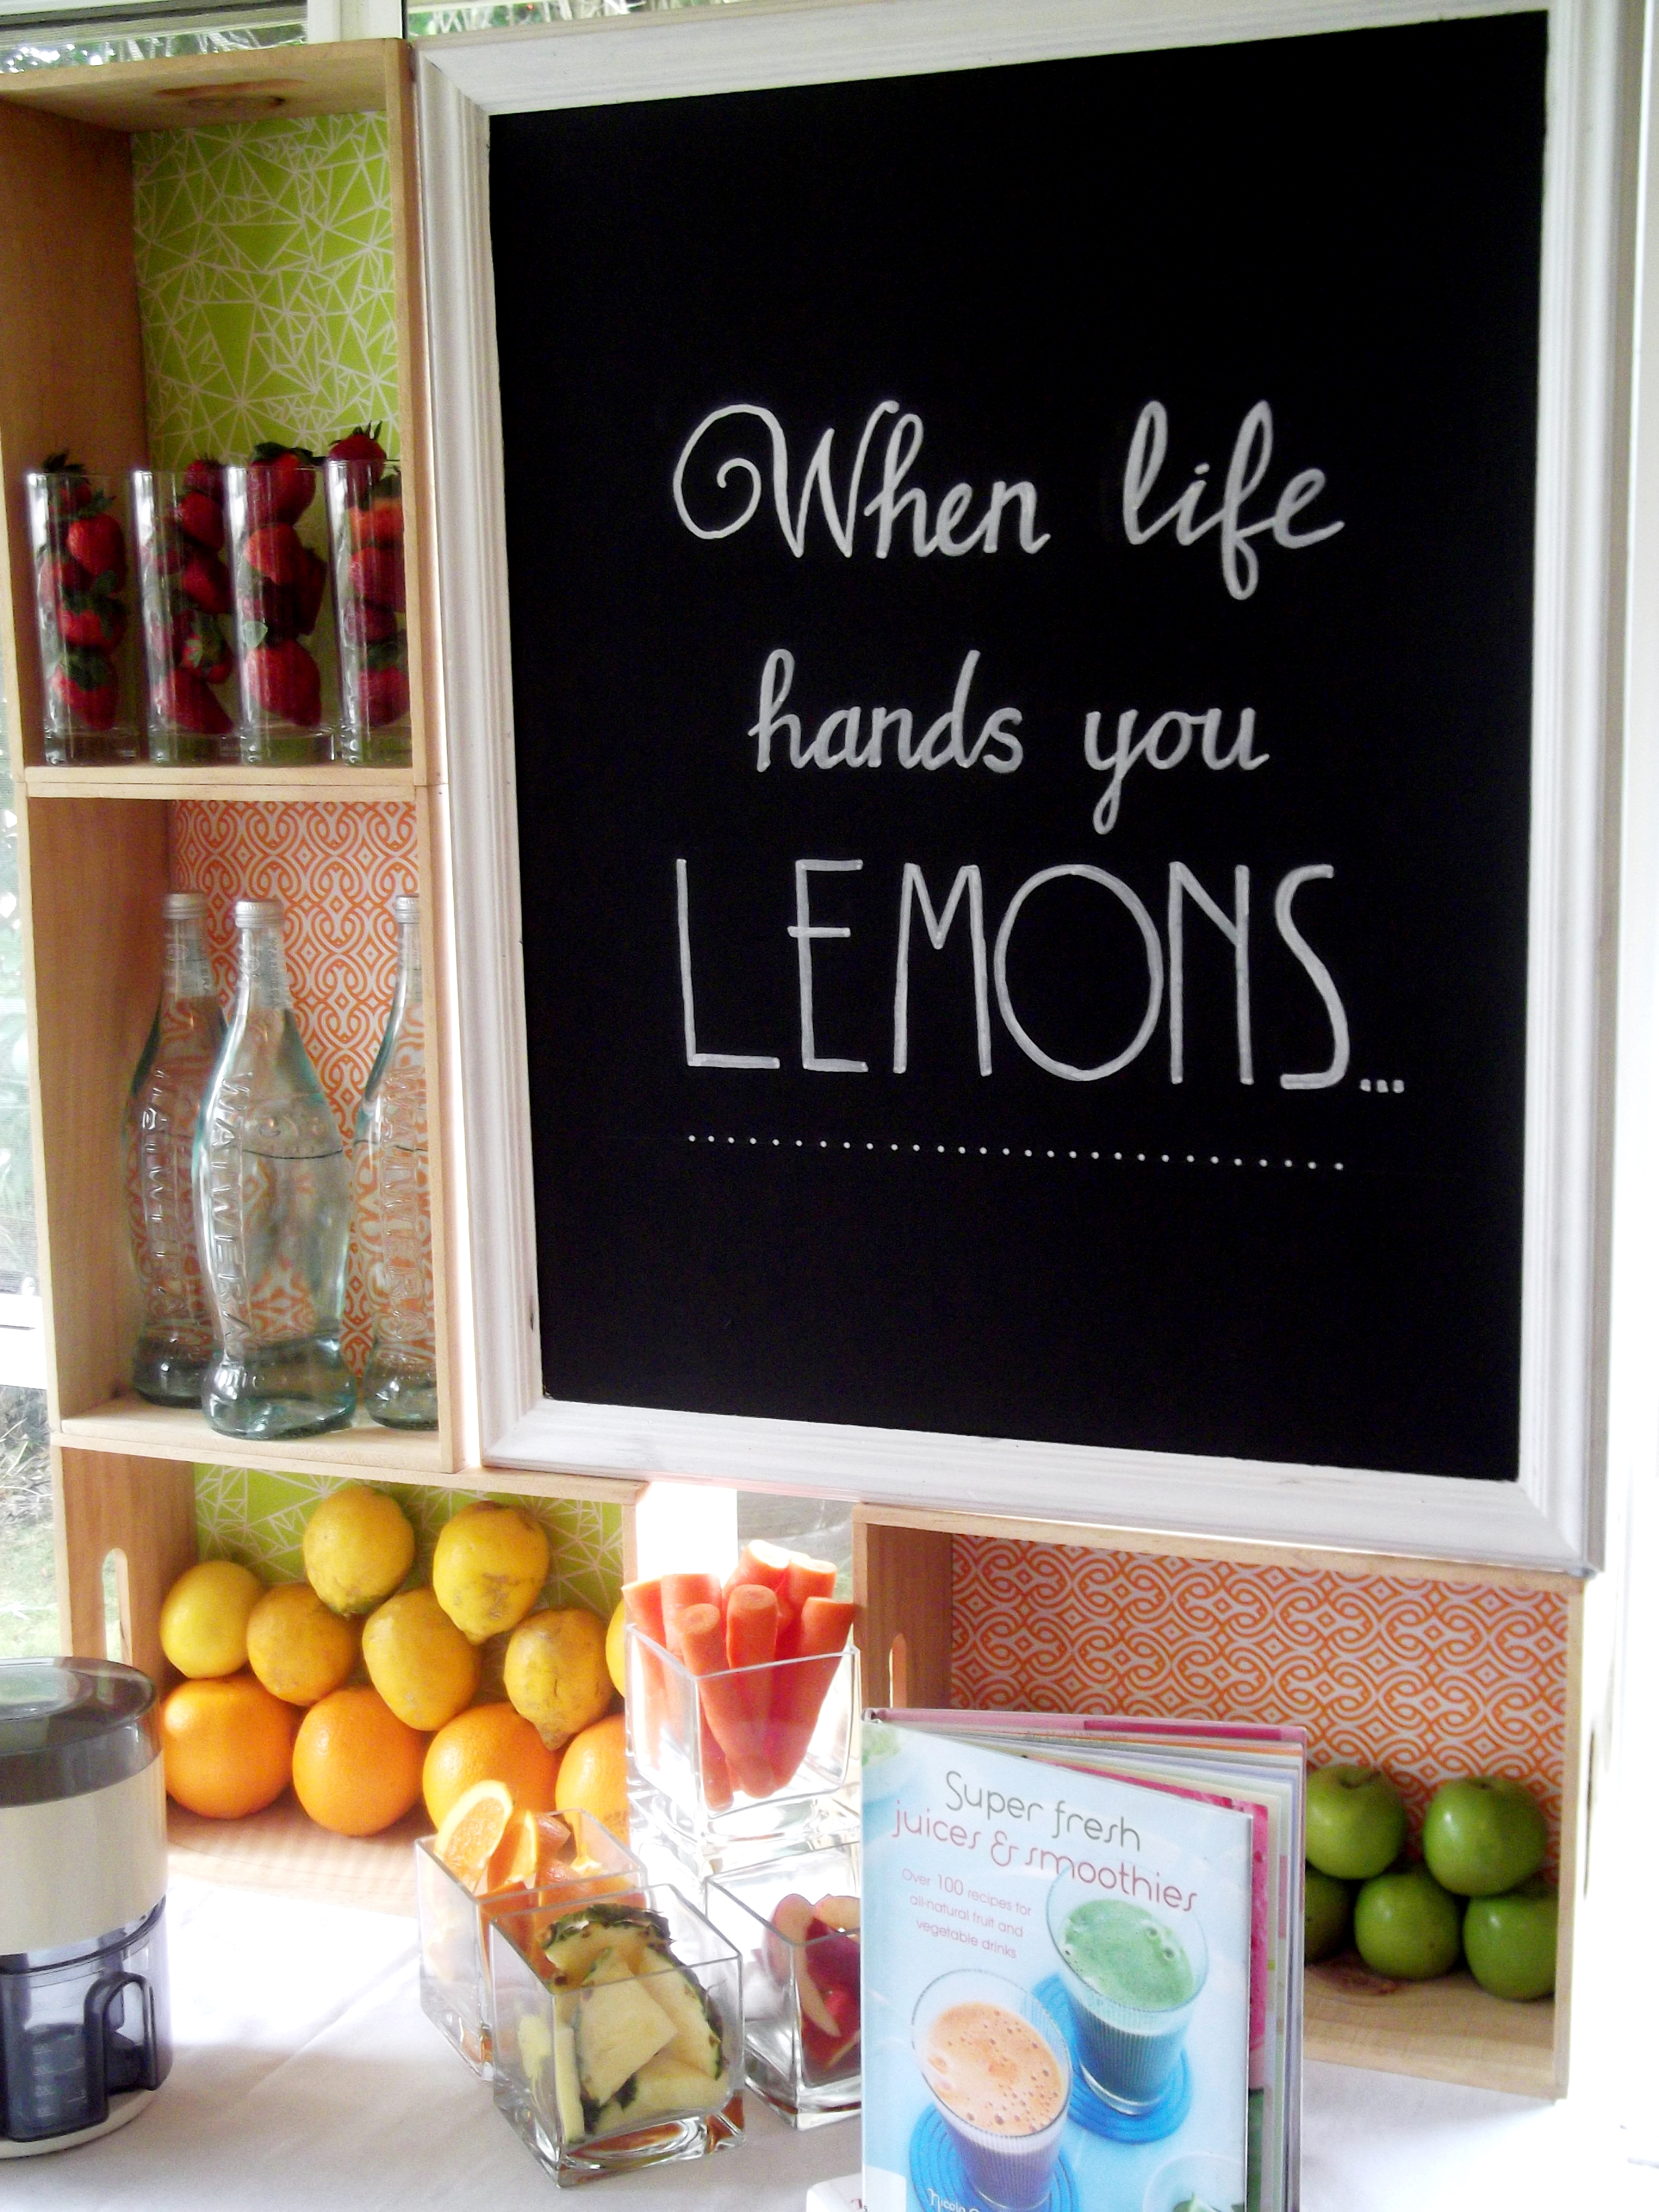
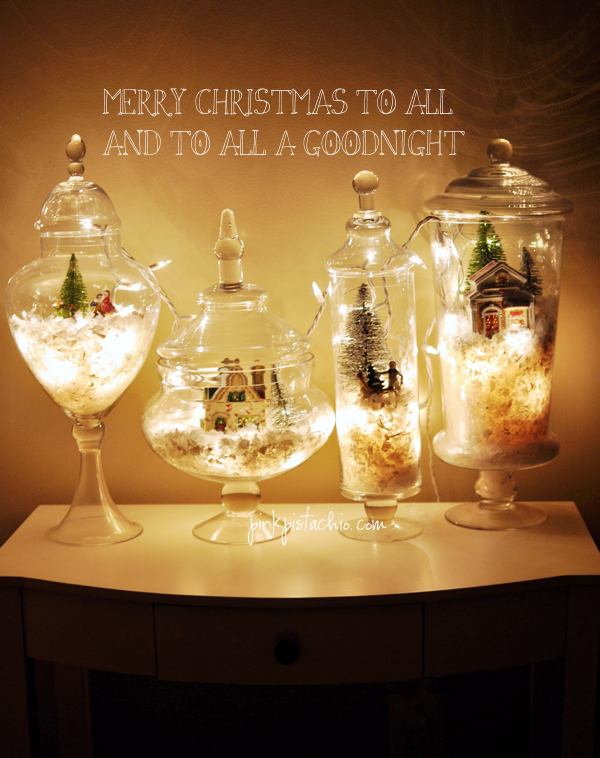
Pinterest is a great source of inspiration. I recently saw this idea and thought I just had to give it a go. Its so simple, yet so stunning. The technique used is called decoupage. You’ve quite possibly heard of it before – but if not this is the art of decorating objects with paper cut-outs. You can pretty much use any kind of paper and apply it to any type of surface, as long as the surface is smooth.

All you need for this project is:
  • Decorative Paper – I cut out my letters from some scrapbooking paper with foil accents.
  • Bottles or other objects if you’d prefer.
  • Adhesive and Varnish – Back in the day we’d use PVA to glue the paper to the object and then once it was dry we’d varnish/seal it with polyurethane. But now-days you can by a product that both sticks and seals. The most common brand for this is Mod Podge, they also offer a choice of finishes (either Matt or Gloss).


Decoupage BottlesFoil paper decoupage

Decoupage for Christmas

What to do:
  • Cut out your desired shape from the paper.
  • Glue it to your object and once it is dry apply the sealer. If you do use Mod Podge or a similar product be sure to follow the directions on the packaging.
  • Let it dry and your done.


Christmas Decor Foils in decor

Decoupage Decor for Christmas

This is such an easy project. It makes for a nice additional to your Christmas décor or even a nice gift. So why not have a go and don’t forget to send us pictures – we just love seeing the creativity of others.

Shopping Credits:
  • Bottles – purchased from Kmart
  • Paper & Mod Podge – purchased from Spotlight
  • Faux Red Berries – Lynne’s ( 500B Pollen St, Thames. They were on sale as she is going out of faux flowers)


Sign off


© 2015 As You Wish Events Ltd.  Want to use this article in your E-newsletter, blog, or website? You can as long as you include this complete statement: Auckland, New Zealand – Event Planner & Designer Nadine Crozier publishes the ‘As You Wish Events’ blog filled with secrets, tips and how-tos for planning your fabulous event. Get your exclusive inspiration, tips and tricks at http://www.asyouwish.co.nz.  As You Wish Events is an event planning and design company based in Auckland, serving the Auckland region and certain areas of Northland.


How to Stress Less this Christmas

12 Days of Christmas Ideas 2015 – Day 4

A little pre-planning can go a long way towards reducing Christmas stress, which is why today’s idea is a planning one.

Christmas in the early years

My family’s Christmas in the early days.

I’m from a family of five girls. If you’re thinking ‘Oh your poor Dad!’ no need to worry, the son-in-laws and grandsons have finally tipped the numbers in his favour. We are also quite a busy bunch and even when we are on holiday there is always a lot of activity. One day while on holiday together, and having just survived another last minute call to gather as a full family at another location, my sister (mother of 3 boys under 5) and I got to talking about how stressful it was to rally our families of pre-schoolers and get somewhere in 20 minutes – after all it can take that long just to get the kiddies to put on their shoes!

My family's Christmas now

My family’s Christmas now.

Next time the holidays came around I was determined to reduce the stress and enjoy our time together. I figured that a written schedule for the busiest part of our time together (this just happened to be Christmas Eve through to Boxing Day) would be very helpful in achieving this. So I gave my parents and my sisters a call and explained that I wanted to be able to enjoy our time together with as little stress as possible – which was something they all wanted too. I asked them what their hopes, plans and expectations were for this period of time. We also agreed that the schedule was flexible – we could easily change anything on the schedule as long as everyone was consulted. I typed up the schedule and sent out copies to everyone. All my family were happy and it worked well – yay!

Now I get that being this kind of organised is not for everyone, it really does depend on what your family is like. For our busy and super active family it worked well. But let’s just strip this idea back to the basics for a moment – stress comes when relationships are put under strain and let’s face it Christmas comes with straining factors. So why not try these 3 basic principles:

  • Talk with those you are spending your busiest times with this Christmas season. Explain why you want to talk with them about their plans – when people can see the ‘why’ they are often quicker to buy into it. Find out what their expectations of you are and of the holiday  season in general – unmet expectations lead to disappointments which leads to strain and stress.
  • Write stuff down and put it somewhere it can be seen – don’t expect your loved ones to remember every detail of your social calendar and what tasks need to be done. This is the busiest time of the year and it is also the end of the year, so they are probably worn out and ready for a holiday too.
  • Be flexible – prepare yourself for the fact that things may not go according to plan. Think about what might go wrong and organise a ‘Plan B’ now. Do this purely for your own peace of mind, no one else needs to know.

I hope this helps you as we approach this year’s silly season. I have truly found that when we approach life head on and are deliberate in our planning great things happen.


Sign off


© 2015 As You Wish Events Ltd.  Want to use this article in your E-newsletter, blog, or website? You can as long as you include this complete statement: Auckland, New Zealand – Event Planner & Designer Nadine Crozier publishes the ‘As You Wish Events’ blog filled with secrets, tips and how-tos for planning your fabulous event. Get your exclusive inspiration, tips and tricks at http://www.asyouwish.co.nz.  As You Wish Events is an event planning and design company based in Auckland, serving the Auckland region and certain areas of Northland.


One Super Juicy Idea

12 Days of Christmas Ideas 2015 – Day 3

I recently spoke to a lovely group of ladies in which I used the example of creating a Hot Chocolate station. I love Hot Chocolate stations, they look great, the drinks taste amazing and they help to create a warm and cozy atmosphere. Sadly, for those of us living in the southern hemisphere Hot Chocolate stations at Christmas time are not such a practical idea. So this got me thinking – what could a summer alternative be?

Since I have a number of family members who love smoothies and fresh juices I thought how about creating a make your own Juice station.

Juice BarFresh Juices and Smoothies

Fresh fruit and vegetables

Strawberries and tall glasses

Homemade Juice Station

Armed with a few books from the local library (prior to this idea I knew very little about juicing) I went shopping for a variety of fresh fruits and veggies. The key here, so I learned, is to buy what is in season. If you grow your own even better. Also try and avoid using over-ripe produce. I decided to keep it very simple, but if you want to, you can get quite fancy. The little bit of fancy that I added were some bottles of sparkling water. I figured some people like to water down their juice a little and others like bubbles in their juice – so sparkling water seemed like a fun and healthy way to provide this option.

Waiwera Sparkling WaterJuices and Smoothie recipe books

Juice bar set up

Juicer and glasses

Gathering the equipment was the next thing to do. Glasses, knife, chopping board and a rubbish bin were some of the basics. And of course there was the juicer itself. I was fortunate enough to have been given a juicer a few years back. There are a few different types of juicers on the market. They all have their pros and cons, but at the end of the day they all make juice. So whatever you choose is fine. I’ve also seen these on Trade Me and in the second hand stores – so don’t feel you have to spend big bucks.

Juice station setupClose up of Juice Bar

When Life Hands You Lemons

Finally it was set up time. Really you could set this up anywhere and in a variety of ways, but I opted to go with a bit of a rustic look that had a fresh and citrus twist. I used some wooden gift boxes to create the shelves. I lined these with vibrant wrapping paper that I brought from Warehouse Stationery. And I then added a chalkboard sign which I made out of an old picture frame that I found in a second hand shop.

And there you have it – one ‘Make You Own Juice Station’. There are so many reasons why I love this idea. Yes it’s healthy, looks good and tastes great, but it is also a help-yourself-solution to serving beverages that is fun and interactive. A little bit of pre-planning and setting up beforehand means you can enjoy the time you have with your guests even more.

Sign off


© 2015 As You Wish Events Ltd.  Want to use this article in your E-newsletter, blog, or website? You can as long as you include this complete statement: Auckland, New Zealand – Event Planner & Designer Nadine Crozier publishes the ‘As You Wish Events’ blog filled with secrets, tips and how-tos for planning your fabulous event. Get your exclusive inspiration, tips and tricks at http://www.asyouwish.co.nz.  As You Wish Events is an event planning and design company based in Auckland, serving the Auckland region and certain areas of Northland.

Fabulous Foils for Christmas

12 Days of Christmas Ideas 2015 – Day 2

Foil christmas cards from Pinc Ltd

If you’ve been following this blog for any amount of time you will most likely know how much I love shiny things. Yes, I’m quite the magpie. While on a recent search for wedding stationery I came in contact with Margriet, from Pinc Ltd. This great local business, having started out specialising in pocketfold envelopes, had recently branched into foil printing and the minute I saw the samples I fell in love.

Margriet from Pinc LtdHaving had the pleasure of seeing their foil product range grow over the last few months, I was thrilled to have Margriet join us in an interview for our 12 Days of Christmas Ideas – after all what time of year goes better with shiny and foil than Christmas, right!

A few years ago Margriet started manufacturing pocketfolds and sleeves for wedding invitations and gift vouchers. This range quickly grew to accommodate various other small items, embellishments like starfish, charms, printed ribbon and more. Earlier this year they were presented with a wonderful opportunity to start foil printing, which they took on with much excitement. The business is now based in Red Beach on the beautiful Hibiscus Coast here in Auckland.

 Margriet, it’s lovely to have you join us. Can you please tell us about your range of readymade foil products?

We started the foil printing earlier this year, like you I am drawn to shiny, sparkly things and as soon as the idea of foiling was presented to us I was so excited! We have printed such a range – business cards, wedding invitations, Christmas cards, packaging… and more recently we have acquired a large format foiler that can do up to A3 size. We’ve been having a lot of fun with that machine, making décor prints and various wall art pieces. Doing one off little frames as art pieces too. We currently have gold and silver foil for the A3 prints, and we’ve actually just today ordered some samples from a local supplier to see if their coloured foils work on that machine. So many options! Very exciting!

Foil christmas cards

They are just so beautiful. How would we go about getting our hands on some of these?

At this stage we have a facebook album with prints for sale – click here. You can message us via that or our contact details are on the page too. We have also attended a few local markets which has been a lot of fun.

One off framed foil print

Do you take orders for custom designs? If so how would someone go about that?

Absolutely! We’d love to add to the range so message us your ideas, we’ve very happy to do custom designs.

Thanks Margriet, for taking the time to share these gorgeous products with us.

Wow, this is exciting stuff. These would truly make beautiful gifts or lovely additions to your Christmas décor.  Make sure you get in touch with Margriet and her team at Pinc Ltd. You can do this by visiting their website www.foilprinting.co.nz or keep in touch with them by following them here on Facebook.

Sign off


© 2015 As You Wish Events Ltd.  Want to use this article in your E-newsletter, blog, or website? You can as long as you include this complete statement: Auckland, New Zealand – Event Planner & Designer Nadine Crozier publishes the ‘As You Wish Events’ blog filled with secrets, tips and how-tos for planning your fabulous event. Get your exclusive inspiration, tips and tricks at http://www.asyouwish.co.nz.  As You Wish Events is an event planning and design company based in Auckland, serving the Auckland region and certain areas of Northland.


7 Christmas Terrariums We Love

12 Days of Christmas Ideas 2015 – Day 1

Growing up I remember going to visit my Aunty and Uncle who had these amazingly detailed little ceramic houses displayed on the shelves in their living room. I would spend ages staring at them imagining what it would be like to play in them had I too been of a miniature size. It was like a window into another world. A world where my imagination would take over and everything seemed magical. It is this same sense of magic and imagination that has drawn me to include this as one of our Christmas Ideas for 2015.

So whether you call them terrariums, snow globes, aqua jars or something else completely, I hope this collection will inspire you for your own creations.


Sign off


© 2015 As You Wish Events Ltd.  Want to use this article in your E-newsletter, blog, or website? You can as long as you include this complete statement: Auckland, New Zealand – Event Planner & Designer Nadine Crozier publishes the ‘As You Wish Events’ blog filled with secrets, tips and how-tos for planning your fabulous event. Get your exclusive inspiration, tips and tricks at http://www.asyouwish.co.nz.  As You Wish Events is an event planning and design company based in Auckland, serving the Auckland region and certain areas of Northland.


An Outdoor Christmas Table Setting

12 Days of Christmas Ideas 2014 – Day 12

Yes, this is our 12th day of Christmas ideas – and I feel we’ve saved the best until last.  Last Christmas I got talking to a lovely lady who was struggling with how to set her outdoor table, with an umbrella, for Christmas dinner.  While we came up with a few ideas at the time, I continued to think about it throughout the year – which has lead me to today’s idea.

Many times I have gone to set a table that has an umbrella and ended up getting frustrated because the pole just got in the way.  So the whole point with this table setting was to create a purpose built centrepiece that would embrace the umbrella pole.

Table Setting - Page 003
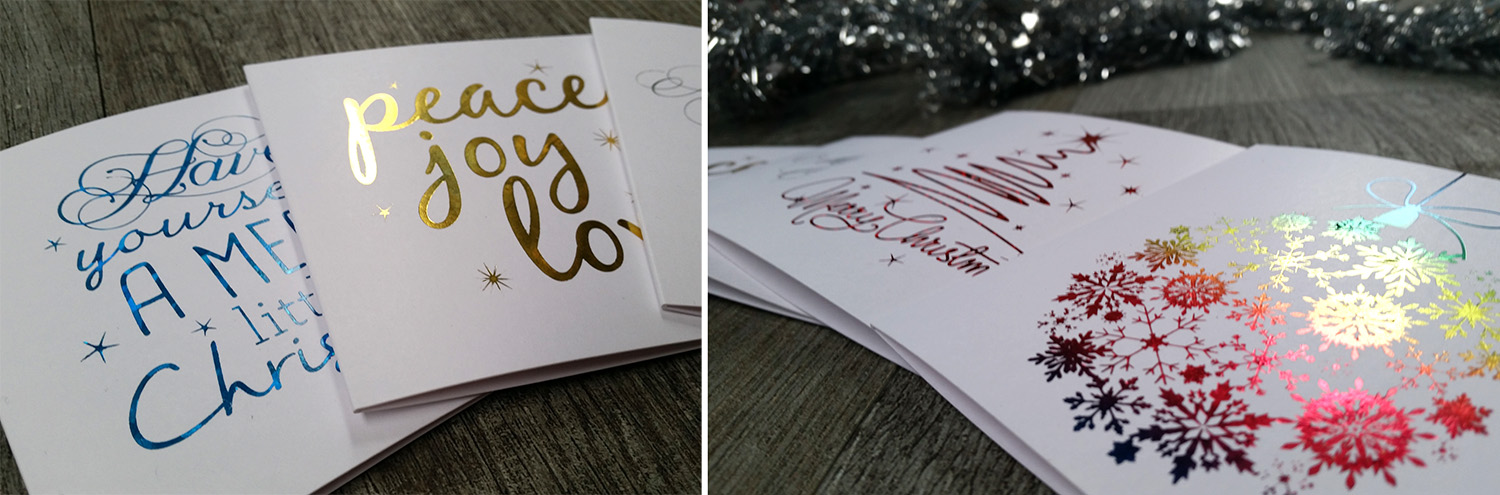
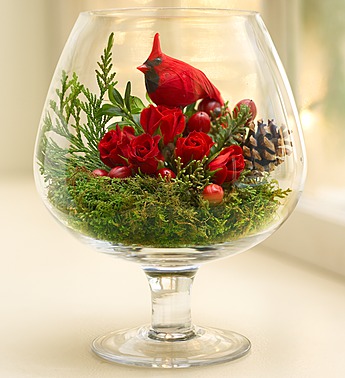
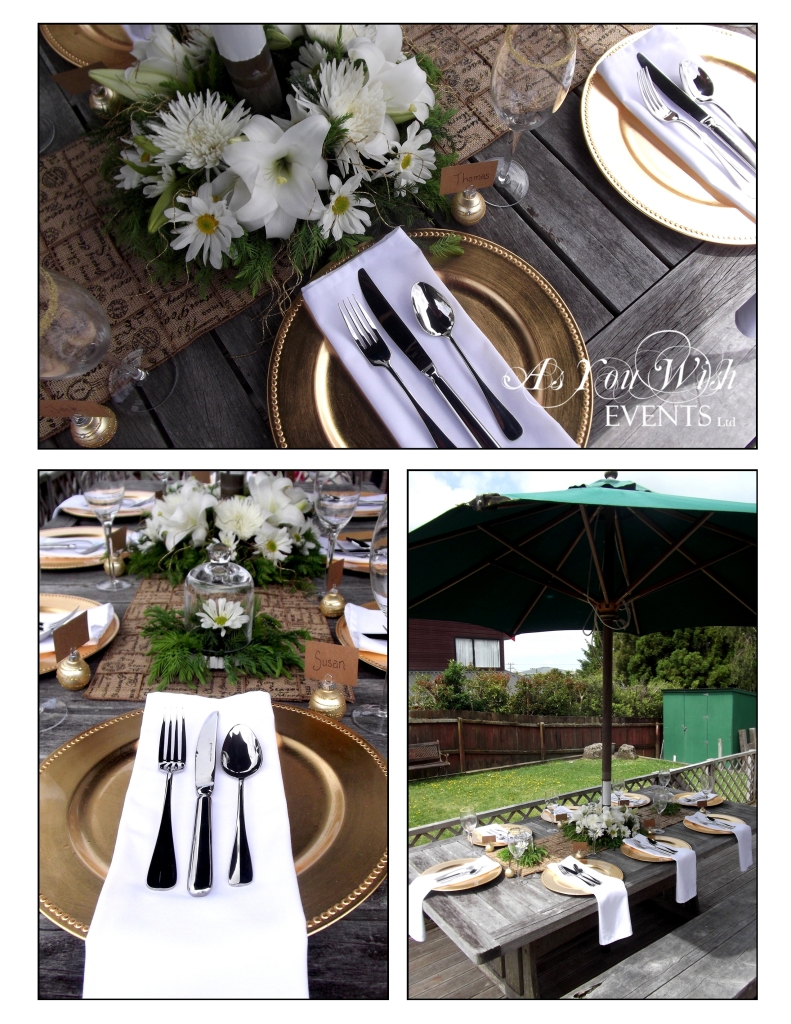
I had seen in my local Spotlight store that they had floral foam rings that were in a plastic ring container – I believe they made for wreaths but I figured why not just arrange the flowers to look more like a centrepiece.   I went to see the lovely ladies at Bethany Gardens Florists and together we put together this beautiful White & Gold arrangement.  The next key element to this table design was the table runner.  I came across this beautiful Christmas ribbon and instantly fell in love with it.  I wanted it to be a feature on the table, so I set about weaving it together to make the runner.  When making a table runner like this the key is to make sure that you have an odd number of ribbon lengths running in each direction – this means you have a perfect centre square that you can cut and fold back to make a very tidy umbrella hole.  Once all the weaving had been done I stitched around the edge in a gold metallic thread to hold it all together.

Table Setting - Page 002

With those two key elements in place I set about adding the final details.  The gold charger plates and white linen napkins tied in nicely which the centrepiece and table runner.  These were hired from Covers Decoration Hire.

Table Setting - Page 001
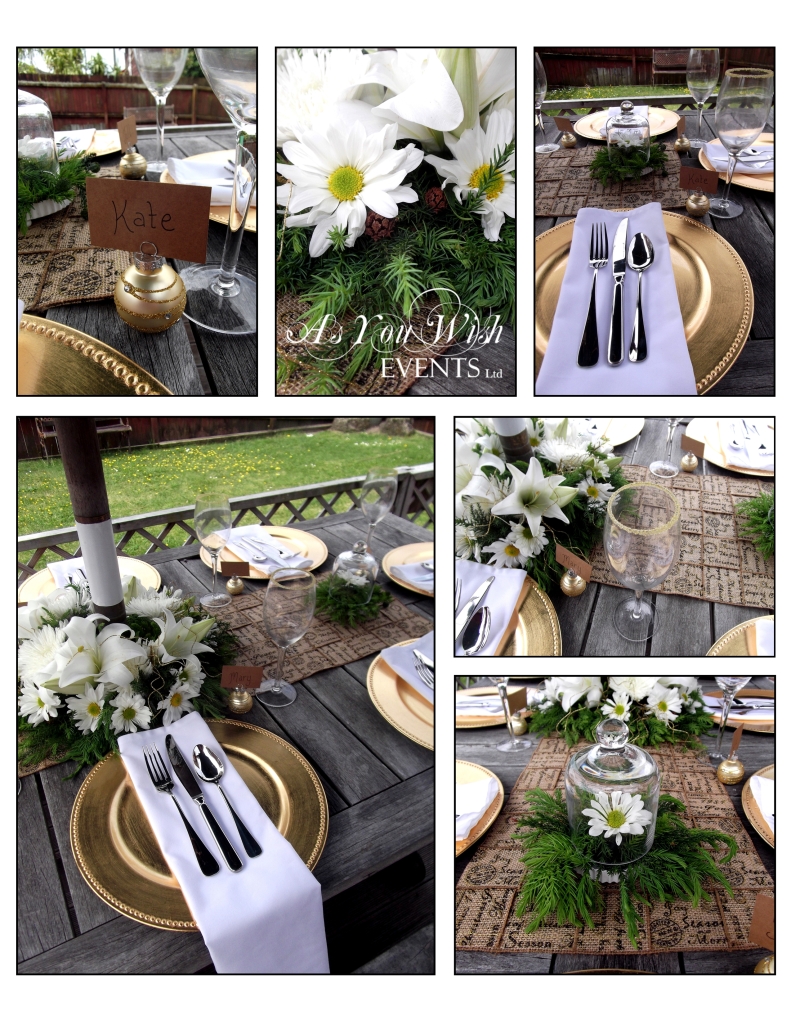
Lastly I added the place cards holders which I found at The Warehouse and the gold sugar rimmed wine glasses.  Overall I think all the elements came together nicely creating a rustic, yet elegant Christmas Table setting.  I hope this inspires you for your Christmas table.

Sign off

The Planning Diary

12 Days of Christmas 2014 – Day 11

02 – Sarita L3
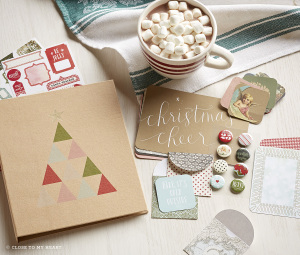
When it comes to reducing stress around a busy event filled time of year, pre-planning is the number one key. Another key is to write everything down – that way you are reducing the strain on your brain that comes from trying to remember all the things you are supposed to do.  This year I thought I should take my own advice and write all my Christmas planning down, and to do this I found this beautiful Christmas diary from Close to My Heart.

Their Christmas Crush Album has 15 beautifully designed pages, including a few little plastic sleeves to slide in notes, photos or whatever else takes your fancy.  My plan is to write into it all our advent activities; other appointments; Christmas décor plans; shopping lists; to-do-lists; travel plans; menus; recipes and photos.  Then at the end of the season I’ll also have a lovely keepsake.

However you decide to plan for this Christmas I hope it frees you up to enjoy the season even more and if you’re interested in purchasing your own folder like this one then click through to Close to My Heart and order online.  If you want to see how I get on with putting mine together, connect with us on Facebook as I’ll be adding the occasional update.

Sign off


The Cupcake Dome

12 Days of Christmas Ideas 2014 – Day 10


Cupcake dome
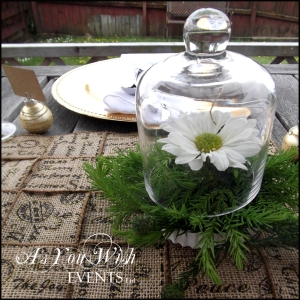
Here is a little gift idea to add to this season’s collection.  These cute Cupcake Domes are perfect for party favours and those small thank you gifts we like to give at Christmas time.  Despite what the name suggests they are surprisingly versatile – they can be used for much more than just cupcakes.

Pictured here, we have used them as a container for a small flower arrangement.  Some other things I’ve seen them used for are as follows:

  • Stacks of homemade sweets, such as fudge, rum balls & truffles.
  • You could even do chocolate coated strawberries.
  •  Or creating scenes like in a snow globe, using small figurines or other ornaments.


If you are interested in adding some of these to your Christmas shopping list, you can pop in and see Beryl at Covers Decoration Hire in New Lynn (they have these in their retail section) or contact us and we can help you find some.

Sign off


Paper Craft Christmas Decor

12 Days of Christmas 2014 – Day 9

Recently I went to Spotlight and purchased one of those jumbo pads of 12 x12 Christmas Scrapbook paper.  My plan was to see how many Christmas decorations I could make using just that pad.  After try all sorts of paper craft ideas I settled on three favourites that I would like to share with you as our 9th Christmas idea for 2014.


1.  The Paper Chain

Paper Chain
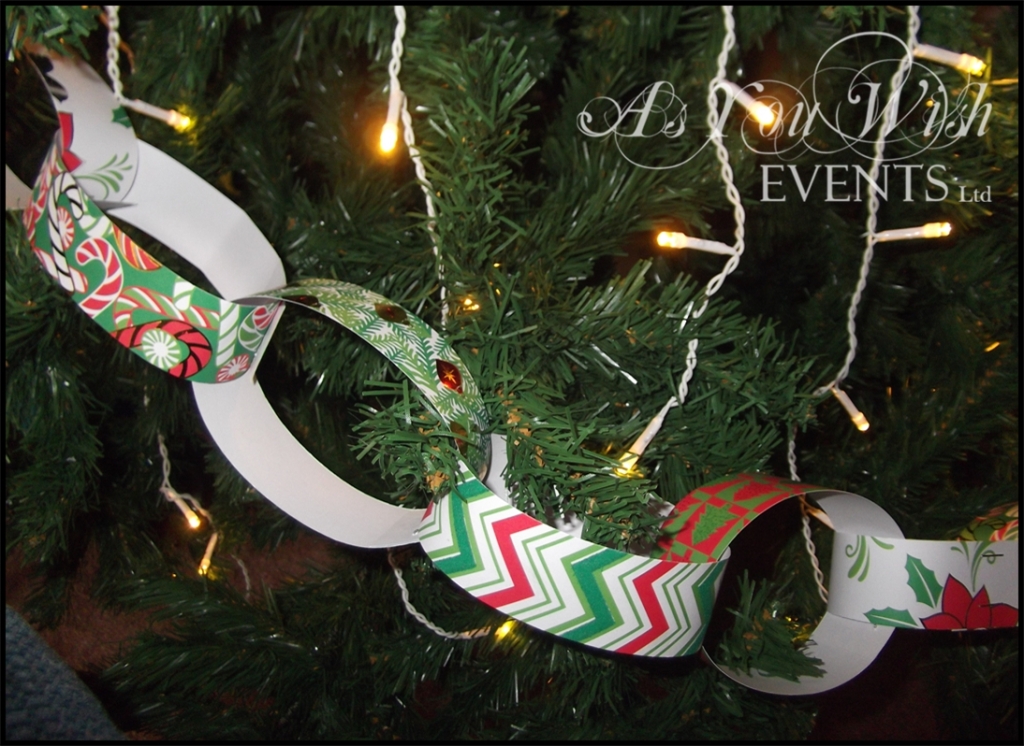
It’s an oldie but a goodie.  In fact I have vague memories of making these in primary school.  Super simple to make and a great craft to do with the kids.  For those who never had the opportunity of making them as a child, all you need to do is cut a bunch of strips of paper all the same size, take one strip and make it into a ring shape then secure it with a couple of staples. Then thread a second strip though the first as you make that one into a ring and then secure it with a couple of staples.  Keep repeating the process until you are happy with the length of your chain.  If your children are a little older and can handle a stapler on their own you could even make it into a competition to see who can make the longest chain.


2. Stitched Paper Garland

Stitched Garland

These days the sewing machine can be used for more than just fabric.  I love these stitched paper garlands.  They can be used in a variety of ways too.  You can hang them from the ceiling or on your Christmas tree, use it in your gift wrapping, they can even be used as an embellishment on your scrapbook pages.  While I wouldn’t recommend this as one for the kids to make on their own, it is still rather simple.  You’ll need a sewing machine, thread, paper and a shape punch (as you can see, I chose to use a circle punch).  First punch out heaps of shapes from your paper.  If your paper is white on one side and patterned on the other and you want to make your garland double sided you’ll need twice as many shapes. Thread up the sewing machine and begin sewing straight through each shape.  If you are going for the double sided option you’ll need to put two shapes back to back before sewing them.  I counted about 5-6 stitches before putting the next shape into the machine to create the gap.


3.  The Paper Rosette

Paper Rosette

These are my absolute favourite.  They are the most difficult to make but they look amazing when arranged together on a wall or around a doorway.  If you are going to attempt these I highly recommend buying a Scoring Board as they making the folding process so much quicker.  You can buy these through a Close to My Heart Consultant or at most Spotlight stores.  What I thought looked extra awesome was layering a couple of different sizes together and inserting a paper or plastic doily in between to make a more complex rosette.  I found this excellent tutorial on You Tube that taught me all I needed to know about making these fabulous rosette decorations.

I hope this inspires you for your Christmas décor.

Sign off


Pretty Punch for Summer

12 Days of Christmas Ideas 2014 – Day 8


Pretty drinks, with fancy garnishes and swizzle sticks are a perfect picture of summer.  Whether it’s served by the glass or set up as a help-yourself drink station, you can guarantee your guests will appreciate it on a hot summers day.

For today’s idea I want to share a couple of pretty easy punch recipes.  The first was introduced to me by a friend a few years back and it couldn’t be more Kiwi, as the main ingredient is the iconic NZ soft drink, L&P.

Pineapple Punch

Pineapple Punch

Pineapple Punch
Ingredients: 
  • 1L Pineapple Juice
  • 1.5L Bottle of L&P
  • 2-3 Tbsp Canned Crushed Pineapple
  • Mint leaves to garnish.

Mix all of the ingredients together, garnish with a few mint leave.  Serve chilled (Makes approx. 2.5 Litres).


For the second punch recipe I wanted it to be pink in colour and without any fizz – just to be different I guess.  After a lot of trial and error I think I have a winner in this Pink Lemonade recipe.

Pink Lemonade

Pink Lemonade

Pink Lemonade
Ingredients:
  • 2 cups of Sugar
  • 2 cups of Boiling Water
  • 3 cups of Lemon Juice
  • 2 cups of Cranberry Juice
  • 12 cups of cold water

Place the sugar and boiling water into a large saucepan or heat proof bowl.  Stir until the sugar has fully dissolved.  Then stir in the lemon juice, cranberry juice and cold water.  If it is still too sweet for your liking, just add more water.  Serve chilled or over ice (Makes approx. 4.5 Litres).

I hope this inspires to you enjoy a refreshing glass of pretty punch this summer.  And if you have a favourite punch recipe that you’d like to share with us, we’d love to hear from you – either send us an email or type it into the comments box below.

Sign off