Mini Layered Cakes

12 Days of Christmas Ideas 2014 – Day 3

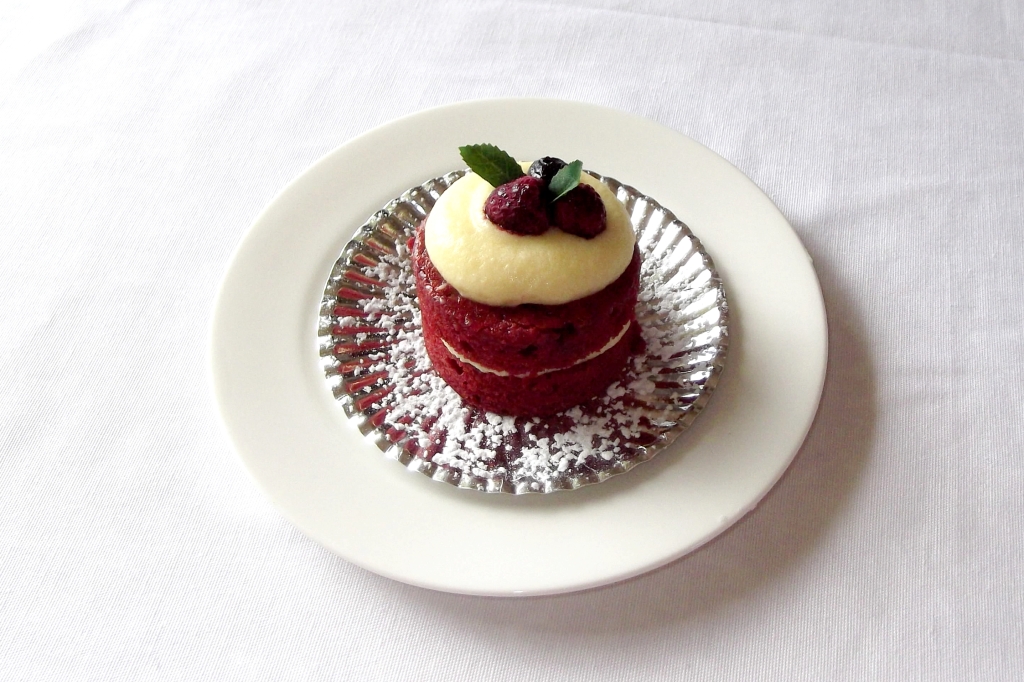
Christmas is synonymous with entertaining and when is come to entertaining I think there is nothing better than a simple way to create a delightful and memorable experience for my guests.  These beautiful Mini Layered Cakes are one of those ways.

dscf3079

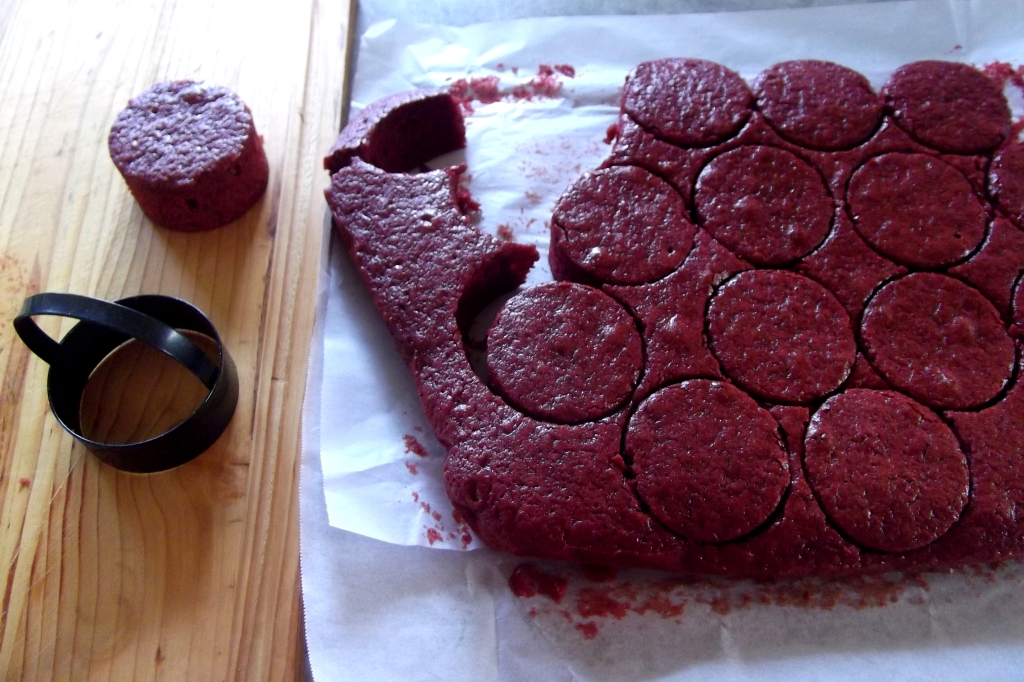
To make these amazing little cakes all you need is a flat cake (approx. 4cm deep), a yummy icing or filling and a round cookie cutter (approx. 7cm diameter).  Use the cookie cutter to cut out rounds from the cake, then split them horizontally through the middle.  Add some of the filling to the middle and some on the top.  Then garnish to finish.

dscf3057

I have tired this idea here with a Red Velvet cake and Cream Cheese and Mascarpone Filling.  But I could also imagine it working well with a Chocolate brownie and Mascarpone cream or even a Chocolate Cake with a Ganache.  I’m sure the options are endless and if you came up with a good one we’d love to hear about it.


Homemade Play-dough Gifts

12 Days of Christmas Ideas 2014 – Day 2


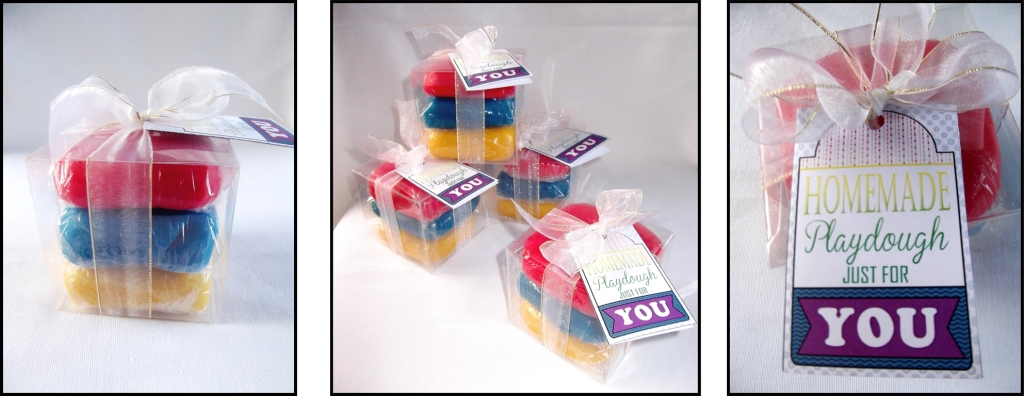
The Playdough Packaged

I love homemade gifts.  To me they say “I thought of you and I took the time to make something that you would like”.  I recently planned a party that had play-dough as one of the activities.  I was reminded how novel it can be and how people of all ages will always take the opportunity to mould and shape all kinds of creations.  The other thing I was reminded of was how as parents we will often shy away from letting our little children play with it for fear that they will eat it and that the ingredients may not be safe for them to consume.

This is why I thought these homemade play-dough gifts are ideal.  The children can have all the joy of playing with the play-dough, and the parents can have piece of mind that the ingredients are safe should it end up in their children’s mouths.

Homemade play-dough is very easy to make, and so you can create your own play-dough gifts, I thought I would share with you my favourite play-dough recipe.  All the ingredients are available from your local supermarket, and are commonly used in baking, which is how we know it’s safe to eat.   However, because of the high salt content I would still discourage it.

Play-dough Recipe
  • 1 cup Salt
  • 2 cups Flour
  • 4 tsp. Cream of Tartar
  • 2 Tbsp cooking Oil
  • 2 cups of water
  • Food colouring

Place all of the ingredients into a large saucepan.  When it comes to adding the food colouring the more you add the more intense the colour will be.  I quite like the strong colours, so I usually add up to 2 teaspoons.  Just bear in mind that as you cook the dough the colour will deepen.  Mix all the ingredients together until it becomes a smooth paste and then place over a medium heat to cook it.  It is important to stir the mixture constantly – this helps to distribute the heat throughout the mixture and will also stop the dough from burning (Note: it is normal for some to stick to the bottom of the saucepan).  As it cooks the mixture will start to stiffen and the colour will deepen.  You will know it’s is ready when it clumps into one big ball, and doesn’t stick to you when you touch it – this usually takes 3-5 minutes. I then turn the play-dough out onto a hard surface and knead it for a bit to insure an even consistency.  It will be quite warm but it is not likely to burn you.  This play-dough will last for months & months, as long as you keep it in an air-tight container.

The Playdough Process

To make the gifts I chose to make 3 batches of play-dough in primary colours.  I figured the play-dough could then be mixed together to make other colours.  I then cut a piece from each colour, wrapped it in plastic-wrap (to keep it air-tight) and layered them into a 8cm x8cm clear cupcake box.  I then finished it off by tying it with a white organza ribbon and adding a rainbow coloured gift card that I designed.  This amount of dough easily makes 6 gifts of this size.  And if you decide to make your own and would like to use our gift cards you can download them here for free.

 Playdough Gift Card Download Here


I hope you enjoy making your own play-dough, whether its for Christmas gifts, party favours or even just as a holiday activity.  If you have any questions or comments we’d love to hear from you.  You can either leave a message in the comments box below, email us or join us on our Facebook page.


Creating Christmas Memories – a guide to an activity based Advent calendar

12 Days of Christmas Ideas 2014 – Day 1

Welcome to As You Wish Events’ 12 Days of Christmas Ideas for 2014.  It was this time last year when we launched this blog with 12 Days of Christmas Ideas, so I guess you can say it is our Blog’s 1st Birthday.  Last year we began with our 5 favourite Advent Calendars, and because I love the countdown to Christmas and how it builds anticipation for the actual day, I thought we’d begin this year’s ideas with how to create an activity based Advent calendar.

Last Christmas, with my son being old enough to appreciate Christmas more fully, we decided that we wanted to do all we could to create great Christmas memories.  So I set out to fill our advent calendar with experiences that would do just that.  And thus this guide was born.  Many of our examples reflect the values we hold as a family, but I’m sure that this guide can inspire you to come up with activities of your own, that will work for you and yours.

Playgroup

Fun on the Bouncy Castle at Playgroup

Christmas Social Group Functions – A great place to start is by adding all the Christmas functions from social groups you belong to.  So for us the first things that went on the advent calendar last year were the Christmas party at playgroup, the Children’s Christmas Production and family fun day at church.

Community Events – Next look around your community to see what Christmas events are happening for the public, and select a few that you would like to go to and add them.  If cost is an issue for you, don’t fret.  Many community events are gold coin donation or free to attend.  We ended up choosing a ‘Live Nativity Drive Through’ put on by a local church and going to see Christmas light displays around our area. Light Up Christmas is a great website for finding the best light displays in your area and it even helps you to plan the best route to take.  And of course we included a trip to see Santa at Smith & Caughey’s Enchanted forest.

Sign to Santa's House

The Enchanted Forest at Smith & Caughey, Queen St

Gatherings with Family and Friends – Don’t be afraid, to be the first to suggest that you should get some dates down on paper.  Pre-planning does help relieve the stress of the season.  Last year we began the tradition of building Gingerbread houses with the cousins, so that became one of our advent activities.  I also thought that a picnic at a playground would be something my son would really enjoy, so we invited a couple of friends and took with us some juice in Christmas decorated bottles and fairy-bread (which we called Angel-bread because we made it with an angel cookie cutter and Christmas coloured sprinkles).  Simple, but great fun.

Things you have to do anyway, but with a Christmas twist – There are always things that can’t be avoided so why not work them into the calendar.  We had to travel to be with family so we decide to build that into our Christmas advent activities.  The Christmas twist we added was that we would stop at a beach along the way for a run around and Ice cream, to which we added some Christmas coloured sprinkles.  A friend of mine recently told me about how the New World Supermarket in Ponsonby, Auckland, do Christmas in a big way.  They add special displays among other things – so maybe grocery shopping could even be a fun advent activity.

Christmas decorating – This is one of my favourites, partly because I love to decorate but also because you can break it down into stages and make it last more than one day. We started with putting up the Christmas tree and decorating it together as a family. Another day we set up our Nativity Scene and on a couple of other days we put up other specific decorations.

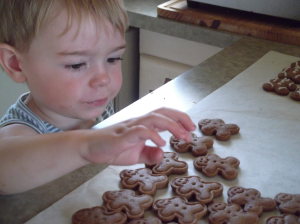
Christmas baking & crafts – I like to make Christmas cookies so we designated a day or two for my son and I to do baking.  I measure out the ingredients and we count them out together as he tips them into the bowl.  He also helps with the mixing.  Of course the part that was most fun for him was licking the bowl and eating them after.  We also made Christmas decorations together like paper chains and lanterns which we added to the tree and around the house.
Baking day

My son with the cookies – a dangerous combination

At home activities for the kids – By this stage the Advent calendar should be getting pretty full.  To fill in some of the final spaces we did things like Christmas colouring-in pages, watching Christmas DVDs, and reading Christmas stories.

At home activities for the family – For the last of the spaces consider adding some family activities.  For our family activities we made a short Christmas video greeting; had a family movie night complete with popcorn and a Christmas movie of course; and celebrated Christmas’ gone past by looking at Christmas photos from years gone by.


So there you have it, an activity based advent calendar that will create beautiful Christmas memories for you and your family.  Now if you do get to the end of this guide and you still have gaps to fill, there is nothing wrong with adding in a few chocolates. Or you can join us on our Facebook page and we might be able to help you come up with a few more ideas.
 

Some Super Ideas for Celebrating Easter

Easter is sneaking up fast on us again.  This is another of my most favourite holidays, so I’ve been out looking for some exciting ideas for our family’s celebrations.

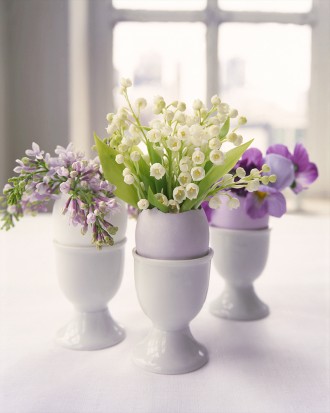
Flower Arrangments in Eggshells

Such a simple yet sweet idea to bring a touch of Easter into your home.

As Seen On: Martha Stewart.com


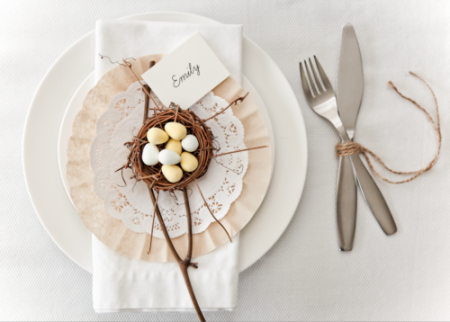
Easter Table Setting

I love this table setting by Boxwood Clippings. It has a rustic elegance about it with the little nest, paper doily and coffee filters. Brilliant!

As Seen On: Boxwood Clippings


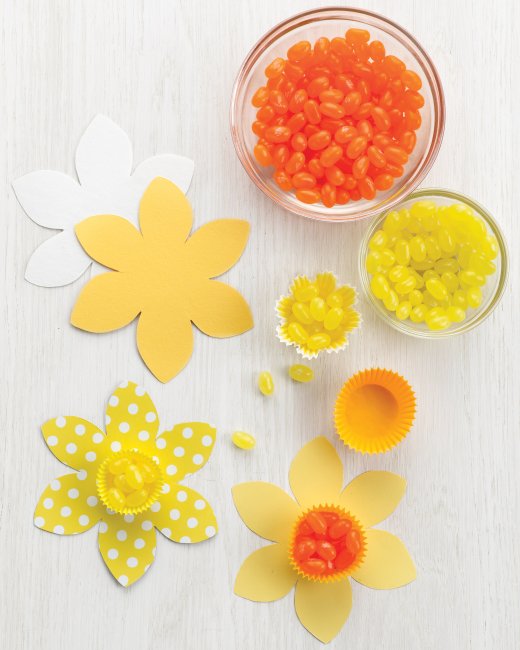
Daffodil Candy Cups

Not only is this a great craft idea to do with the family, its also a great option for those who have allergies that stop them from eating chocolate.

As Seen On:  Martha Stewart.com

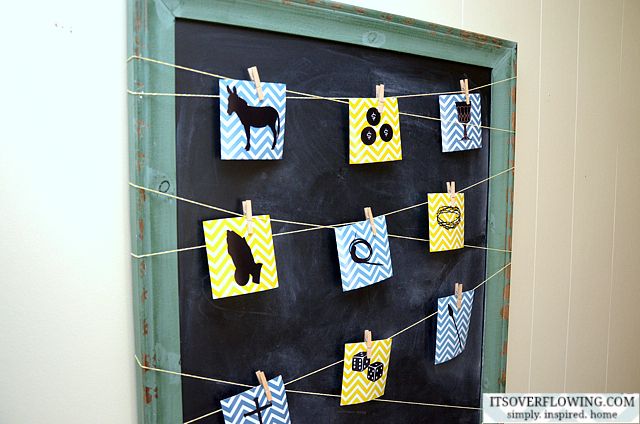
The Easter Story

What a beautiful way to keep the true story of Easter central to the holiday. Aimee from ‘It’s Overflowing’, offers the template for this as a free printable on her website. I absolutely love it!

As Seen On: It’s Overflowing


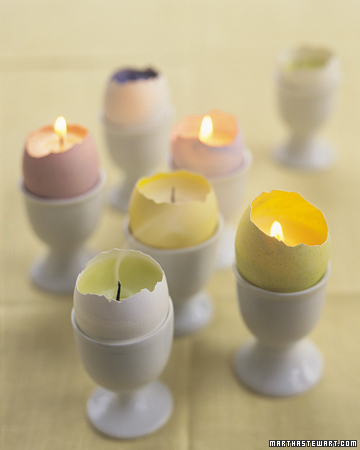
Egg Votive

Another fantastic idea from Martha Stewart.com

As Seen On: Martha Stewart.com

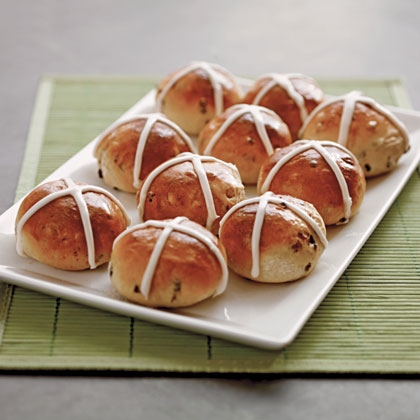
Hot Cross Buns

I just can’t imagine having Easter without Hot Cross Buns. Why not try making your own, maybe hunt out the old family recipe or give this one a try.

As Seen On: Spoonful

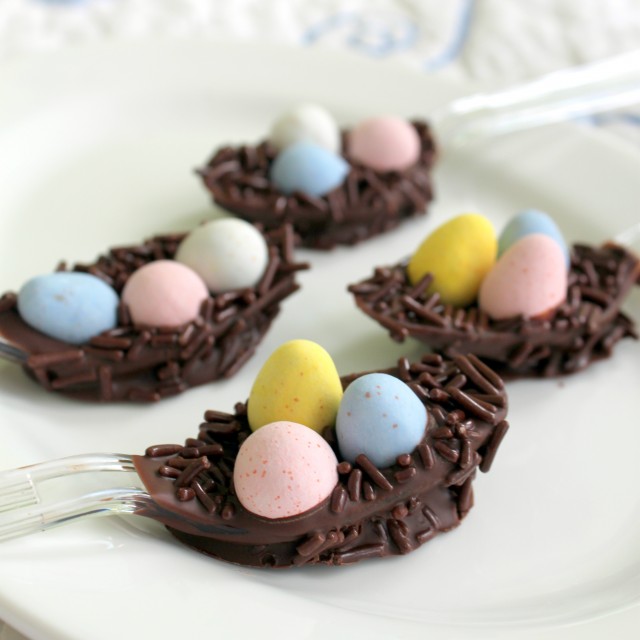
Chocolate Easter Egg Nests

A fun gift idea or maybe an activity for the family.
Mmmm, I would like to try stirring one into a nice mug of hot chocolate.

As Seen On: Life and Kitchen

If you have any Easter craft ideas, favourite Easter recipes or Easter decorations that you’d like to share, we’d love to hear from you.  Just share your ideas in the comments below or send us an email.  Happy Easter everyone!

Table Setting – What you need to know.

It has surprised me the number of times I’ve come across people working in the food service industry that don’t know how to properly set a table.  However I guess that it shouldn’t be that surprising with more of us eating in front of the TV or in cafés and restaurants that roll their cutlery in a paper serviette – not that there is anything wrong with that.  But when you’re faced with a more formal or special occasion, you may like to brush up on your table setting skills as it is a simple and low cost way to add style to your event.

To look at a fully set table it can be rather daunting.  You are most definitely not alone if you find yourself thinking “Really, how many glasses and forks do I need?”  The important things to remember are that a well set table shouldn’t have any unnecessary items, and that all you have to do is work your way from the outside in.


casual-table-place-setting

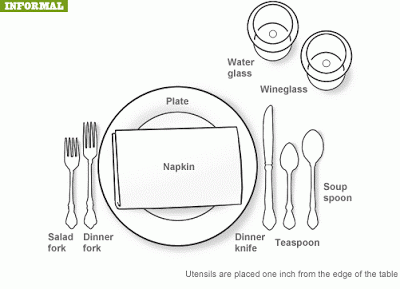
If it is your job to set the table a few things you need to remember are that the forks all go on the left of the dinner plate and the knives and spoons go on the right, with the glasses above them.  The bottom edge of the cutlery and the lower rim of the plate should all line up so that they are approximately 3 cm in from the edge of the table. This way guests should be able to sit down without knocking them.

formal-place-setting

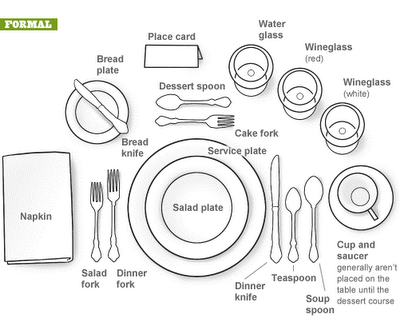
For the more formal of occasions, usually when the menu is pre-plated, a bread plate and knife is added above the forks, and the dessert spoon and cake fork are placed above the dinner plate so that they can be moved into place either side of the plate space once the other courses are completed.  Napkins can be either placed to the left or on the plate.  The only other item to mention is the service plate, sometimes called a Charger.  No food is served directly on this plate, instead it serves as an under plate for the plate holding the first course.  The service plate will then be cleared either with those from the first course or will be exchanged for the plate holding the second course.

Lastly, while there are the traditionally accepted ways of setting a table it is also quite common to tweak these to suit the specific needs of your occasion.

If you want to learn more about table settings then I recommend the following articles:


Counting Down to Valentines Day – Part 2

What to do, what to do?  Dinner and a Movie?  Sometimes we can easily get stuck in a rut when it comes to date ideas, so here are  5 Valentine’s Date ideas, to spark your dating creativity.

1. ‘A Great Pick Up’ – Sometimes what could be a rather unimaginative date idea can be made memorable by arriving to pick up your date in an unexpected mode of transportation.  Yes there is the cliché limousine, but why not try something different like a scooter, horse, tandem bicycle, golf cart or roller blades.

2. ‘On a Mission’  – Just like the old party game ‘Treasure Hunt’, set up a series of clues for your date to follow in order to find you.  When they do find you, you are waiting with a fun activity to do together or a romantic dinner.

3. In the Park – If you happen to be in the Auckland region over the summer months there are a great selection of free outdoor movies and concerts that you can take your date too.  Take along a picnic and enjoy the outdoor entertainment together.  For more details on when and where these events are taking place click here.

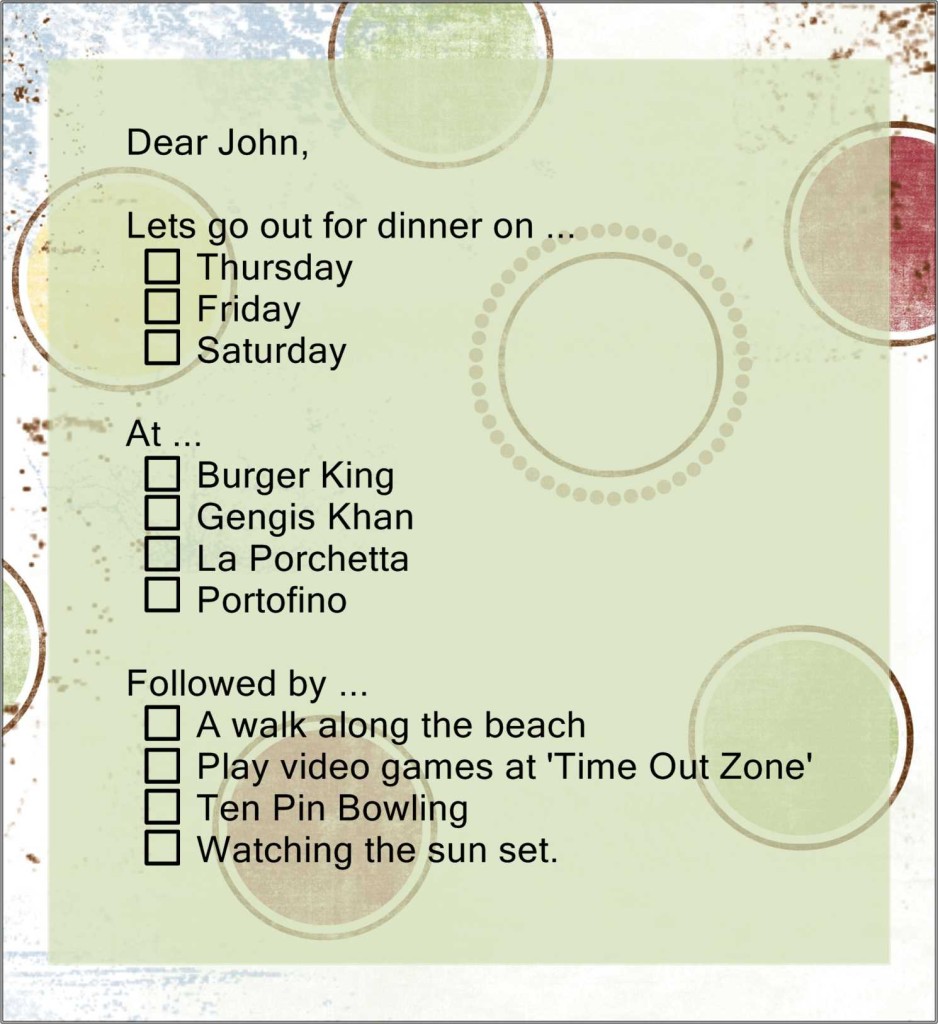
4. ‘Decisions, Decisions’ – If you are tired of being the one who always makes the date plans then here is a great idea for you.  Send your loved one an invitation for a date. However, create multi-choice options for the when, where and what so they have to make the decision for once. Here is an example …

Invitation Example

5. ‘A Rotic Evening’ – While Valentine’s Day is considered to be more for couples, why should the singles miss out on celebrating love.  Rotic is simply ‘romantic’ without the ‘man’.  So arrange a girls night with a group of single friends.  Why not have a candle light dinner and watch a good chick flick.

For more ideas and resources try The Romantic.com, alternatively if you have some creative ideas for dates please share them in the comments section below.  But more than anything we hope you enjoy your Valentine’s Day.

Counting Down to Valentines Day – Part 1

Every Valentine’s Day celebration needs a yummy sweet treat to accompany it and this idea I found on the Sprinkle Bakes website couldn’t be more perfect.

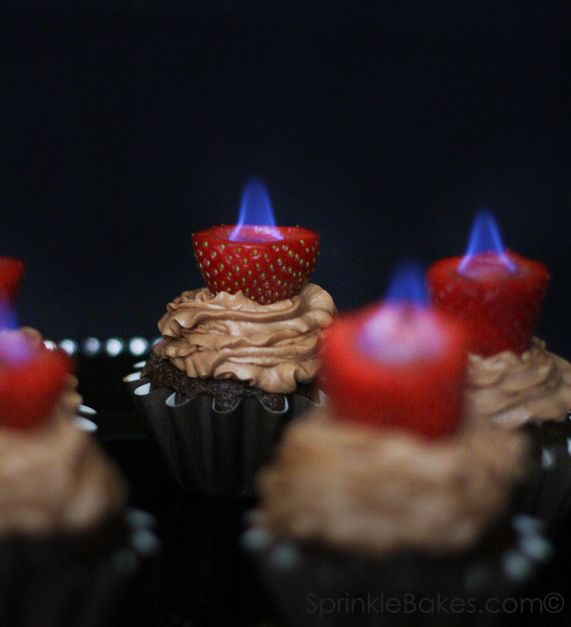
Chocolate Cupcakes with Flaming Strawberries

Chocolate Cupcakes with Flaming Strawberries

What could be more Valentines Day than Chocolate and Strawberries, but then to add the fiery flare of the flambé truly gives this dessert a unique twist.  I must admit that I’m a bit of a pyromaniac, having grown up in a family that really enjoys fireworks, and a lover of all things that sparkle and shine which is why I think this idea appeals to me so much.

Heather at Sprinkle Bakes has all the fabulous instructions on her blog, all the links in this post will take you there.  I do suggest you practise the technique of flambé beforehand as it can be a bit tricky – Heather has some great tips for this on her blog also.  So have fun, be creative, but still do be careful – it is fire you’re playing with after all.

Christmas Foyer Decor

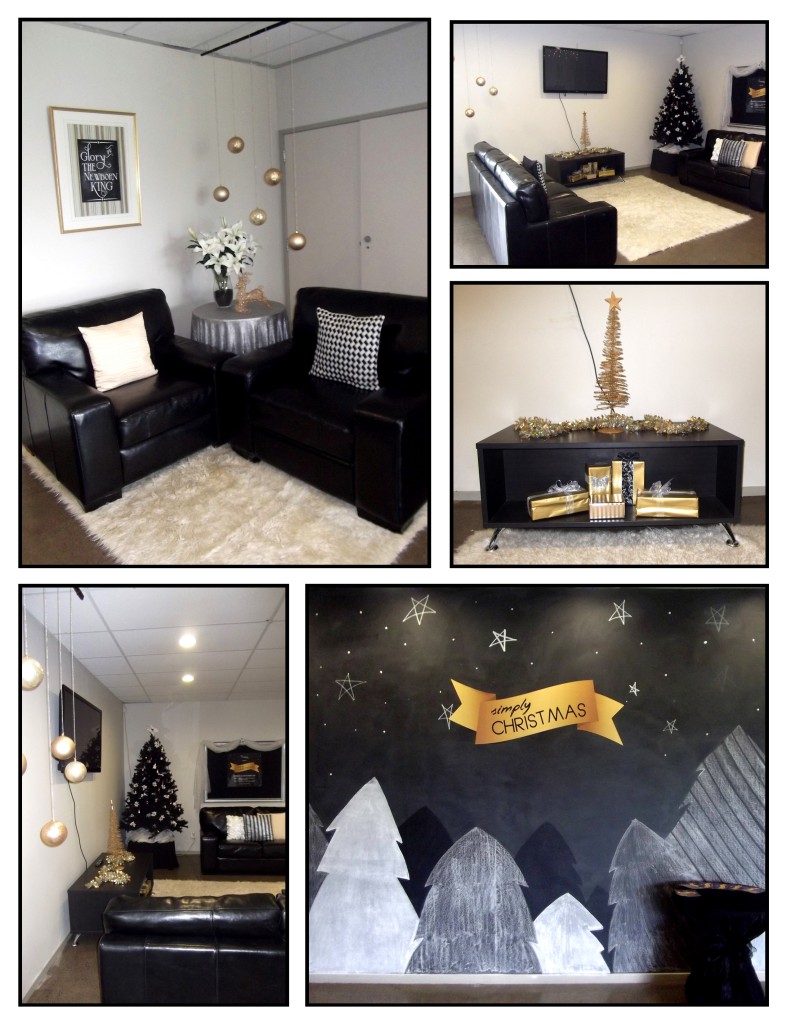
This year I was asked to decorate our church’s foyer for the Christmas season.  The flyer for the Christmas Production served as my inspiration which lead to a colour scheme of gold, black, and white with a touch of silver and yellow.  Although the church had a collection of decorations such as the trees and a few ornaments, some shopping was still needed to create a look that was new.  My favourite shopping finds were from The Clearance Shed where I found the extra large gold baubles and stylish cushion covers.

One of the permanent features in the foyer is a large blackboard wall.  On this wall my assistant and I drew up the same scene at was pictured on the Christmas Production flyer.  The mural was done completely in chalk, apart from the gold banner which was printed onto paper, cut out and stuck on.

Christmas Foyer Decor 1

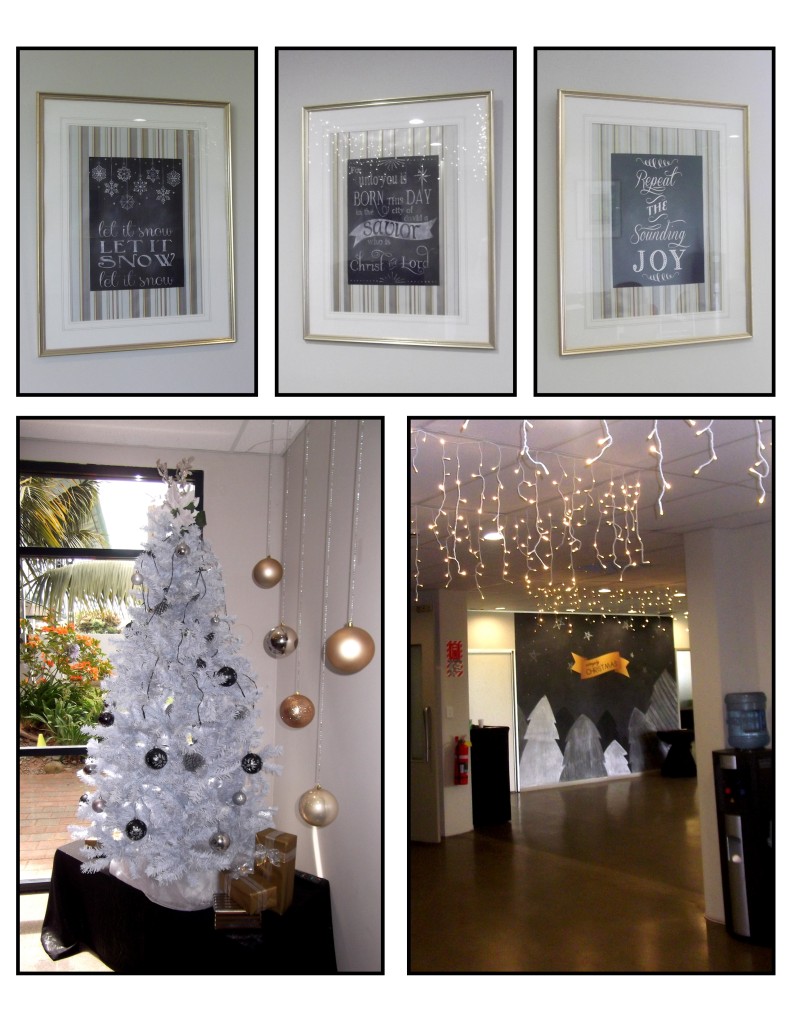
The lowest cost item with the biggest impact had to be the wall hangings.  The frames had been sitting around for a while having been recused from the recycling pile.  I pulled these apart and using some stripy wrapping paper and some beautiful chalkboard printables I found online at Nest of Poises and Love, Pomegranate House I put them together again to create some stunning wall hangings – all for the cost of the wrapping paper.

Christmas Foyer Decor 2

The look was finished off with a few clusters of faux presents and some icicle fairy lights.  Overall a reasonably low cost project that looked fabulous.

Sundae Buffet

12 Days of Christmas Ideas – Day 12

Well here we are – Day 12 of ’12 Days of Christmas Ideas’.  So many ideas to choose from yet somehow I managed to whittle it down to 12 of my favourites.  Today’s idea is not only a favourite of mine, but a favourite with everyone whenever I set one up.  It is the Sundae Buffet.  Plus with today’s idea we are offering a free download of Christmas tags and buffet labels.

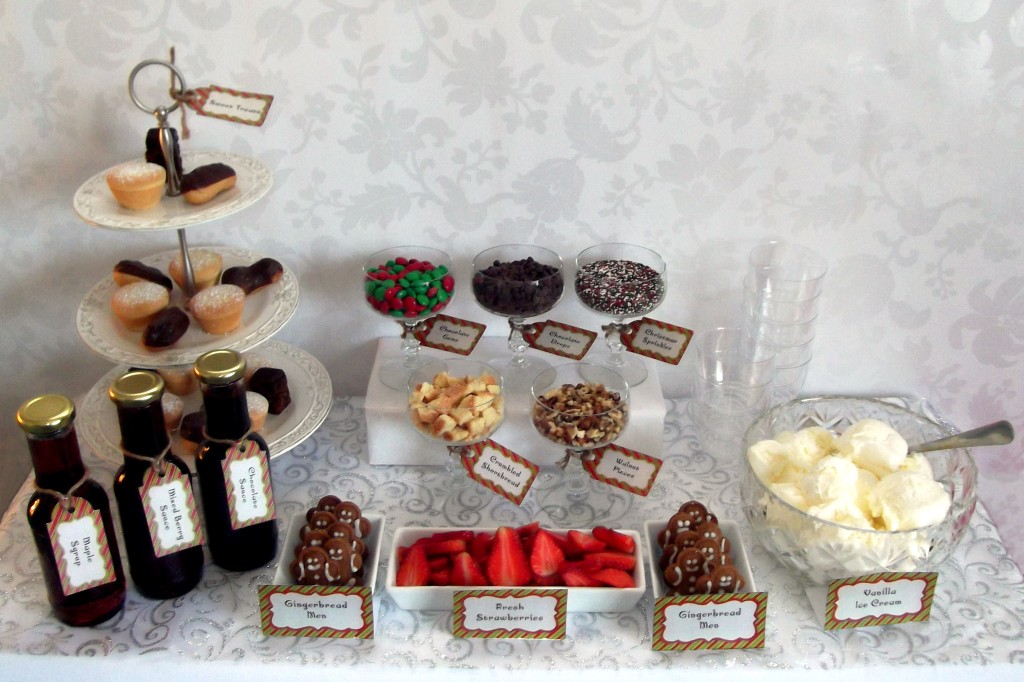
Sundae Buffet for Christmas Day

I have done Sundae Buffets for a few years now and whether its for children or adults they always prove to be popular.  Being that Christmas Day can often be a hot one here in New Zealand I thought it would be great to create one that is very Christmassy and will go well along side Christmas Dinner.  A simple solution to dessert – they are fairly easy to set up and most of the prep-work can be done well in advance.  Not only that they look incredible!

For this Sundae Buffet I have used dishes that I have collected over the years (mostly from my grandmothers when they cleaned out their china cabinets), but you can use anything to hold your toppings.  It doesn’t need to be a great expense. I’ve seen people use paper bags and terracotta pots.  I suggest you look around your home and see what you have available.  If you decide you do need to buy some dishes try the second hand shops, they often will have a variety of suitable dishes.

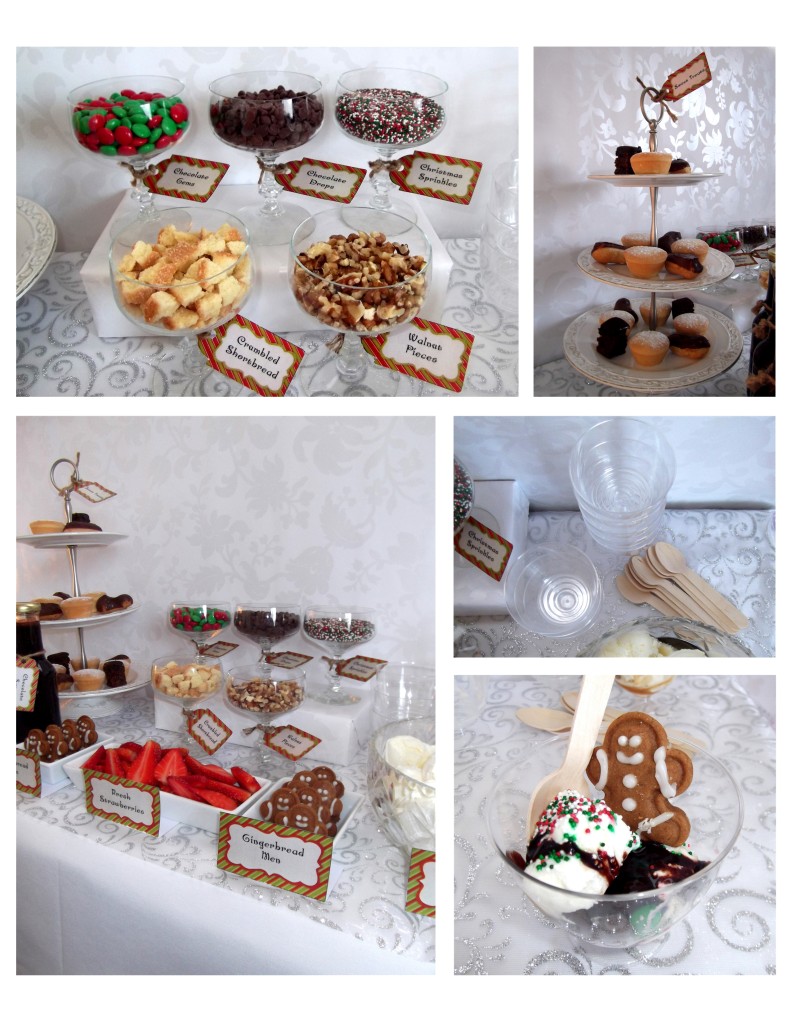
Sundae Buffet Topping Ideas

It’s so easy to get carried away with the number of toppings you add to a Sundae Buffet.  Keep in mind that a little can go a long way. I always like to start with either Vanilla or French Vanilla Ice cream, that way it keeps the toppings as the main feature and flavour.  I then work at having a selection of toppings from the following categories: Sprinkles; Sauces; Fruit (Fresh or Frozen) and Sweet Treats.  Depending on the occasion I might add a few extras – for example being that this Sundae Buffet was a Christmas theme, I added the little Gingerbread Men.

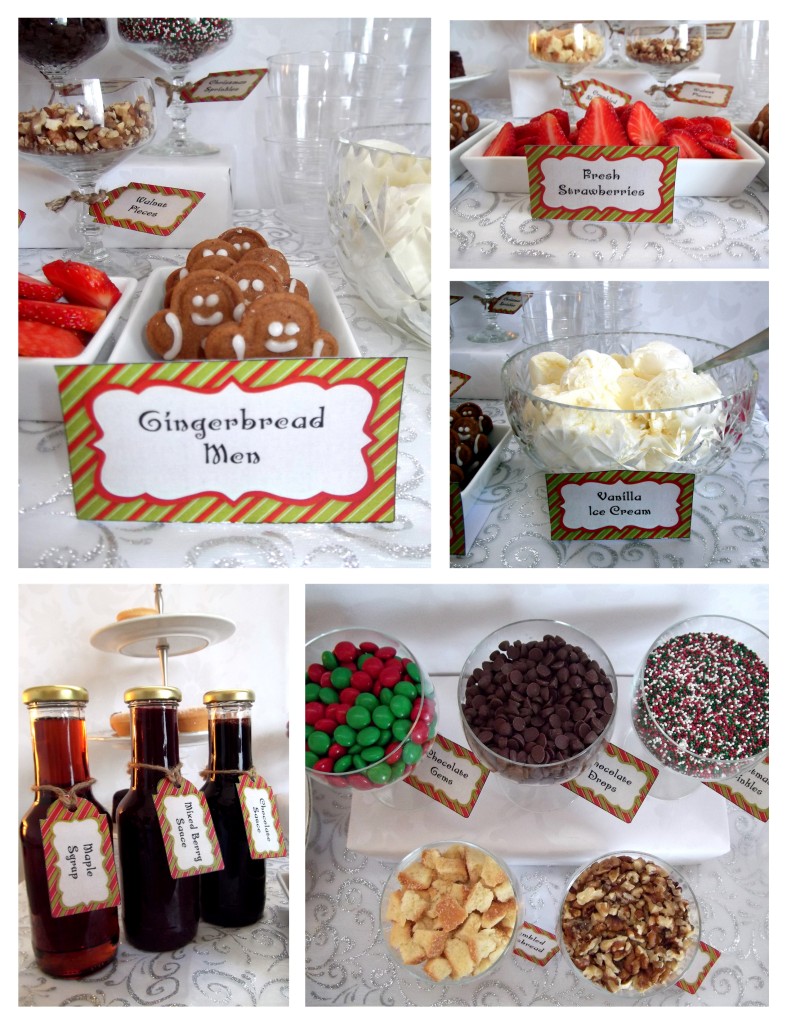
For the sprinkles I started with the chocolate drops, then chopped up some shortbread biscuits and walnuts.  I also decided I just had to have some Christmas coloured candies and 100s and 1000s.  I found an online candy store (based in NZ) called Crazy Candies.  Their candies are sorted by colour which meant I could easily find what I wanted. I ended up buying one pack of their red chocolate gems and one pack of their green chocolate gems.  I was very impressed with their service and how quickly they delivered.  To get the mix of 100s and 1000s that I wanted I ended up buying one packet of each colour and mixing them myself.  I got mine from an awesome little cake decorating shop in New Lynn, Auckland called Miss Bon Bon.  If you do plan to visit, try and go on a Friday as it is cupcake day and they are just divine.  You can place orders with them over the phone if you live further afield. Alternatively Pretty Baker have a good online store that also supply these.

For the sweet treats you can have anything you fancy.  I like to keep them bite size since it’s it really just about having a taste and you don’t want them to take up the entire sundae cup.  For this Christmas theme I went for mini Christmas mince tarts, Christmas cake and mini chocolate éclairs.  For the Sauces I always feel that 3 is a good number – in this case I choose Maple Syrup,  Homemade Mixed Berry Sauce and Homemade Chocolate Sauce.  Lastly I added in the fresh Strawberries.

Sundae Buffet Topping 2

Once you have your toppings all sorted it’s just a matter of setting it up, putting out the sundae dishes ( I suggest using small ones – people can always come back for seconds) and adding the buffet labels.  You can either make your own our download our editable designs.

Download Christmas 2013 Tags & Buffet Labels

So that brings us to the end of our ’12 Days of Christmas Ideas’.  We’d love to hear your feedback about any of the ideas and if you decide to try out any for yourself we’d love to hear how you got on.

Merry Christmas, may your countdown to Christmas 2013 be creative, low-stress and most of all enjoyable.