A Doc McStuffins Birthday Party

Birthday Party by Jo Cole

This weekend we had the honour of being invited to the 4th Birthday Party of my good friend’s daughter, Sophia.  Sophia’s Aunty Jo had taken on the task of party planning and design.  I was so blown away by all her creativity and attention to detail that I pulled out my phone and started snapping pictures.

Sophia's Party - Page 003 Sophia's Party - Page 002 Sophia's Party - Page 001

I love the way Jo put so much thought into theming this Doc McStuffin party.  From the games and activities that reflected the Doc McStuffin cartoon, right through to the way the food was presented.  Jo you truly are an inspiration!


The Fantastic Fudge Cake

Food is such a big part of any celebration, and one particular food item that usually makes it onto the menu is cake!  So this week I thought I would share one of my favourite cake recipes with you.  As children my sisters and I loved to help mum with the baking.  One year we were given a kids recipe book which had this lovely fudge cake recipe in it.  It was probably the first cake I ever baked on my own and because it was so easy to make it quickly became a family favourite.

There are so many reasons why I love this recipe.  Because this cake has no eggs, butter or milk it makes it a very economical cake to make, as well as making it a great recipe for those who are on a dairy free diet.   I also love the versatility of this recipe.  It can easily be baked as a Bundt cake, cupcakes or even a fancy birthday cake.  Not to mention it makes a delicious dessert on a cold winter’s night simply by pouring a hot chocolate sauce or custard over it while it is still warm.  But of course the most important reason is that it tastes great!

Digger Birthday Cake

I used the fudge cake recipe to make this digger birthday cake.


Fudge Cake

Ingredients:

  • 1 ½ cups of Flour
  • 2 Tbspn of Cocoa
  • 1 cup of Sugar
  • 1 cup of Water
  • 6 Tbspn of Oil
  • 1 Tbspn of White Vinegar
  • 1 tsp of Baking Soda
  • 1 tsp of Vanilla
  • ½ tsp of Salt


Method:

Mix flour, sugar, cocoa and water together in a bowl.  Add Vanilla, Vinegar, Oil, Baking Soda and salt.  Mix together well.  Pour into a floured or lined tin and bake in the oven for 35-40 mins at 180C° or in the microwave for 6-7mins (cover while cooking) on High.

Variation:  Make as cupcakes. ¾ fill Patty Pans and bake for 20-30mins.  Makes 12

Words of Wisdom for the Happy Couple

A guest book alternative for the faith based wedding.

Guest Book Alternative

I was recently out with a client looking at venues when I came across this idea.  The Bride and Groom-to-be simply set up a Bible for the guests to underline their favourite verse and then sign their name next to it for the couple to read at a later date.  The reason I like this idea so much is that this Bible could then go on to have further verses underlined or notes added to it by the couple, throughout their married life.  It could even becoming a family heirloom, or if you prefer a ‘Legacy Bible’,  that can then be handed down through the generations to come.

While this idea may not be everyone’s ‘cup of tea’ I think it offers a thoughtful alternative to the traditional wedding guest book.  I know I often struggle to think of something meaningful to write in the wedding guest book, so often I just resort to the good old “Congratulations and best wishes for the years ahead” comment – not particularly awe-inspiring.  Maybe that is why some couples decide not to have one at all.

So if you have a wedding coming up soon, even a milestone birthday or anniversary, and you are looking for a novel way to record the well-wishes from your guests this may just work for you.


Fabulous Fudge Favours

 New Zealand Made Wedding Favours from The NZ Fudge Farm


I believe that Oprah Winfrey was right when she said ‘Love is in the details’ and as an event designer I believe that favours are one of those details. As a result I often find myself helping my clients to source favours for their events and if they have a large number of guests coming from overseas then they are often keen to have something that is New Zealand made.

Recently I was pleased to discover that the New Zealand Fudge Farm, based in Whangarei, sells a two piece pack that works perfectly as a wedding or party favour.

Fudge Farm Favours

The New Zealand Fudge Farm’s fudge has to be my all time favourite fudge.  The perfect fudgy texture just melts in your mouth.  Their standard two piece pack has one piece of their Chocolate Fudge and one piece of their Russian Fudge, giving your guests some added variety.  They are very reasonably priced and the staff there are always very helpful and friendly.

So if you are looking for a sweet treat to add as your wedding or party favour, consider giving the New Zealand Fudge Farm a call to place your order.


Pure Elegance with Gold & Pearls {Sashi & Alvin}

An April Wedding in Auckland, New Zealand.

This wedding was truly an elegant occasion.  Although the rain clouds lingered on that Thursday afternoon, they could not dampen the happiness of this beautiful couple.  Everything came together nicely and the smiles on their faces said it all.  Congratulations, Sashi and Alvin we wish you all the love in the world as you build a life together.

A big thank you to Jo from Joanna Wickham Photography for sharing with us these beautiful photos from their special day.

The finishing touches

Bridal BouquetHair piece, buttonhole and church

Ring bearer and Aisle decorSt Mary's Garden and Flower girl Bridesmaid and posieBridal Party at Cornwall ParkBride on the Kauri Steps at Cornwall ParkBride and Groom on the Kauri Steps and among the nearby treesTwin Oaks DriveBride and Groom on Twin Oaks DriveReception DecorThe Wedding CakeReception Decor at The Heritage Hotel Grand Tea RoomAt the end of the day

Vendor Credits:

Wedding Planning, Coordination & Design: As You Wish Events Ltd
Photography: Joanna Wickham Photography
Ceremony Venue: St Marys, Parnell, Auckland
Reception Venue & Catering: The Grand Tea Room, at The Heritage Hotel Auckland
Wedding Cake: Sweet Bite Cakes
Florists: Bethany Gardens and Orlando Flowers (Reception Table Centrepieces)


1950s/Greased Lightning Theme Party

For the last 4 years I have had the privilege of arranging the theming for an annual scrapbooking camp held at Totara Springs just out of Matamata.  This year the theme was ‘Greased Lightning’.  For most of the weekend the theming stretched only as far a name tags, room labels and work table decorations, but on the Saturday night for dinner we went all out.   While the campers donned their full circle skirts, cats eye glasses, tight black leather pants and pink wigs I set to giving the dinning room an overhaul.

1950s / Greased Lightning Image 1

1950s/Grease Lightning Image 2
Party Décor Favourites:
  • I loved working with the Pink, Turquoise and Purple colour scheme.  They added the necessary pop of colour among all the black and white checks.
  • The ice cream soda centrepieces were another favourite.  I wanted to incorporate the neon lights we tend associate with 1950s so I filled the tall cone vases with acrylic ice and ran a strand of battery operated lights through them.
  • Lastly, the final touches of the theme coloured chocolate gems (similar to Smarties and M&Ms) as a self serve favour bag and the ‘Grease’ movie trivia card really finished it all off perfectly.

If you have any questions or comments regarding how we put this theme together or if you would like us to create a party for you then please contact us either via email or through the comments section below.


A Little Time Out

A Pamper Party

In amongst the hectic lives we live it is important to take a little time out every now and then to relax and pamper ourselves.  After a fairly stressful start to the year I decided that for my birthday that was exactly what I was going to do.

I wanted to be able share the experience with a few of my good friends.  I also wanted the experience to be similar to that of going to an actual day spa, but without having to leave the comfort of my own home.  I didn’t think this would work if we had to do the treatments ourselves, which meant finding a company that would do these for us.    So I went looking, and found Beauty Patrol.  Their staff are fully trained and the ladies that came to us had a lot of experience and did great work.  Beauty Patrol offer a great selection of pamper party treatment menus and at a very reasonable price, I might add.  All that was left to organise was a relaxing environment and some tasty food.

Pamper Party Image 1

Pamper Party Food & Favours

The Menu:

For the food I decided that a couple of fresh and healthy options would be ideal.  So we served a roast vegetable salad with Haloumi Cheese and Honey Mustard Dressing, as well as some fresh summer fruits.  And of course no pampering is complete without a little indulgence so I included some triple chocolate cupcakes.

The Favours:

I love party favours, they are a simple way of saying how much you love and appreciate your guests.  I also think for an occasion such as this it adds just that little extra to the atmosphere of luxury.  So in keeping with the natural and neutral theme, I purchased some flax ketes from the $ value store and some beauty sets off Trade Me to go in them.  I also added a chocolate bar that I wrapped with my thank you note, that matched the rest of my stationery.

Pamper Party 2

The Environment

 The Environment:

Usually when I write about parties I talk about the decorations, because they play a large role in setting the atmosphere.  However in this case setting the atmosphere was more about clearing things away, rather than setting things up.  I moved out all the unnecessary items that usually clutter our living room.  This instantly made the room more relaxing.  Then apart from a few flowers and a scented candle, everything else I put out was there to be used by my guests.  I made sure we had plenty of towels, water bottles, magazines, a couple of foot spas, and a few additional pamper products like lotions and face masks.

Summing Up:

Overall, it was everything I had hoped and planned for.   One pampered afternoon with friends.

If you have any questions or comments please feel free to share them with us in the space below.  If you’d like us to organise a pamper party for you then please contact us via email for more information.

Vendor Credits:
  • Party Printables: As You Wish Events Ltd
  • Décor & Styling: As You Wish Events Ltd
  • Catering: As You Wish Events Ltd
  • Beauty Therapists: Beauty Patrol


The Last of the Toolbox Favourites

At the end of last year I began a series of articles about my favourite and most often used toolbox items.  I figured it’s about time I wrap this series up, so today I am going to share with you the last few items I just wouldn’t want to be without when decorating.

Toolbox 3

1. Pins, Pins and More Pins

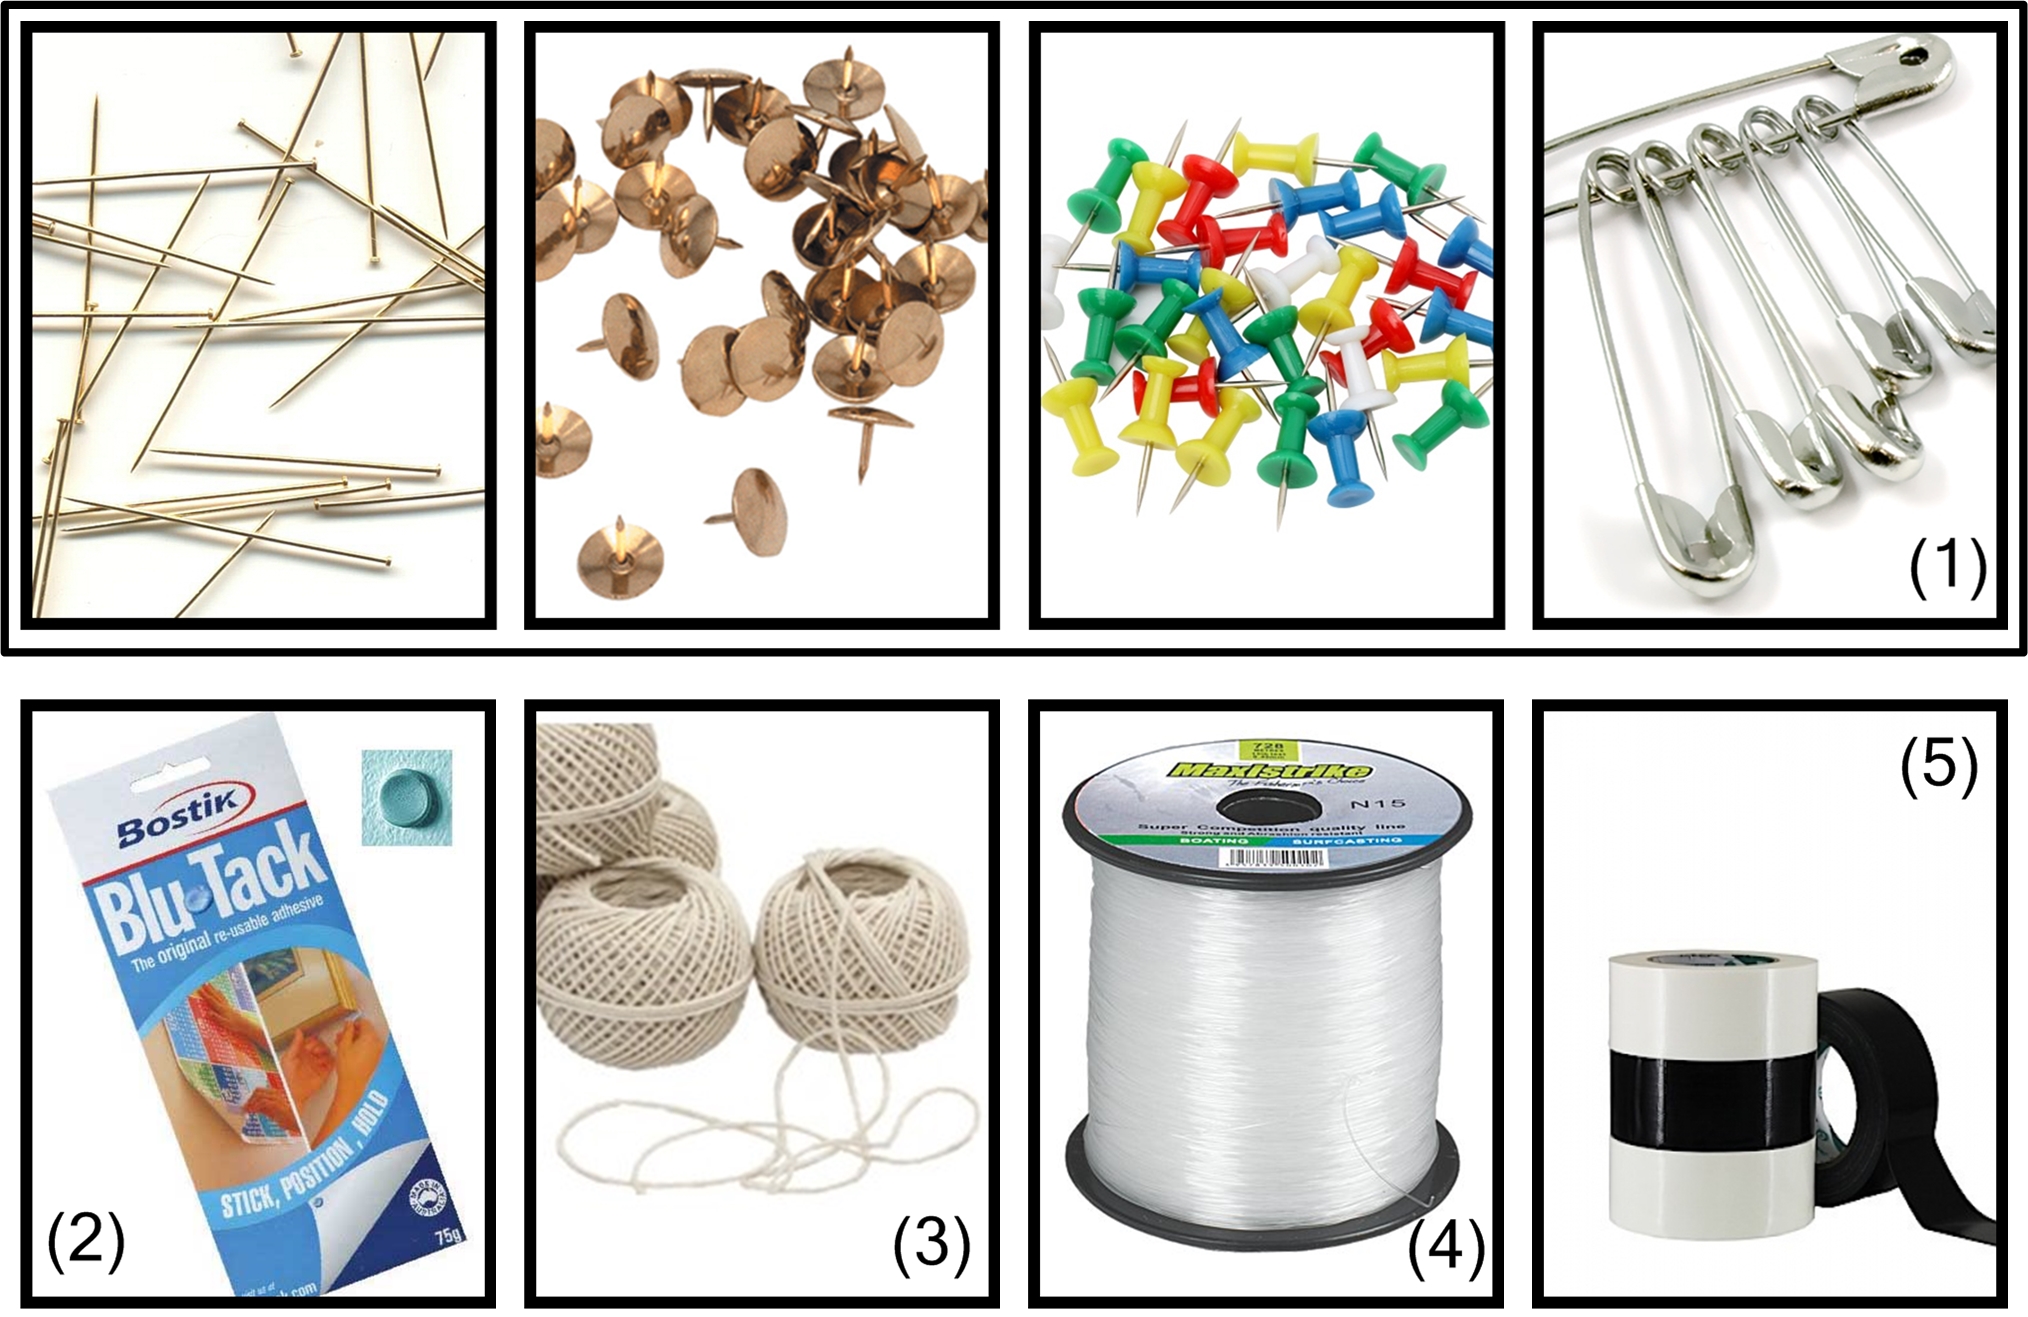
As seen in the picture above, there are a few different kinds of pins that can be useful when decorating.  There are the dressmaker pins, thumb tacks, drawing pins (also know as push pins) and safety pins.  In each situation gage which type of pin is best for the task at hand.  If you plan to pin things to the walls or ceiling, be sure to check with your venue’s management that it is okay to do so.  Try not to use more pins than you have to and where possible position the decorations to hide them as it gives a neater finish.  Lastly (and while this may seem obvious), if you are using the dressmakers pins just be careful that the sharp end isn’t sticking out somewhere that will stick into one of your guests.

2. Blu Tack

An all time favourite for most people, Blu Tack is ideal for hanging up posters or pictures that are part of your décor.  Don’t be fooled by the cheaper knock offs that are out there as they may not do a good job of holding your pictures up properly and they may mark the surface you are working with.

3. String

Another useful item for hanging items or tying items together.  I prefer the natural coloured, cotton varieties as they look clean and tidy, however if are going for a more rustic look in your décor then the chunkier twines can look fantastic.  If the string is going to be seen make sure your knots or bows look neat and that you trim the ends appropriately.

4. Fishing Nylon

Much like string, fishing nylon is also good for hanging items or tying items together. The difference with fishing nylon is that it is pretty much see through, so it is like using invisible string.

5.  Cloth Tape

Also known as gaffer or duct tape, cloth tape can come in handy for just about anything.  If you are wanting to secure poles, framing, or curtain rails in place then cloth tape is good for this, as long as it is hidden out of sight once you’re finished.  Cloth tape is also ideal for taping down any extension leads or carpet runners you might be running across your venue – by securing these you are reducing the risk of your guests tripping on them.

So there you have it, 11 of my favourite toolbox items.  But as I said last time unless you are decorating events on a regular basis, save yourself some money by taking a good look at your venue and determining beforehand what items you will need on the day of your event.  As always having the right tools for the task at hand will make your event less stressful and therefore more enjoyable.

Happy Decorating!


Some Super Ideas for Celebrating Easter

Easter is sneaking up fast on us again.  This is another of my most favourite holidays, so I’ve been out looking for some exciting ideas for our family’s celebrations.

Flower Arrangments in Eggshells

Such a simple yet sweet idea to bring a touch of Easter into your home.

As Seen On: Martha Stewart.com


Easter Table Setting

I love this table setting by Boxwood Clippings. It has a rustic elegance about it with the little nest, paper doily and coffee filters. Brilliant!

As Seen On: Boxwood Clippings


Daffodil Candy Cups

Not only is this a great craft idea to do with the family, its also a great option for those who have allergies that stop them from eating chocolate.

As Seen On:  Martha Stewart.com

The Easter Story

What a beautiful way to keep the true story of Easter central to the holiday. Aimee from ‘It’s Overflowing’, offers the template for this as a free printable on her website. I absolutely love it!

As Seen On: It’s Overflowing


Egg Votive

Another fantastic idea from Martha Stewart.com

As Seen On: Martha Stewart.com

Hot Cross Buns

I just can’t imagine having Easter without Hot Cross Buns. Why not try making your own, maybe hunt out the old family recipe or give this one a try.

As Seen On: Spoonful

Chocolate Easter Egg Nests

A fun gift idea or maybe an activity for the family.
Mmmm, I would like to try stirring one into a nice mug of hot chocolate.

As Seen On: Life and Kitchen

If you have any Easter craft ideas, favourite Easter recipes or Easter decorations that you’d like to share, we’d love to hear from you.  Just share your ideas in the comments below or send us an email.  Happy Easter everyone!

Table Setting – What you need to know.

It has surprised me the number of times I’ve come across people working in the food service industry that don’t know how to properly set a table.  However I guess that it shouldn’t be that surprising with more of us eating in front of the TV or in cafés and restaurants that roll their cutlery in a paper serviette – not that there is anything wrong with that.  But when you’re faced with a more formal or special occasion, you may like to brush up on your table setting skills as it is a simple and low cost way to add style to your event.

To look at a fully set table it can be rather daunting.  You are most definitely not alone if you find yourself thinking “Really, how many glasses and forks do I need?”  The important things to remember are that a well set table shouldn’t have any unnecessary items, and that all you have to do is work your way from the outside in.


casual-table-place-setting

If it is your job to set the table a few things you need to remember are that the forks all go on the left of the dinner plate and the knives and spoons go on the right, with the glasses above them.  The bottom edge of the cutlery and the lower rim of the plate should all line up so that they are approximately 3 cm in from the edge of the table. This way guests should be able to sit down without knocking them.

formal-place-setting

For the more formal of occasions, usually when the menu is pre-plated, a bread plate and knife is added above the forks, and the dessert spoon and cake fork are placed above the dinner plate so that they can be moved into place either side of the plate space once the other courses are completed.  Napkins can be either placed to the left or on the plate.  The only other item to mention is the service plate, sometimes called a Charger.  No food is served directly on this plate, instead it serves as an under plate for the plate holding the first course.  The service plate will then be cleared either with those from the first course or will be exchanged for the plate holding the second course.

Lastly, while there are the traditionally accepted ways of setting a table it is also quite common to tweak these to suit the specific needs of your occasion.

If you want to learn more about table settings then I recommend the following articles: